Authors
Anna Geller
Anna Geller
In the previous article, we’ve discussed why data ingestion is a challenging problem and how various tools have approached it. In this post, we’ll introduce CloudQuery, an open-source, high-performance ELT framework for developers. We’ll briefly cover the product’s history and its main strengths. We’ll also look at a practical example of how to use CloudQuery to ingest data from Hacker News API to DuckDB, and how to put your CloudQuery syncs to production using Kestra.
CloudQuery is an ELT tool for developers. You can use many existing plugins to move data from your desired source systems to various destinations, and you can also build custom plugins in Go, Java, JavaScript, or Python.
To use CloudQuery:
spec.yml filecloudquery sync spec.yml — instead of pointing to a single file, you can also point to a directory with multiple YAML files.As you can see, a YAML spec and the CLI are all that’s needed to automate many ELT use cases. However, CloudQuery hasn’t started as an ELT tool. Let’s briefly look at the product’s history.
When CloudQuery announced its seed round in November 2021, it was focused on building an open-source cloud asset inventory powered by SQL, enabling developers to assess, audit, and monitor the configuration of cloud resources.
They were building a tool to help developers:
They quickly realized that all of these use cases require an ELT engine to collect data from various sources, load it to a database, and then query it to ask questions. To ensure all relevant data is centralized and kept up-to-date, they needed to build a wide range of connectors to various cloud providers and data sources.
CloudQuery also decided to make the framework open-source to allow everyone to contribute plugins. Looking at other verticals such as Infrastructure as Code, they acknowledged that open-sourcing the framework provides mutual benefits for both the company and the community. With an infinite number of APIs, no single vendor can cover all connectors that customers might need. By virtue of open source, users can add their own integrations without being blocked by a vendor, and CloudQuery benefits from a wider range of connectors and continuous feedback from the community.
That’s how CloudQuery has evolved from a Cloud Asset Inventory to a more generic ELT framework that can be used for any data integration use case, including data warehousing, analytics, FinOps, CSPM, infrastructure, and security monitoring.
CloudQuery offers many useful source and destination plugins out of the box, and you can also create your own using an SDK. Plugins can be written in any language that has libraries for Apache Arrow and gRPC, including Go, Java, JavaScript, C++, Python, and more.
Source plugins collect data from the source system’s APIs, and destination plugins push that data to specific target destinations. You can think of plugins as microservices that conform to a gRPC API spec. The role of a source plugin is to collect information and adapt it to the desired destination schema using CloudQuery’s Apache Arrow-based type system. Destination plugins are then responsible for taking the serialized data received from a source plugin and converting them into a suitable storage format (i.e., the logic to write to a database, a file, or a third-party API).
CloudQuery also operates CloudQuery Hub, a managed service that hosts the source and destination plugins. You can sign up, generate an API key, and log in from the CLI using:
cloudquery loginAlternatively, you can set the API key as an environment variable CLOUDQUERY_API_KEY:
export CLOUDQUERY_API_KEY=<your-api-key>As an authenticated user, you get the following benefits:
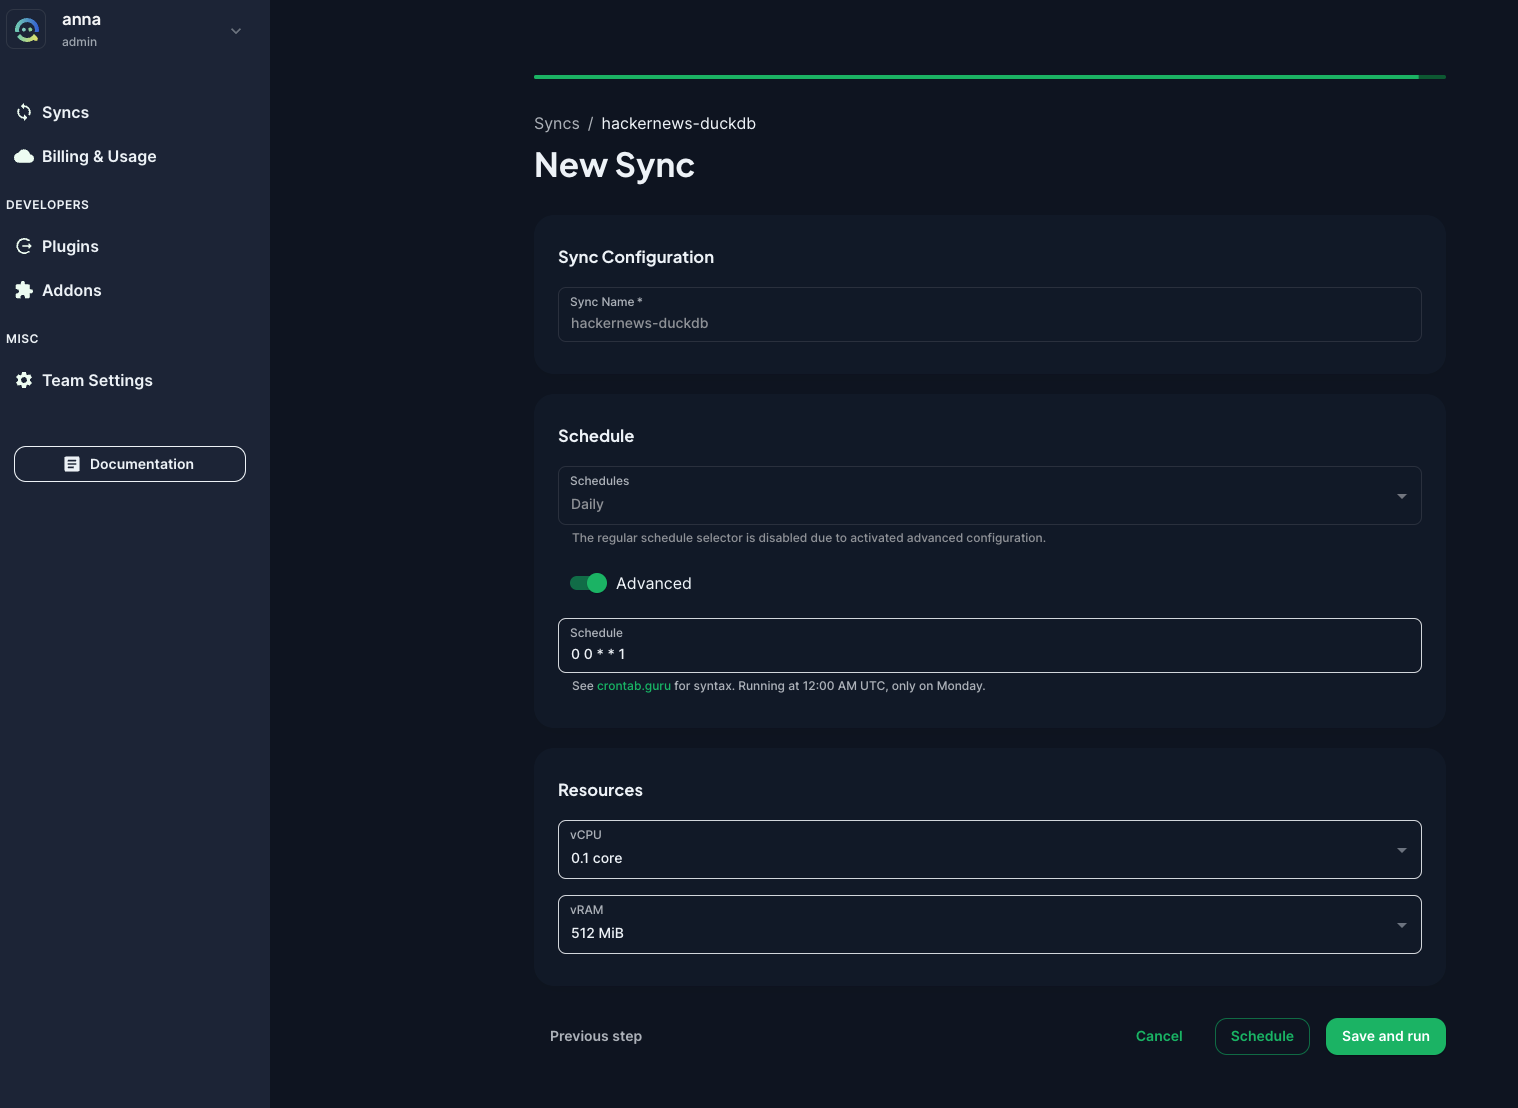
CloudQuery ingestion framework is open-source and free to use, but premium plugins require a paid subscription. The company behind CloudQuery offers a managed service called CloudQuery Cloud, allowing you to configure and schedule your CloudQuery syncs from a web interface. You can configure the desired amount of vCPU and vRAM for your syncs so that you don’t have to worry about the infrastructure.
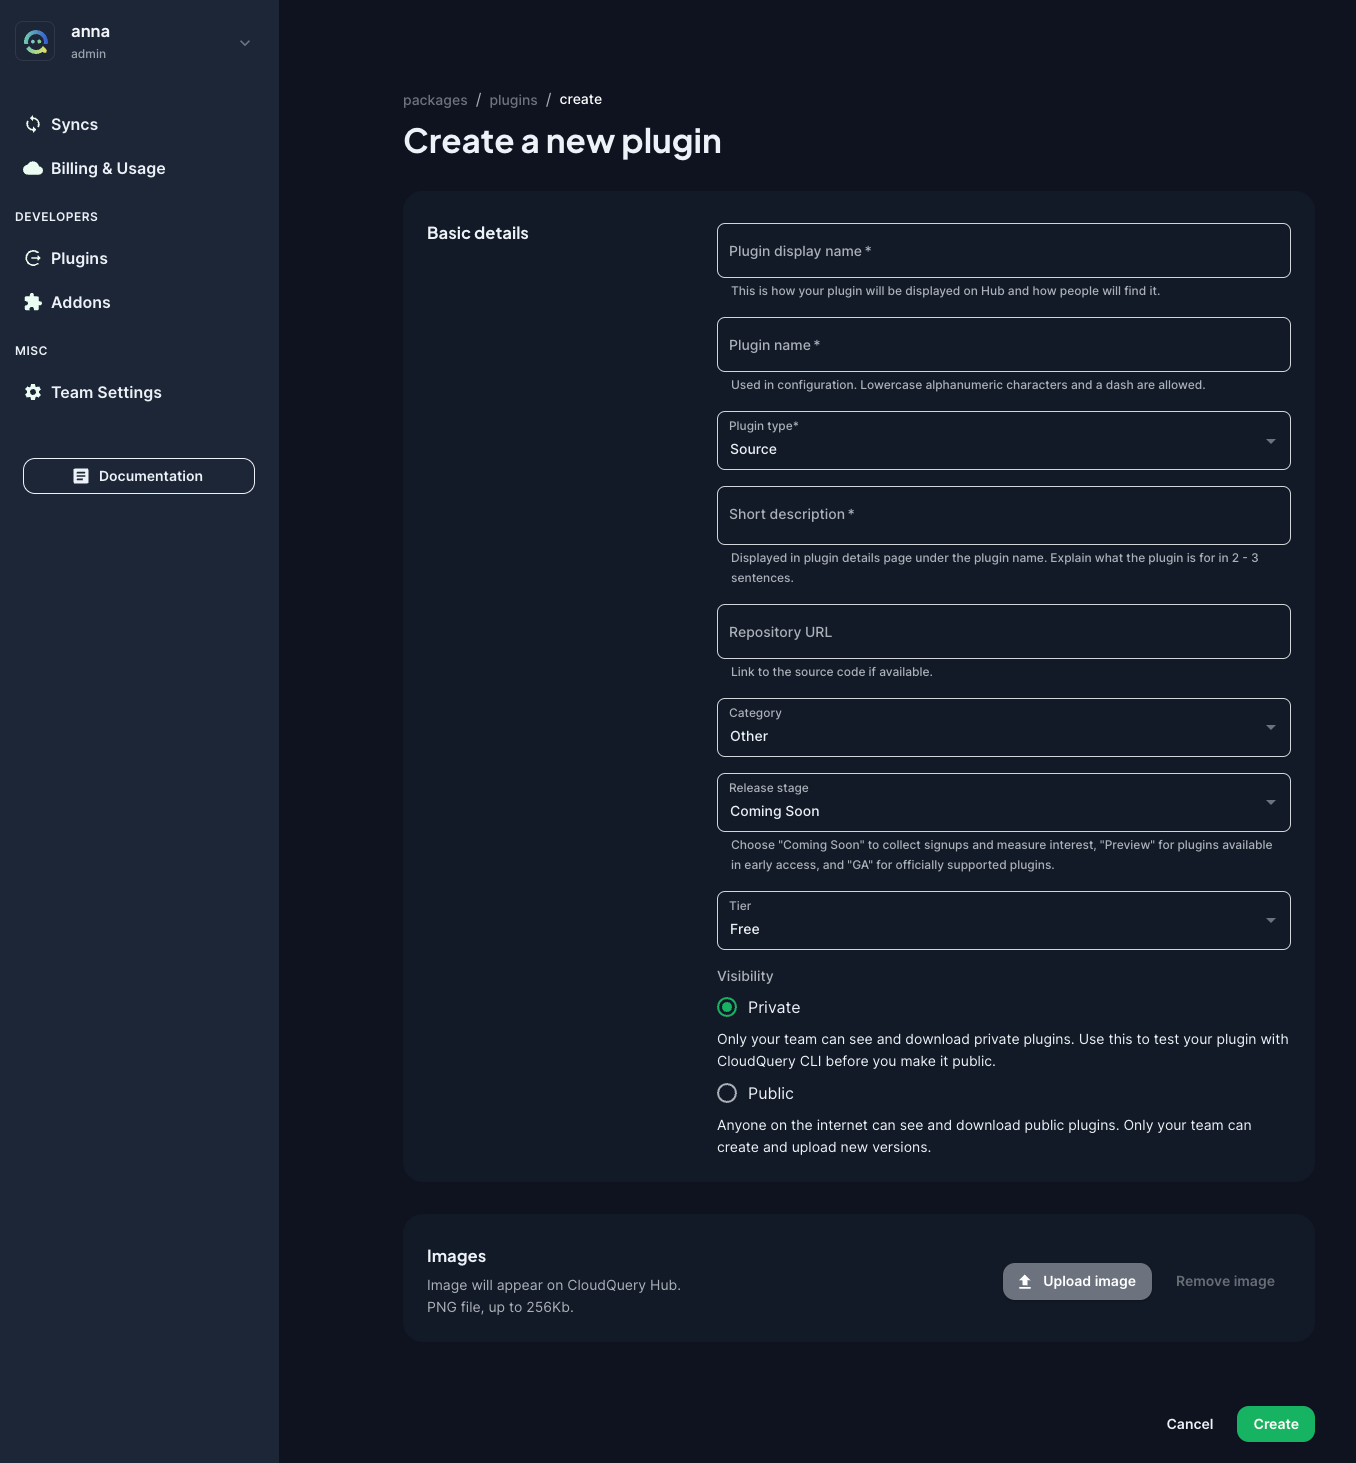
The UI allows you to configure a new plugin by pointing to a Git repository containing your plugin code.
Let’s look at a practical example of how CloudQuery works. First, install the CLI e.g. using Homebrew. You should be able to install CloudQuery in a single command. Then, you can optionally login to CloudQuery Cloud with cloudquery login. Finally, you can create a YAML file with your source and destination configuration.
The easiest way to start configuring sources and destinations is by going to the Explore page. From here, you can select your desired source and destination, and you’ll see the YAML configuration that you can copy and paste into your own file.
The following example will use the Hacker News API as a source and DuckDB as a destination. Create a file called hn_to_duckdb.yml:
kind: sourcespec: name: hackernews path: cloudquery/hackernews registry: cloudquery version: v3.0.24 tables: ["*"] backend_options: table_name: "cq_state" connection: "@@plugins.duckdb.connection" destinations: - "duckdb" spec: item_concurrency: 100 start_time: 2024-03-07T11:00:00Z---kind: destinationspec: name: duckdb path: cloudquery/duckdb version: v5.4.2 write_mode: "overwrite-delete-stale" spec: connection_string: hn.dbThen, run the following command to start the ingestion process:
cloudquery sync hn_to_duckdb.yml --log-consoleOnce the sync completes, you can start querying the synced data in DuckDB. Let’s open the database and check the tables:
duckdb hn.dbshow tables;To find out more about the schema of the hackernews_items table, you can run:
PRAGMA table_info('hackernews_items');Let’s say you want to find the most recent Hacker News articles about AI. You can run:
SELECT titleFROM hackernews_itemsWHERE title LIKE '%AI%'ORDER BY time DESC;The above example demonstrates CloudQuery’s main purpose: collecting data from various sources and loading it into a database, enabling users to perform queries.
What makes CloudQuery unique is its declarative approach to data integration. You define your sources and destinations in a YAML file, and then you can run the ingestion process using a single CLI command cloudquery sync spec.yml. This is similar to how you define Kubernetes resources in YAML files and then run kubectl apply -f spec.yml to deploy them.
Speaking of deployments: CloudQuery is stateless, so you can deploy your syncs anywhere. This is in contrast to traditional ELT tools, where you have to use their cloud service or operate multiple backend components to run the syncs. With CloudQuery, you can run the syncs on your local machine, on a server in your data center, or in the cloud. You can also run the syncs on a schedule using a cron job or a workflow orchestrator such as Kestra. In the last section, we’ll demonstrate how you can put your CloudQuery syncs to production using Kestra’s CloudQuery plugin.
CloudQuery is also fast thanks to:
API ---> [Source Plugin] -----> [Destination Plugin] -----> [Destination Plugin] gRPCAnother great aspect is the versioning of all source and destination plugins. This makes the framework more reliable than traditional ELT tools. You can always pin the plugin version to mitigate any surprises in production. If you want to upgrade to a newer version, you can do so in a controlled way, and you can always roll back to the previous version if something breaks. Go to Releases, type the source or destination plugin you are looking for (e.g. AWS pricing as source, and DuckDB as destination), and you’ll see all available versions.
CloudQuery doesn’t support as many source and destination connectors as data integration tools such as Fivetran or Airbyte. However, due to the open-source nature of the framework, you can contribute your own plugins.
Both CloudQuery and Kestra follow a declarative approach, and you can combine them to build an end-to-end data ingestion workflow that runs on schedule or is based on external events. Here is an example of a Kestra flow that runs a CloudQuery sync every day at midnight. The sync will collect data from Hacker News API and load it to MotherDuck, a serverless DuckDB service in the cloud.
id: hackernews_to_motherducknamespace: company.team
tasks:  - id: daily_sync    type: io.kestra.plugin.cloudquery.Sync    description: 90k rows for 1 week worth of data, thus incremental sync    incremental: true    env:      MOTHERDUCK_TOKEN: "{{ secret('MOTHERDUCK_TOKEN') }}"      CLOUDQUERY_API_KEY: "{{ secret('CLOUDQUERY_API_KEY') }}"    configs:      - kind: source        spec:          name: hackernews          path: cloudquery/hackernews          version: v3.0.24          tables: ["*"]          destinations:            - duckdb          backend_options:            table_name: "cq_state"            connection: "@@plugins.duckdb.connection"          spec:            item_concurrency: 100            start_time: "{{ schedule.date ?? execution.startDate | date('yyyy-MM-dd') }}"      - kind: destination        spec:          name: duckdb          path: cloudquery/duckdb          version: v5.4.2          write_mode: overwrite-delete-stale          spec:            connection_string: md:cq
triggers: - id: every_midnight type: io.kestra.plugin.core.trigger.Schedule cron: "0 0 * * *" # = @dailyOrchestrating CloudQuery syncs in Kestra is simple — you configure your source(s) and destination(s) in a list, and the sync will ensure that each source is ingested into the desired destinations.
In this example, we’re also using Kestra’s secret management to store the MotherDuck token. This way, you don’t need to hardcode any credentials in the sync’s YAML configuration. You can also use Kestra’s variable templating to pass the current date to the sync job. This way, you can run the sync daily, and it will collect data incrementally. And if you miss some scheduled intervals due to downtime, Kestra’s backfills make it easy to catch up on missed syncs.
In this article, we’ve discussed CloudQuery, an open-source high-performance ELT framework for developers. We’ve explored the product’s evolution, strengths, and limitations and walked through a practical example of how to use CloudQuery to ingest data from Hacker News API to DuckDB. We’ve then demonstrated how to put your CloudQuery syncs into production using Kestra.
If you have any questions, reach out via Slack or open a GitHub issue.
If you like the project, give us a GitHub star and join the community.

Stay up to date with the latest features and changes to Kestra