
Authors
Shruti Mantri
Shruti Mantri
Amazon recently introduced S3 Tables, purpose-built for storing and querying tabular data directly on S3. Backed by built-in Apache Iceberg support, S3 Tables make data instantly accessible to popular AWS and third-party analytics engines like EMR and Athena.
In this post, we’ll show you how to orchestrate a complete workflow using Kestra—from downloading raw CSV files to converting them, uploading to S3, and creating Iceberg-backed S3 Tables. You’ll also learn how to query the data using Athena.
Structured data is often stored in files across object storage systems like S3—but making it queryable usually requires manual setup, format conversion, and provisioning of compute engines.
With Kestra, you can automate this entire process. Our declarative workflows handle data conversion, orchestration logic, infrastructure interactions, and job submission to EMR—all in a repeatable and trackable way.
This walkthrough will help you:
Ingest and convert data into Parquet format
Upload the data into S3
Create an Iceberg table backed by S3 Table Buckets
Automate querying through Athena
We will need the following as a prerequisite before we could proceed with the workflow creation:
Ensure you select the AWS region in which S3 Tables are supported.
In order to get the end-to-end Kestra workflow that interacts with S3 table, we will need a lot of prework to be done. We will go through each of the step in detail. This will involve making some changes on the AWS console. In the process, we will also develop the Kestra workflow incrementally.
Firstly, we will need a general purpose S3 bucket where we will store the data. For this, navigate to the S3 service on the AWS console. From the left navigation menu, select General purpose buckets. On the General purpose buckets page, select the Create bucket button. On the Create bucket page, provide a globally unique bucket name in the Bucket name text box. For the purpose of this blog, for example we name the bucket as s3-general-purpose-ecommerce. Rest of the configurations can be left as default, and select the Create bucket button at the bottom of the page. This will create the new bucket.

From the General purpose buckets page, search for the newly created bucket, and select the bucket name. On the corresponding bucket’s home page, select the Create folder button. Provide the folder name, for example data, and select the Create folder button at the bottom of the page. We will be storing our data in this folder.
Navigate to the Kestra UI, and create a new flow. We will download the CSV file containing products data using the HTTP Download task. We will then convert the CSV data into ION format using the CsvToIon task, and then from ION format into a parquet file using IonToParquet task. Finally, we will upload the parquet file into the recently created S3 general purpose bucket inside the data folder using S3 Upload task.
This is how the Kestra flow will look like:
id: s3_tables_demonamespace: company.teamdescription: With this flow, you will upload the products data in parquet format into S3 general purpose bucket
tasks:  - id: http_download    type: io.kestra.plugin.core.http.Download    uri: https://huggingface.co/datasets/kestra/datasets/raw/main/csv/products.csv
  - id: csv_to_ion    type: io.kestra.plugin.serdes.csv.CsvToIon    from: "{{ outputs.http_download.uri }}"
  - id: ion_to_parquet    type: io.kestra.plugin.serdes.parquet.IonToParquet    from: "{{ outputs.csv_to_ion.uri }}"    schema: |      {        "type": "record",        "name": "Product",        "namespace": "com.kestra.product",        "fields": [          {"name": "product_id", "type": "int"},          {"name": "product_name", "type": "string"},          {"name": "product_category", "type": "string"},          {"name": "brand", "type": "string"}        ]      }
- id: s3_upload type: io.kestra.plugin.aws.s3.Upload accessKeyId: "{{ secret('AWS_ACCESS_KEY') }}" secretKeyId: "{{ secret('AWS_SECRET_KEY') }}" region: "{{ secret('AWS_REGION') }}" from: "{{ outputs.ion_to_parquet.uri }}" bucket: "s3-general-purpose-ecommerce" key: "data/products.parquet"On the S3 service page on the AWS console, navigate to Table buckets from the left navigation menu.
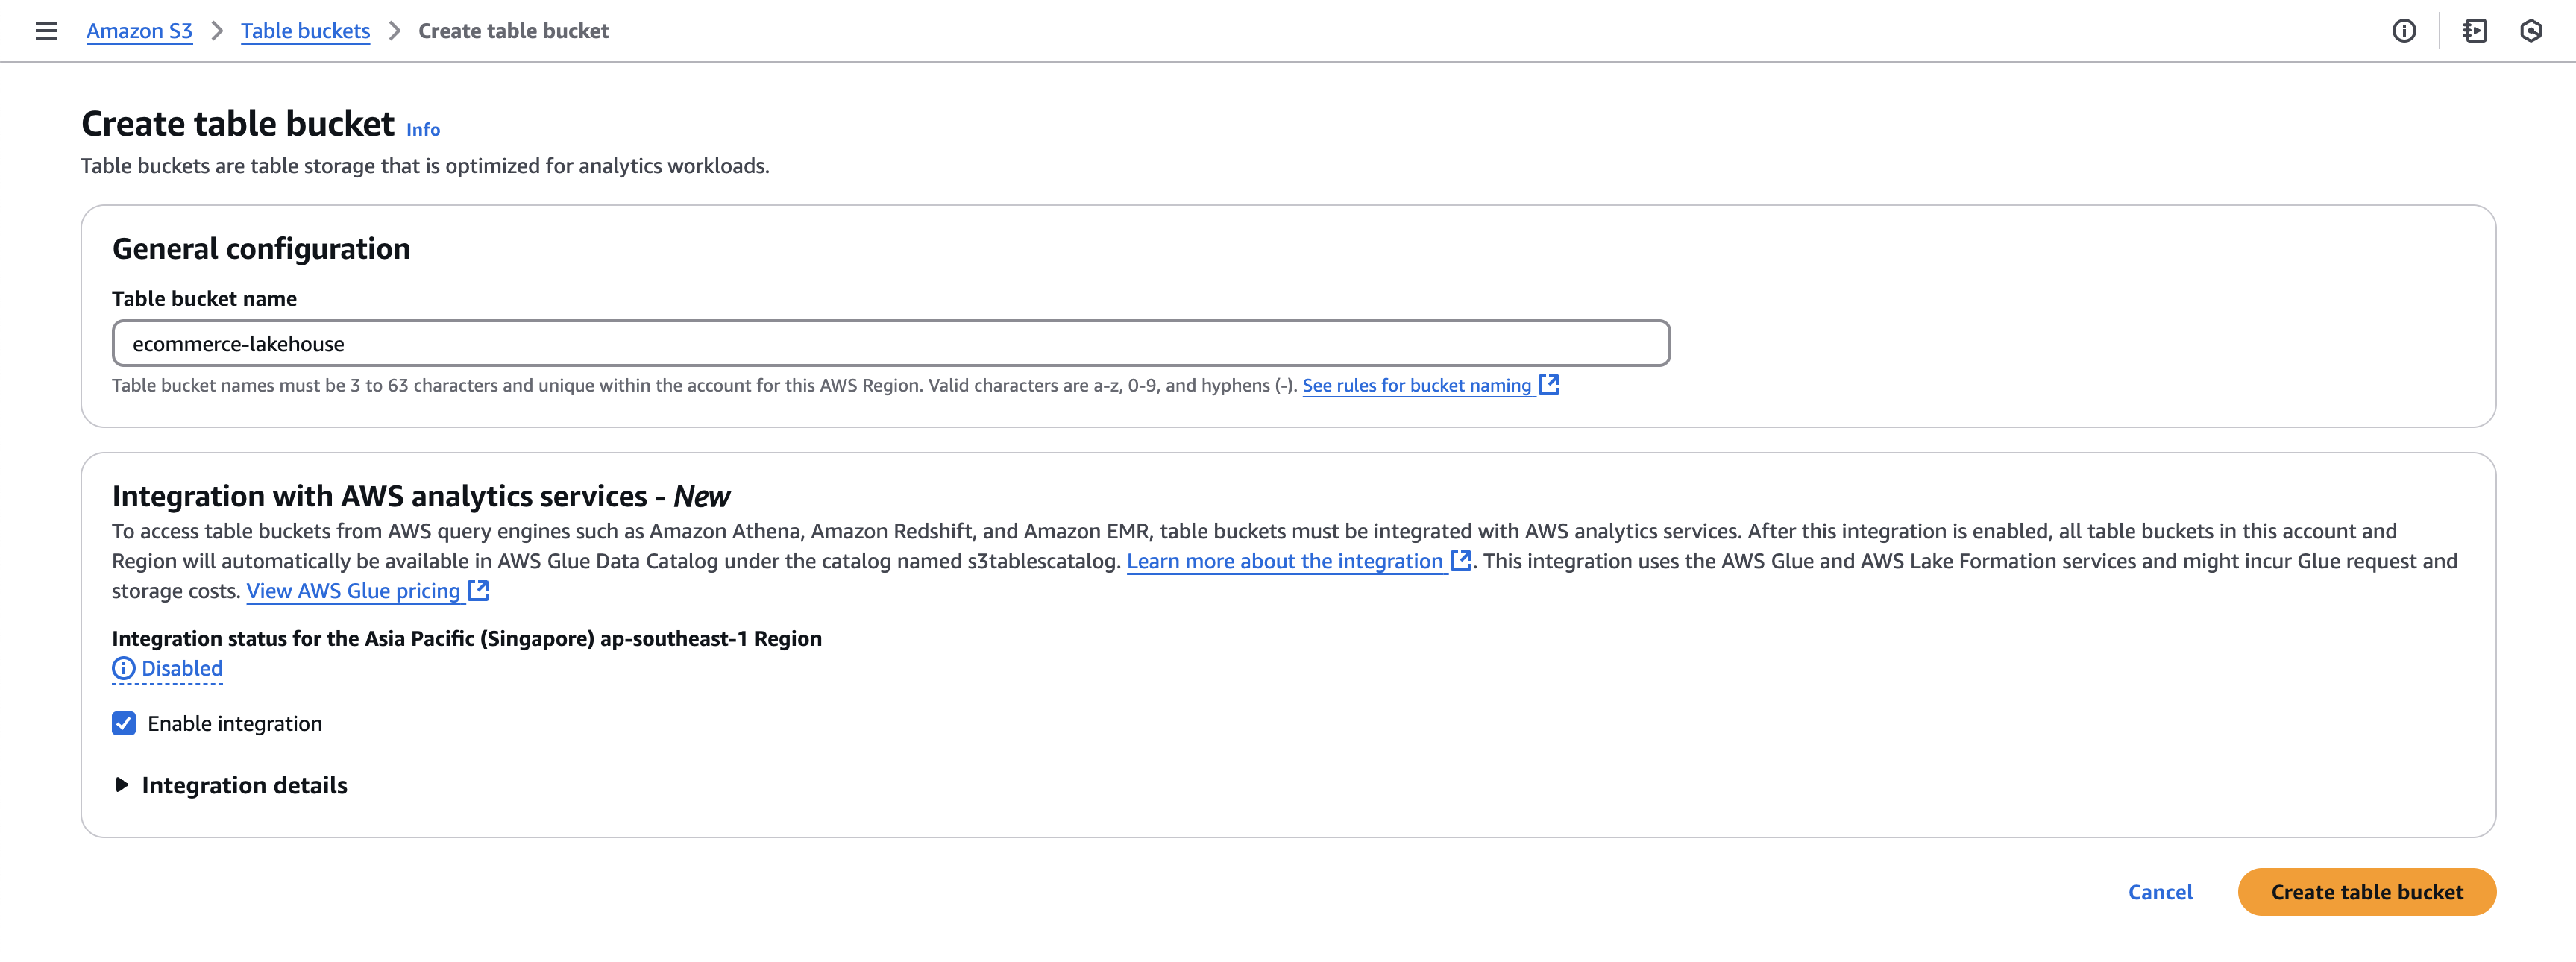
In case, you are opening the table buckets page for the first time, you will see a box at the top of the page about Integration with AWS analytics services - New with the Enable integration button. Select the button and enable the integration of S3 table buckets with AWS analytics services like Amazon EMR, Amazon Redshift and Amazon Athena.
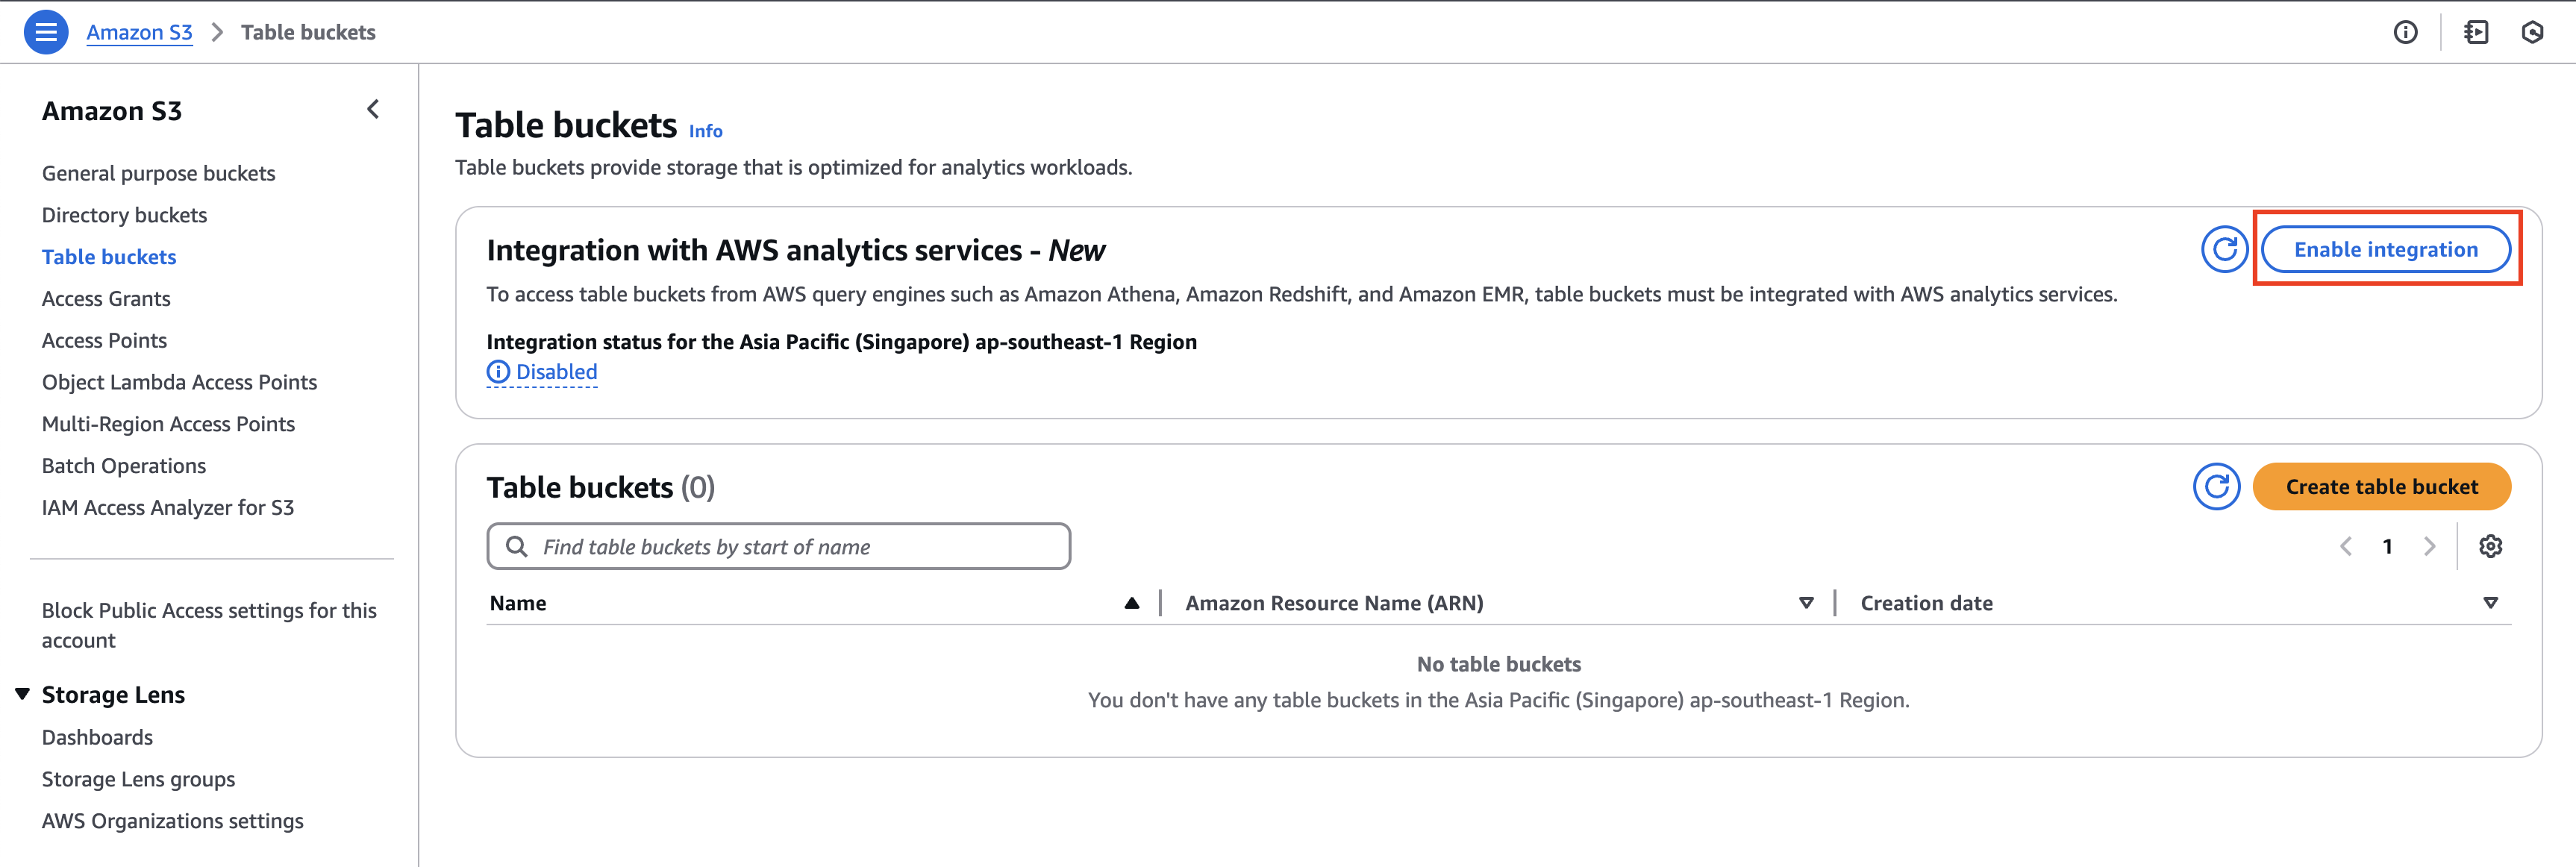
Next, we will create a table bucket. Select the Create table bucket button at the top of the page. On the Create table bucket page, provide an appropriate name for the table bucket, say ecommerce-lakehouse. Select the Create table bucket button at the bottom of the page. This will create the new table bucket.
Navigate to IAM service on the AWS console. Navigate to Roles from the left navigation menu. Using the search box on the top of the page, ensure that you have EMR_DefualtRole and EMR_EC2_DefaultRole roles already present. If the roles are missing, you can create these default roles using create-default-roles as described here. Both these roles will be required for creating the EMR cluster.
On the Roles page with IAM, search for EMR_EC2_DefaultRole, and select the same. On the EMR_EC2_DefaultRole role page, select the Add permissions button, and from the dropdown that appears, select Attach Policies. On the Attach policy for EMR_EC2_DefaultRole page, search for AmazonS3TablesFullAccess, select the AmazonS3TablesFullAccess policy and select Add permissions button. This provides full access to S3 tables from the EC2 machines of the EMR.
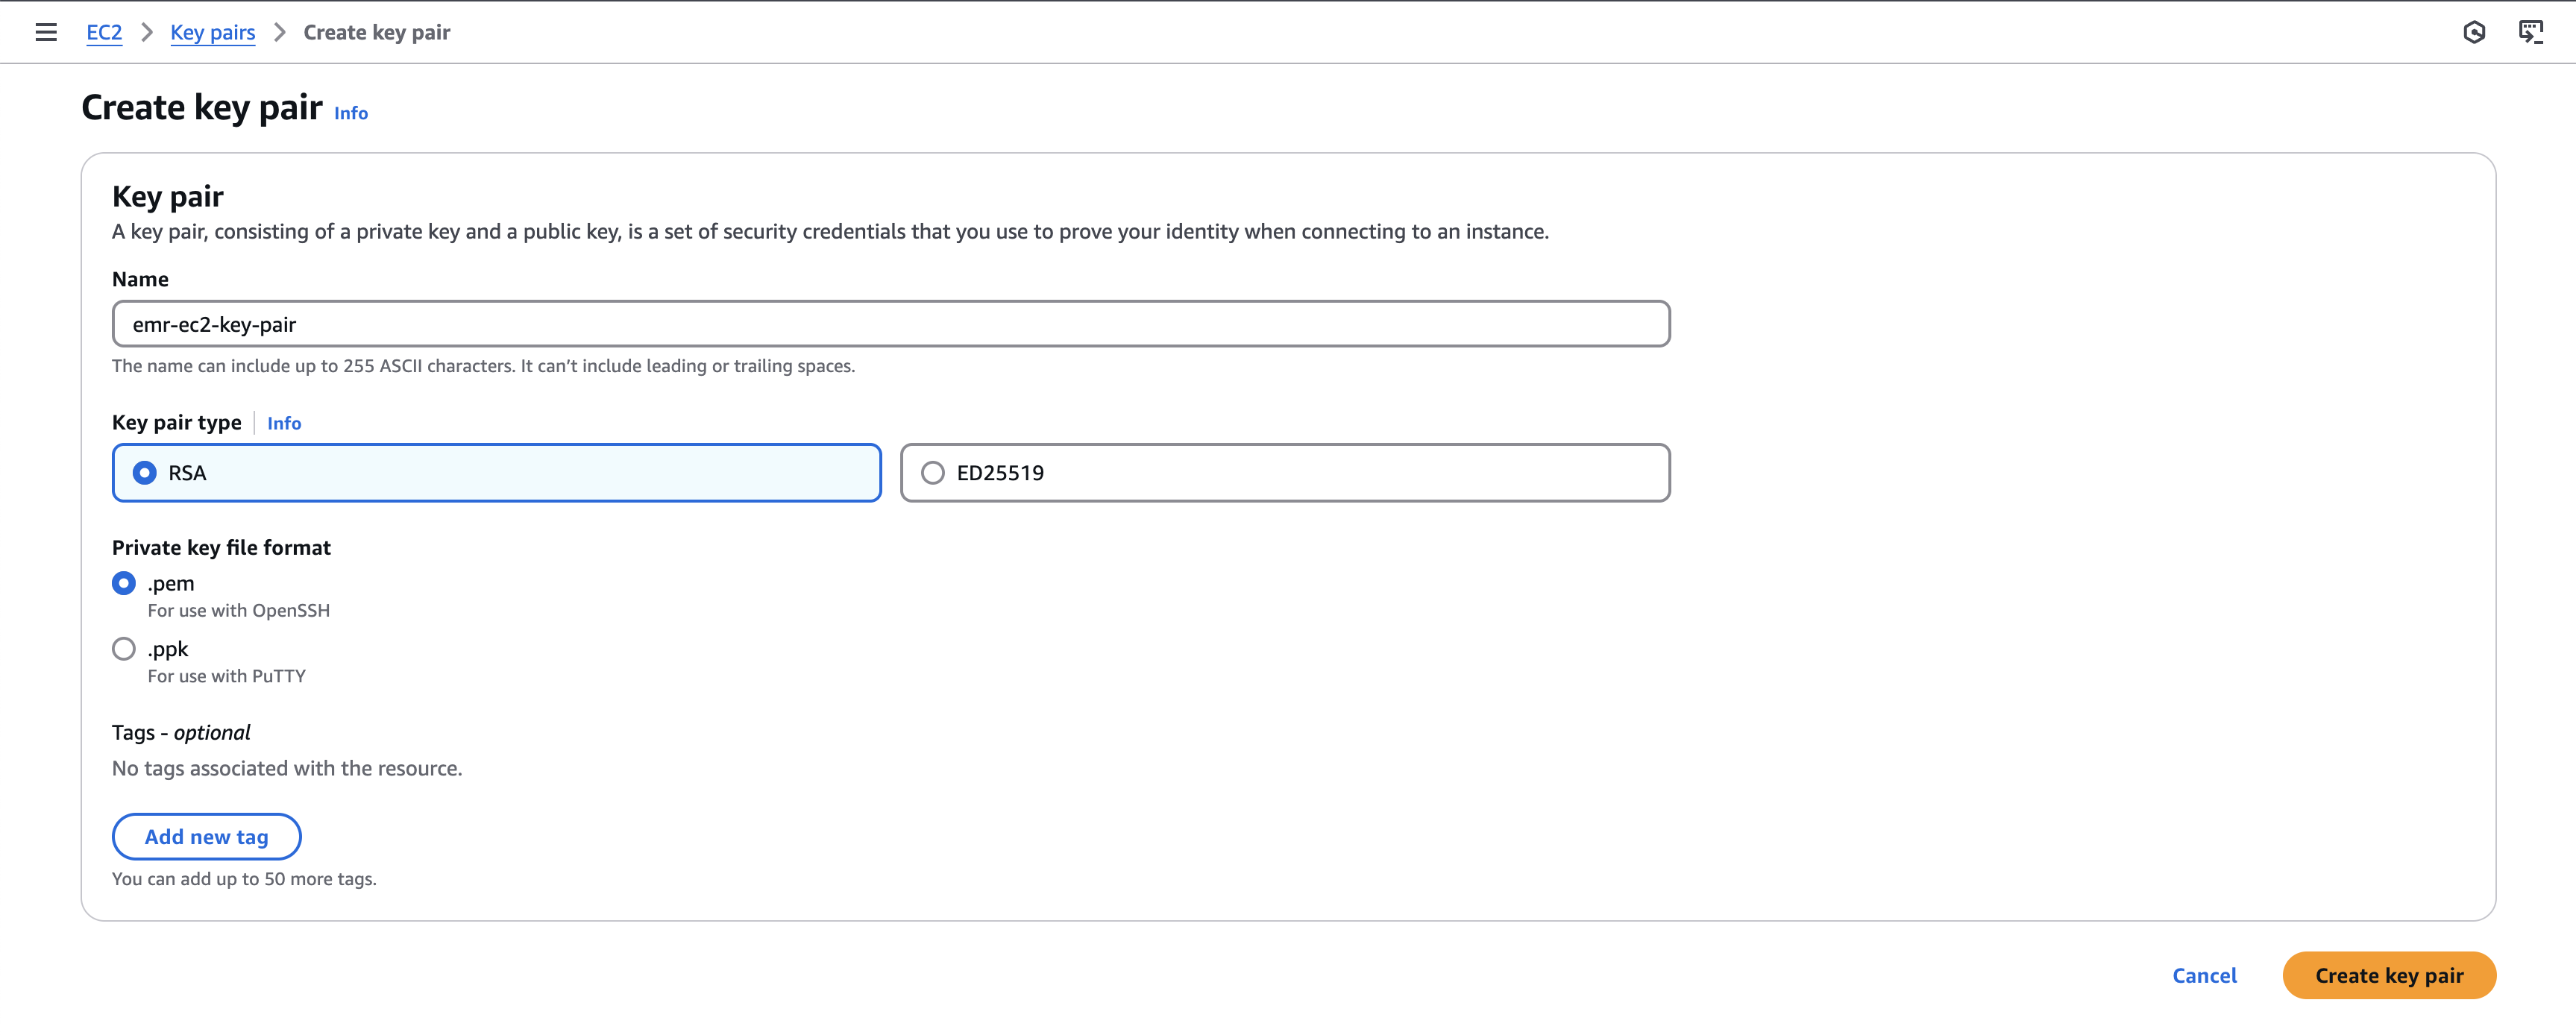
Navigate to EC2 service on the AWS console. From the left navigation menu, navigate to Key pairs. On the Key pairs page, select the Create key pair button at the top of the page. On the Create key pair page, provide an appropriate name for the key pair, say emr-ec2-key-pair, and select the Create key pair button at the bottom of the page. This will download the pem file associated with the key pair to your machine, and the new key pair will be created.
We will now create the Spark job that will create Iceberg namespace and Iceberg table, and load the data into the S3 table bucket which will then be available for query using the Iceberg table.
In order to leverage S3 tables for loading the data into Iceberg table, we need to use the following Spark configuration:
spark.sql.catalog.s3tablesbucket=org.apache.iceberg.spark.SparkCatalogspark.sql.catalog.s3tablesbucket.catalog-impl=software.amazon.s3tables.iceberg.S3TablesCatalog
#This should be set to the ARN of the S3 table bucketspark.sql.catalog.s3tablesbucket.warehouse=arn:aws:s3tables:ap-southeast-1:1234567890:bucket/ecommerce-lakehouse
spark.sql.extensions=org.apache.iceberg.spark.extensions.IcebergSparkSessionExtensions
We will set this configuration while running the spark-submit command in the EMR related Kestra task CreateClusterAndSubmitSteps.
Also, we will be including the following packages to provide all the necessary libraries for working with Iceberg using S3 tables:
org.apache.iceberg:iceberg-spark-runtime-3.5_2.12:1.6.1software.amazon.s3tables:s3-tables-catalog-for-iceberg:0.1.0These packages will be provided along with the spark-submit command.
The following is the PySpark job code:
from pyspark.sql import SparkSession, SQLContextimport argparse
if __name__ == "__main__":    parser = argparse.ArgumentParser()    parser.add_argument("--input", type=str, help="Data location in S3", default="")    args = parser.parse_args()
    spark = SparkSession.builder.appName("Load to Iceberg").getOrCreate()    sqlContext = SQLContext(spark.sparkContext)
    #Create Iceberg namespace    sqlContext.sql("CREATE NAMESPACE IF NOT EXISTS s3tablesbucket.data")
    #Create Iceberg table    sqlContext.sql("CREATE TABLE IF NOT EXISTS s3tablesbucket.data.products (product_id INT, product_name STRING, product_category STRING, brand STRING) USING iceberg")
    data_file_location = args.input    data_file = spark.read.parquet(data_file_location)
    #Load data to Iceberg table `products`    #The data is loaded into S3 table bucket provided in the Spark configuration    data_file.writeTo("s3tablesbucket.data.products") \        .using("iceberg") \        .tableProperty("format-version", "2") \        .createOrReplace()
spark.stop()We can write this code in a python file, say load_to_iceberg.py, and upload this file in the S3 general purpose bucket that we had created earlier s3-general-purpose-ecommerce.
Now comes the final step towards working with the S3 Tables using Kestra. We will create the CreateClusterAndSubmitSteps EMR task that will dyanmically create the EMR cluster based on the configuration provided in the task, and then submit the Spark job as a step to the EMR cluster. The task will look like follows:
- id: create_cluster_and_submit_spark_job type: io.kestra.plugin.aws.emr.CreateClusterAndSubmitSteps accessKeyId: "{{ secret('AWS_ACCESS_KEY') }}" secretKeyId: "{{ secret('AWS_SECRET_KEY') }}" region: "{{ secret('AWS_REGION') }}" clusterName: "Spark job cluster" logUri: "s3://s3-general-purpose-ecommerce/test-emr-logs" keepJobFlowAliveWhenNoSteps: true applications: - Spark masterInstanceType: m5.xlarge slaveInstanceType: m5.xlarge instanceCount: 3 ec2KeyName: smantri-test releaseLabel: emr-7.5.0 steps: - name: load_to_iceberg jar: "command-runner.jar" actionOnFailure: CONTINUE commands: - spark-submit --packages org.apache.iceberg:iceberg-spark-runtime-3.5_2.12:1.6.1,software.amazon.s3tables:s3-tables-catalog-for-iceberg:0.1.0 --conf spark.sql.catalog.s3tablesbucket=org.apache.iceberg.spark.SparkCatalog --conf spark.sql.catalog.s3tablesbucket.catalog-impl=software.amazon.s3tables.iceberg.S3TablesCatalog --conf spark.sql.catalog.s3tablesbucket.warehouse=arn:aws:s3tables:ap-southeast-1:1234567890:bucket/ecommerce-lakehouse --conf spark.sql.extensions=org.apache.iceberg.spark.extensions.IcebergSparkSessionExtensions s3://s3-general-purpose-ecommerce/load_to_iceberg.py --input s3://s3-general-purpose-ecommerce/data/products.parquet wait: trueThe final Kestra workflow will look as follows:
id: s3_tables_demonamespace: company.teamdescription: With this flow, you will upload the products data in parquet format into S3 general purpose bucket
tasks:  - id: http_download    type: io.kestra.plugin.core.http.Download    uri: https://huggingface.co/datasets/kestra/datasets/raw/main/csv/products.csv
  - id: csv_to_ion    type: io.kestra.plugin.serdes.csv.CsvToIon    from: "{{ outputs.http_download.uri }}"
  - id: ion_to_parquet    type: io.kestra.plugin.serdes.parquet.IonToParquet    from: "{{ outputs.csv_to_ion.uri }}"    schema: |      {        "type": "record",        "name": "Product",        "namespace": "com.kestra.product",        "fields": [          {"name": "product_id", "type": "int"},          {"name": "product_name", "type": "string"},          {"name": "product_category", "type": "string"},          {"name": "brand", "type": "string"}        ]      }
  - id: s3_upload    type: io.kestra.plugin.aws.s3.Upload    accessKeyId: "{{ secret('AWS_ACCESS_KEY') }}"    secretKeyId: "{{ secret('AWS_SECRET_KEY') }}"    region: "{{ secret('AWS_REGION') }}"    from: "{{ outputs.ion_to_parquet.uri }}"    bucket: "s3-general-purpose-ecommerce"    key: "data/products.parquet"
- id: create_cluster_and_submit_spark_job type: io.kestra.plugin.aws.emr.CreateClusterAndSubmitSteps accessKeyId: "{{ secret('AWS_ACCESS_KEY') }}" secretKeyId: "{{ secret('AWS_SECRET_KEY') }}" region: "{{ secret('AWS_REGION') }}" clusterName: "Spark job cluster" logUri: "s3://s3-general-purpose-ecommerce/test-emr-logs" keepJobFlowAliveWhenNoSteps: true applications: - Spark masterInstanceType: m5.xlarge slaveInstanceType: m5.xlarge instanceCount: 3 ec2KeyName: smantri-test releaseLabel: emr-7.5.0 steps: - name: load_to_iceberg jar: "command-runner.jar" actionOnFailure: CONTINUE commands: - spark-submit --packages org.apache.iceberg:iceberg-spark-runtime-3.5_2.12:1.6.1,software.amazon.s3tables:s3-tables-catalog-for-iceberg:0.1.0 --conf spark.sql.catalog.s3tablesbucket=org.apache.iceberg.spark.SparkCatalog --conf spark.sql.catalog.s3tablesbucket.catalog-impl=software.amazon.s3tables.iceberg.S3TablesCatalog --conf spark.sql.catalog.s3tablesbucket.warehouse=arn:aws:s3tables:ap-southeast-1:1234567890:bucket/ecommerce-lakehouse --conf spark.sql.extensions=org.apache.iceberg.spark.extensions.IcebergSparkSessionExtensions s3://s3-general-purpose-ecommerce/load_to_iceberg.py --input s3://s3-general-purpose-ecommerce/data/products.parquet wait: trueRunning this workflow will get the data loaded onto the S3 table bucket which can then be queried using Iceberg table in query services like Amazon Athena.
Navigate to Athena service on the AWS console. Under the Data section on the left panel, select Data source as AwsDataCatalog, select Catalogue as s3tablescatalog/ecommerce-lakehouse, and Database as data. The Tables and views section should automatically show up the recently populated products table.
On the Query tab, you can write the query to get the data from this table:
SELECT * FROM "data"."products";You should be able to see all the 20 rows from the table getting displayed in the Query results section.
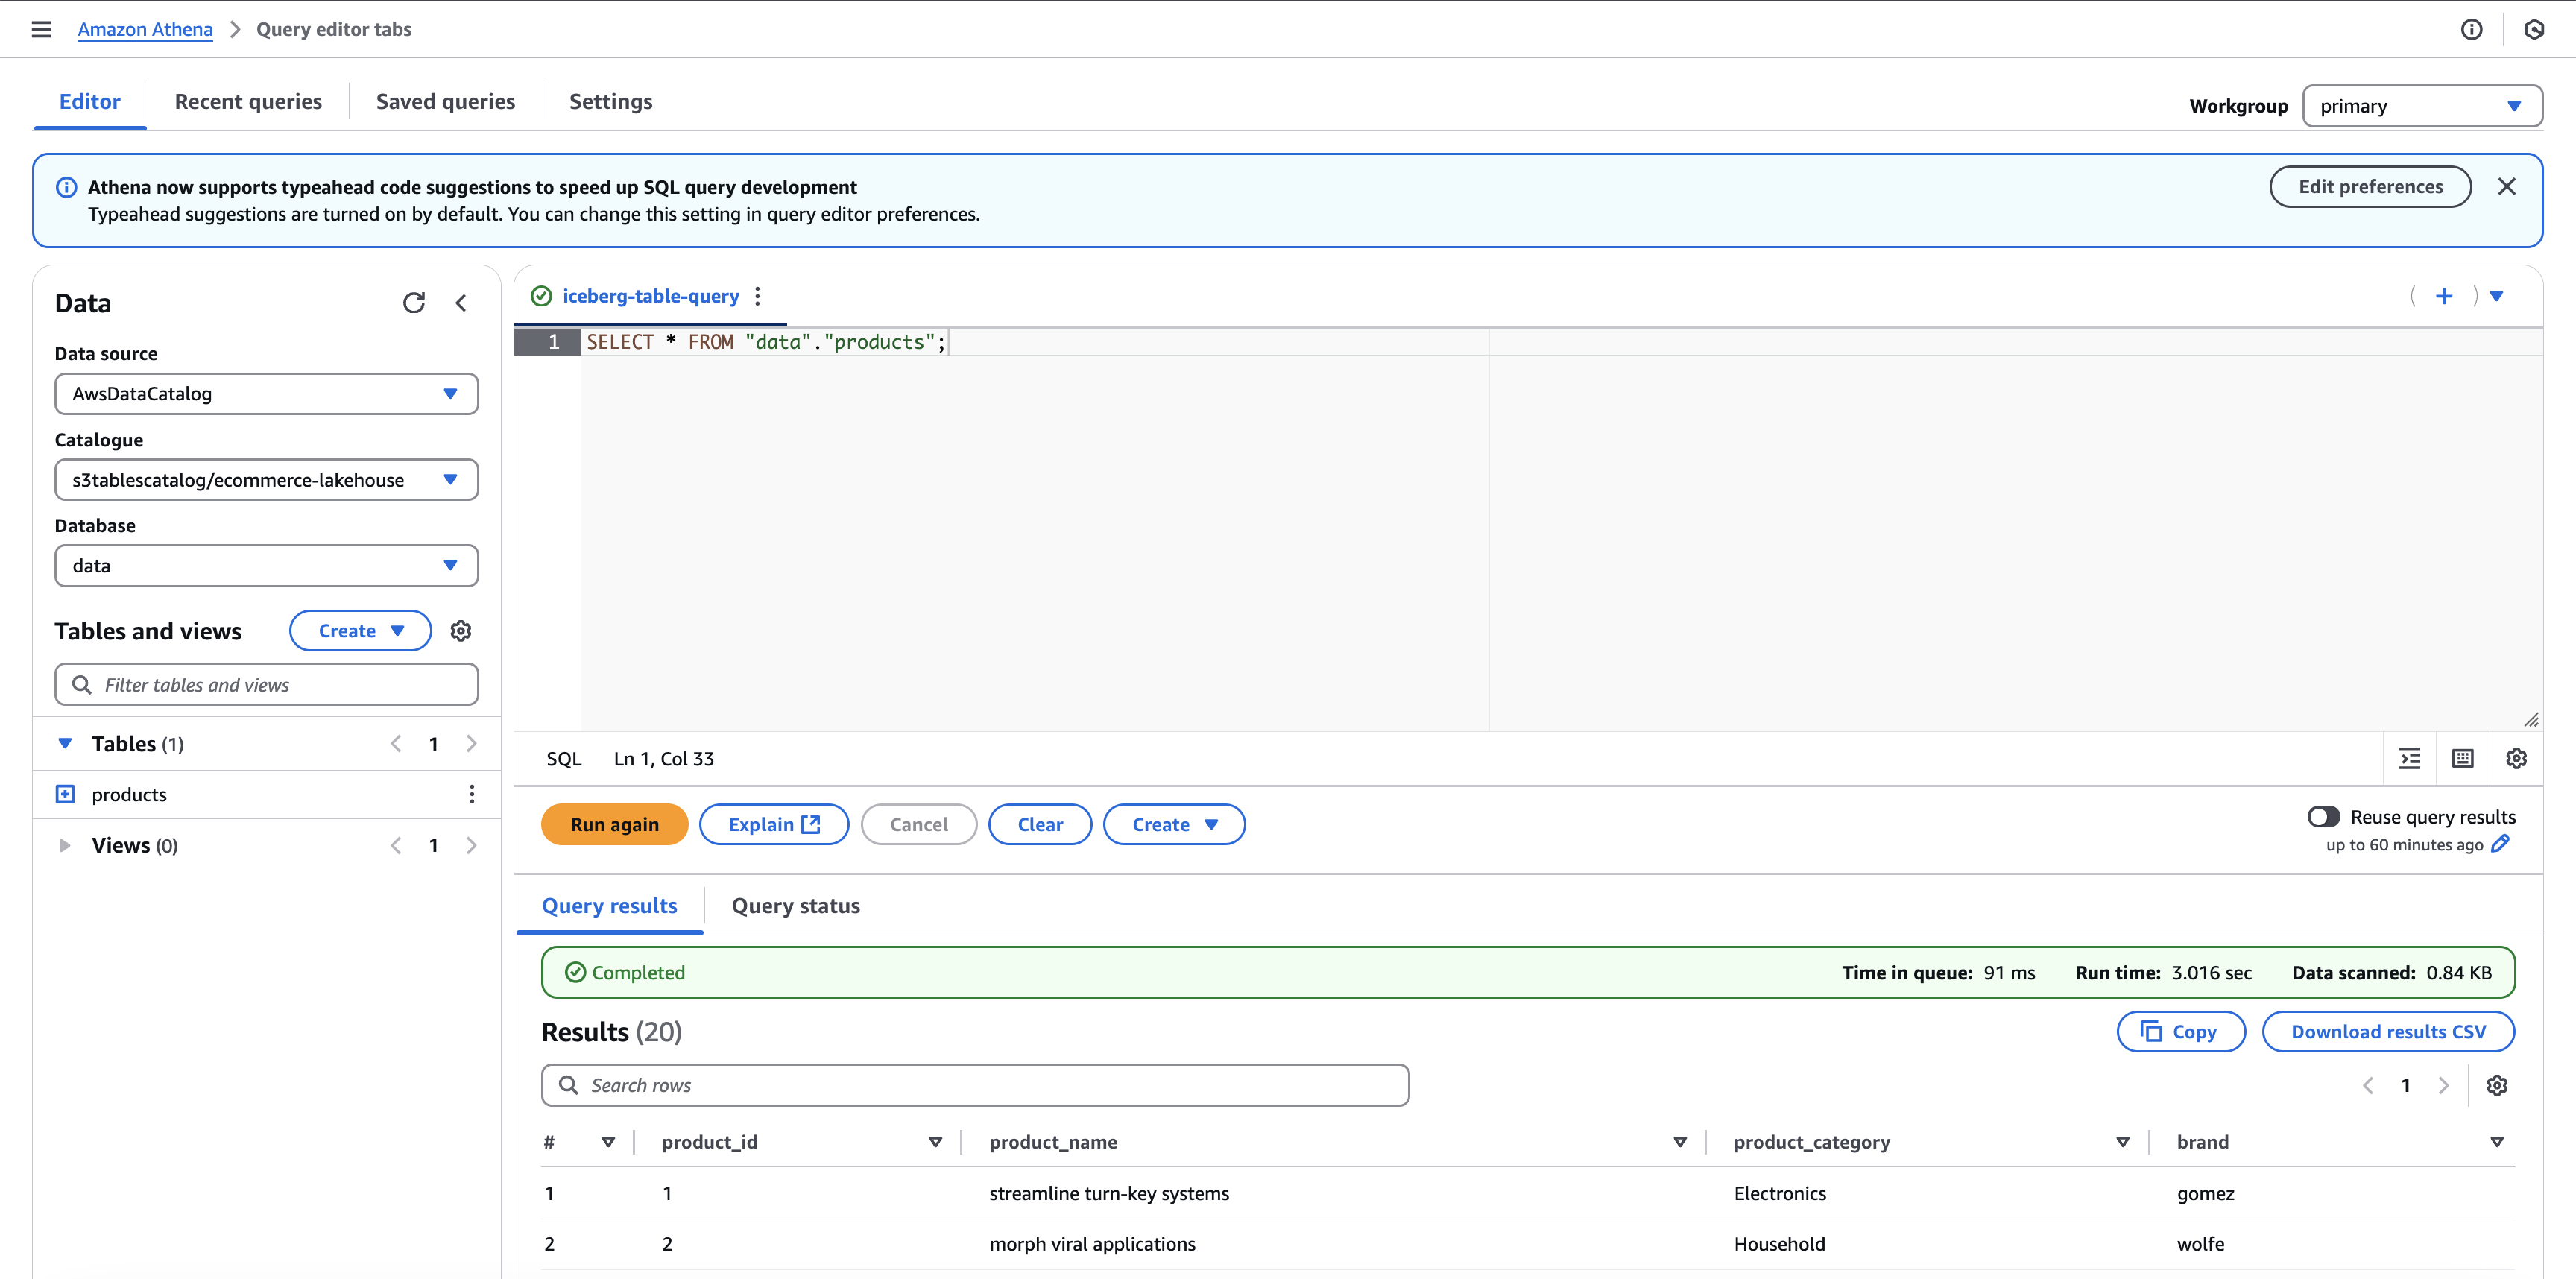
Thus, we have successfully leverage S3 table bucket to create an Iceberg table.
Kestra workflows can be used to work with the S3 table buckets and create Iceberg tables. This enables us to introduce orchestration related to S3 tables with Kestra, bringing in all the good features that S3 tables have to offer.
If you have any questions, reach out via Kestra Community Slack or open a GitHub issue.
If you like the project, give us a GitHub star and join the open-source community.

Stay up to date with the latest features and changes to Kestra