Authors
Anna Geller
Product Lead
Anna Geller
Product Lead
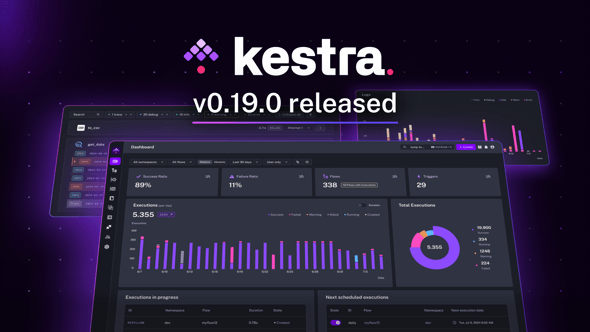
Kestra 0.19.0 has arrived, bringing a host of powerful new updates for your orchestration platform.
The table below highlights the key features of this release:
| Feature | Description | Edition |
|---|---|---|
| UI Localization | Switch between 12 different languages directly from the Settings UI. | All editions |
| Fully redesigned Dashboard | Get a quick overview of the health of your platform with a faster and more informative Dashboard. | All editions |
| System Flows | Automate maintenance tasks with dedicated flows that are hidden by default to end users. | All editions |
| Conditional Inputs | Make workflows more dynamic by defining inputs based on conditions, allowing one input to depend on another via new dependsOn property. | All editions |
| New log level display | Navigate logs across warnings or debug messages with the new interactive Log level display. | All editions |
| In-app versioned docs | Access the full documentation of the version you’re using, directly from the app. | All editions |
| Backup & Restore | Protect your data and simplify migrations with the new Backup & Restore feature. | Enterprise Edition (EE) |
Check the video below for a quick overview of the new features:
Let’s dive into these highlights and other enhancements in more detail.
Kestra now supports 12 different languages — you can easily switch from English to your preferred language directly from the Settings page. This makes the platform more accessible and user-friendly for teams across the globe, letting you work in the language you feel most comfortable with.
Here’s the full list of the currently supported languages:
With this new localization feature, Kestra is now language-agnostic both in terms of programming languages and spoken languages. If the language you speak isn’t on the list, let us know, and we’ll do our best to add it. We also encourage you to contribute to the translation of Kestra into your language or submit a pull request with a fix to any translation issues you might find.
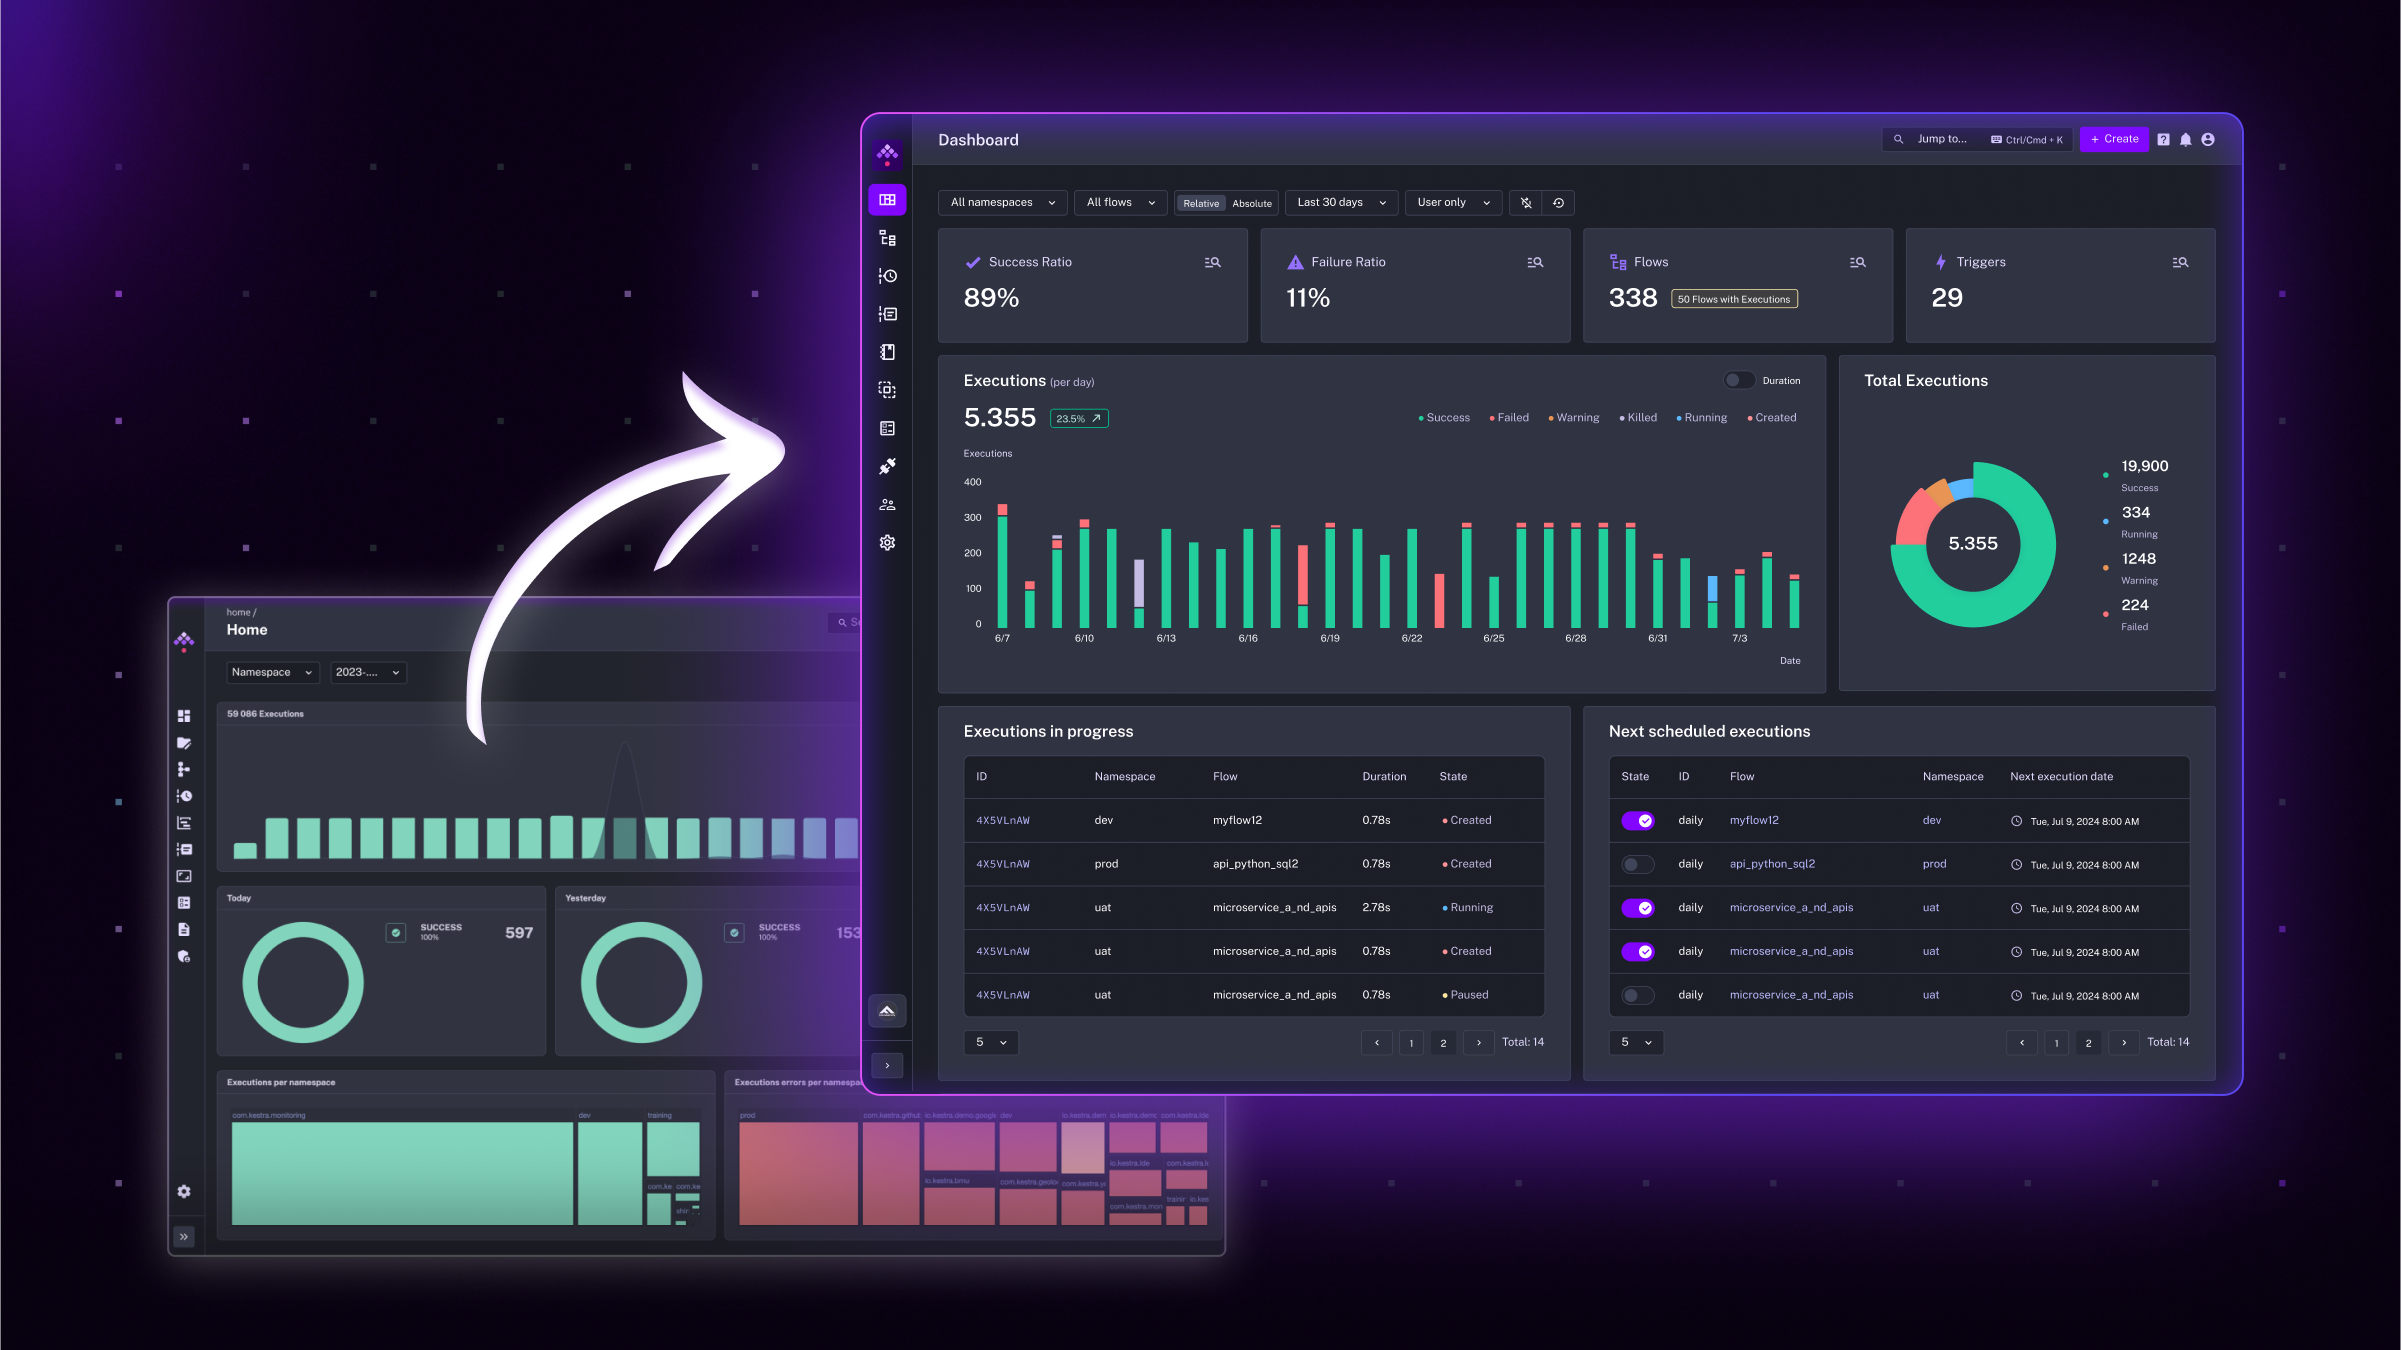
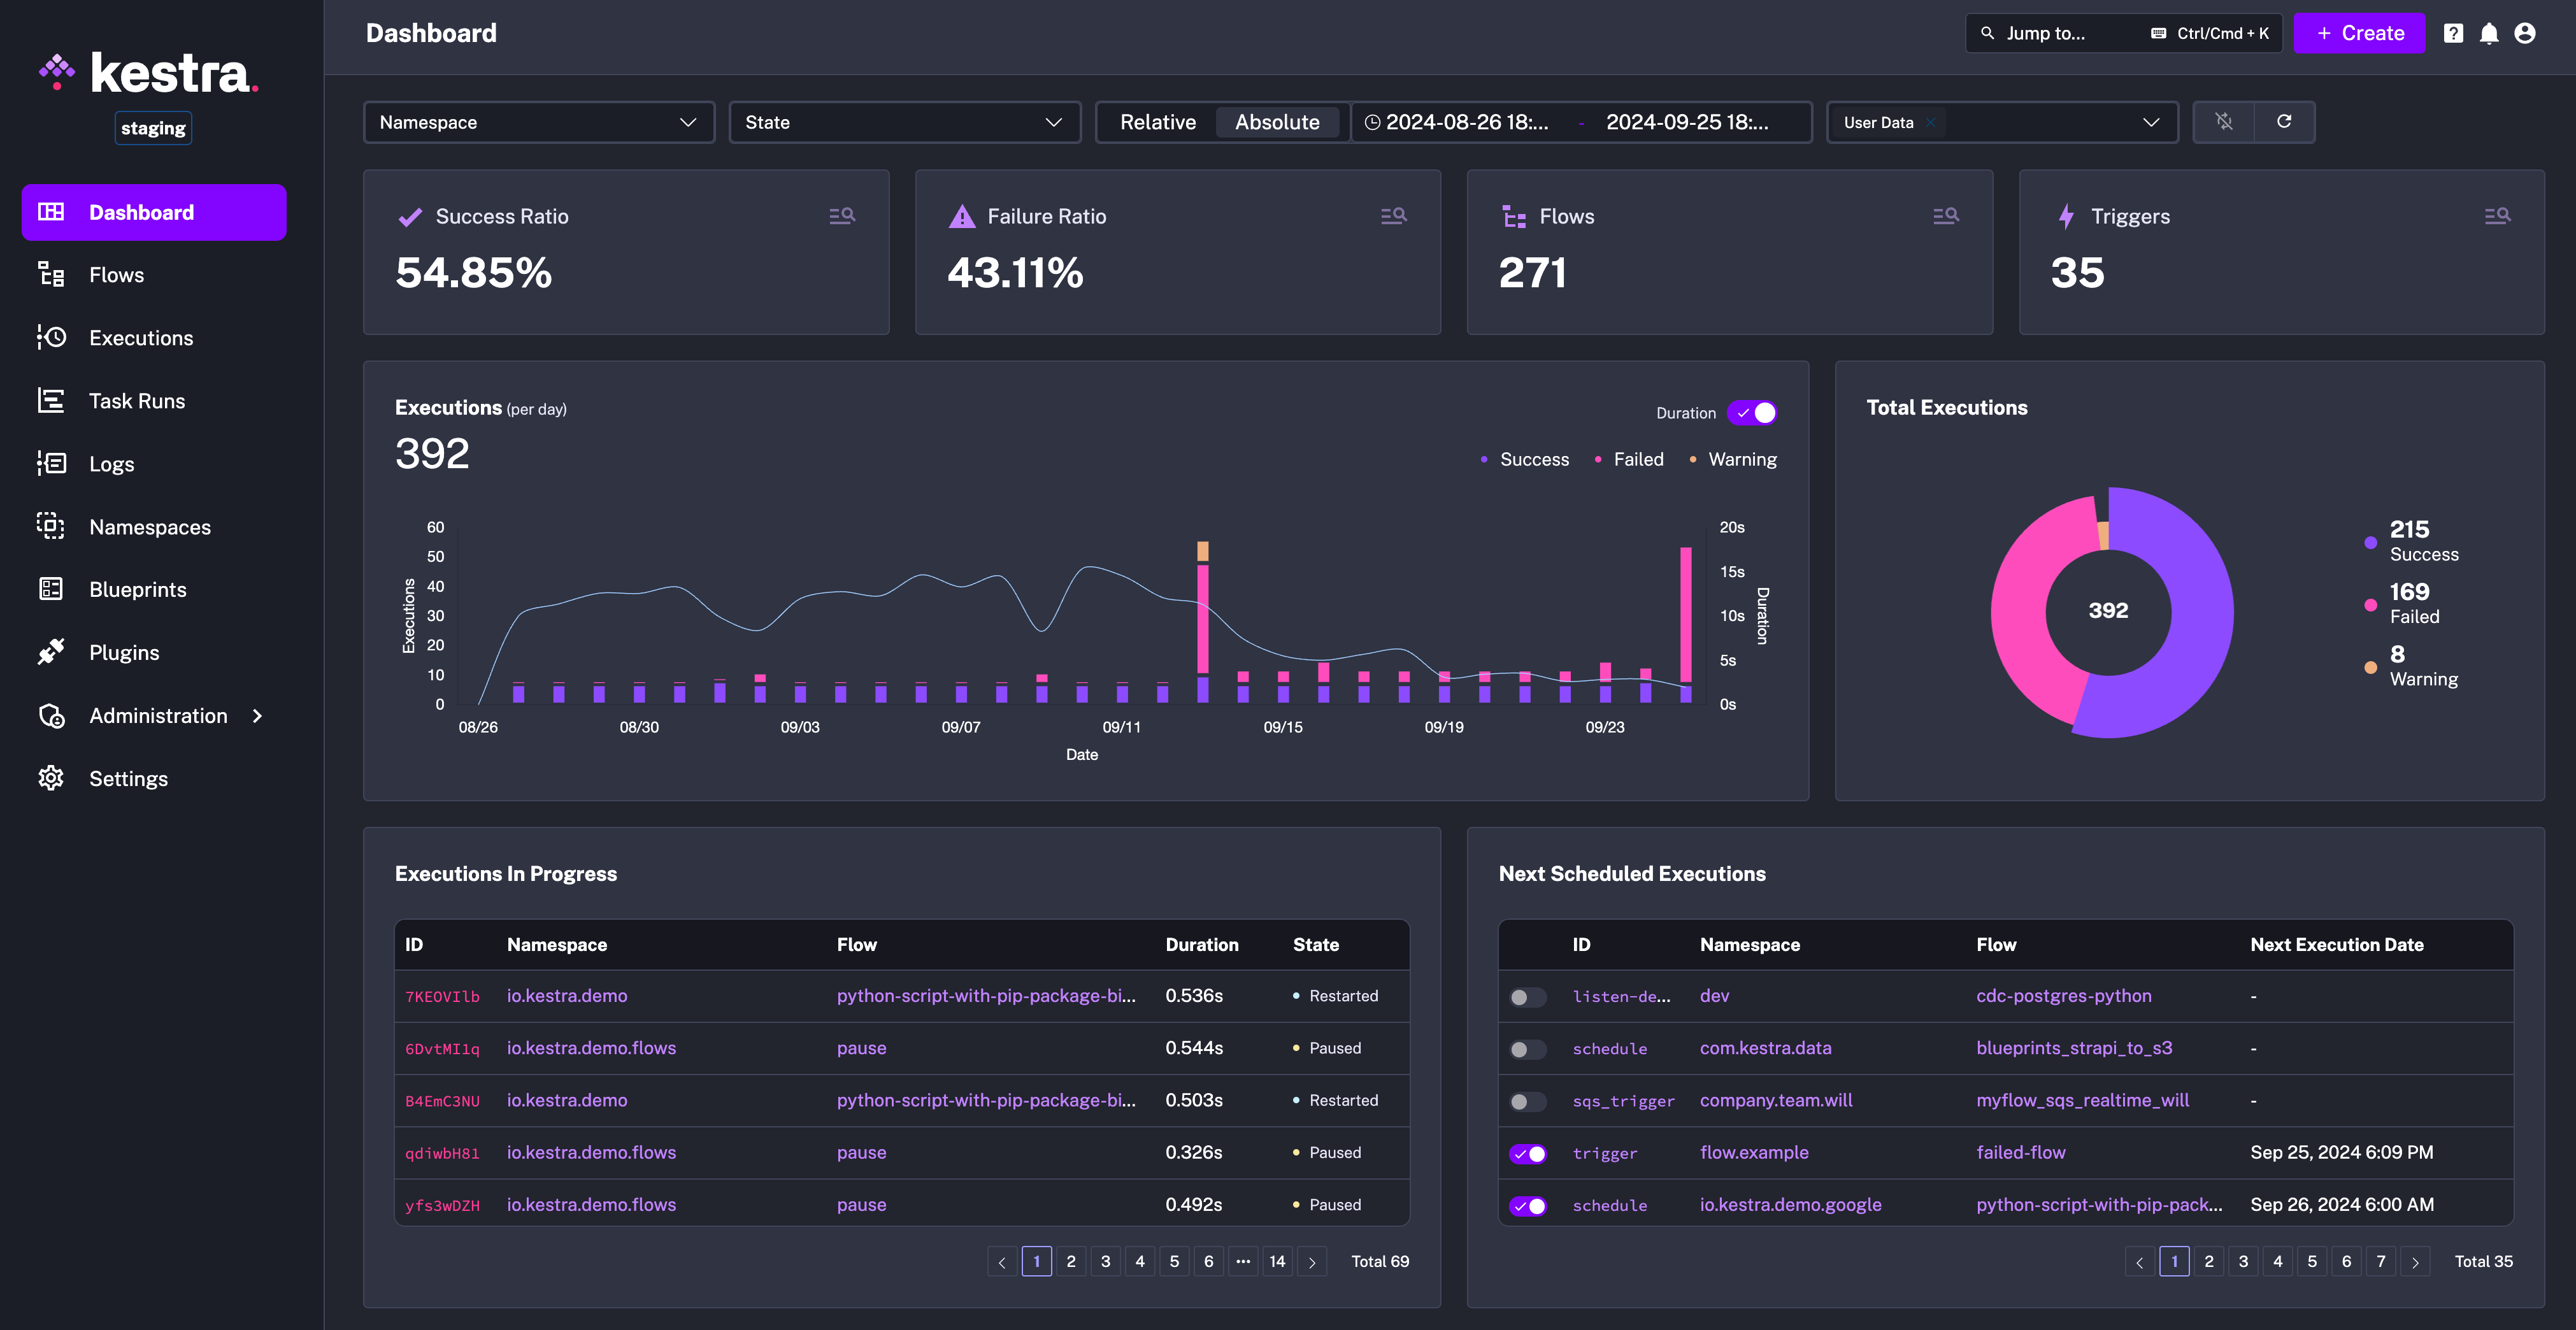
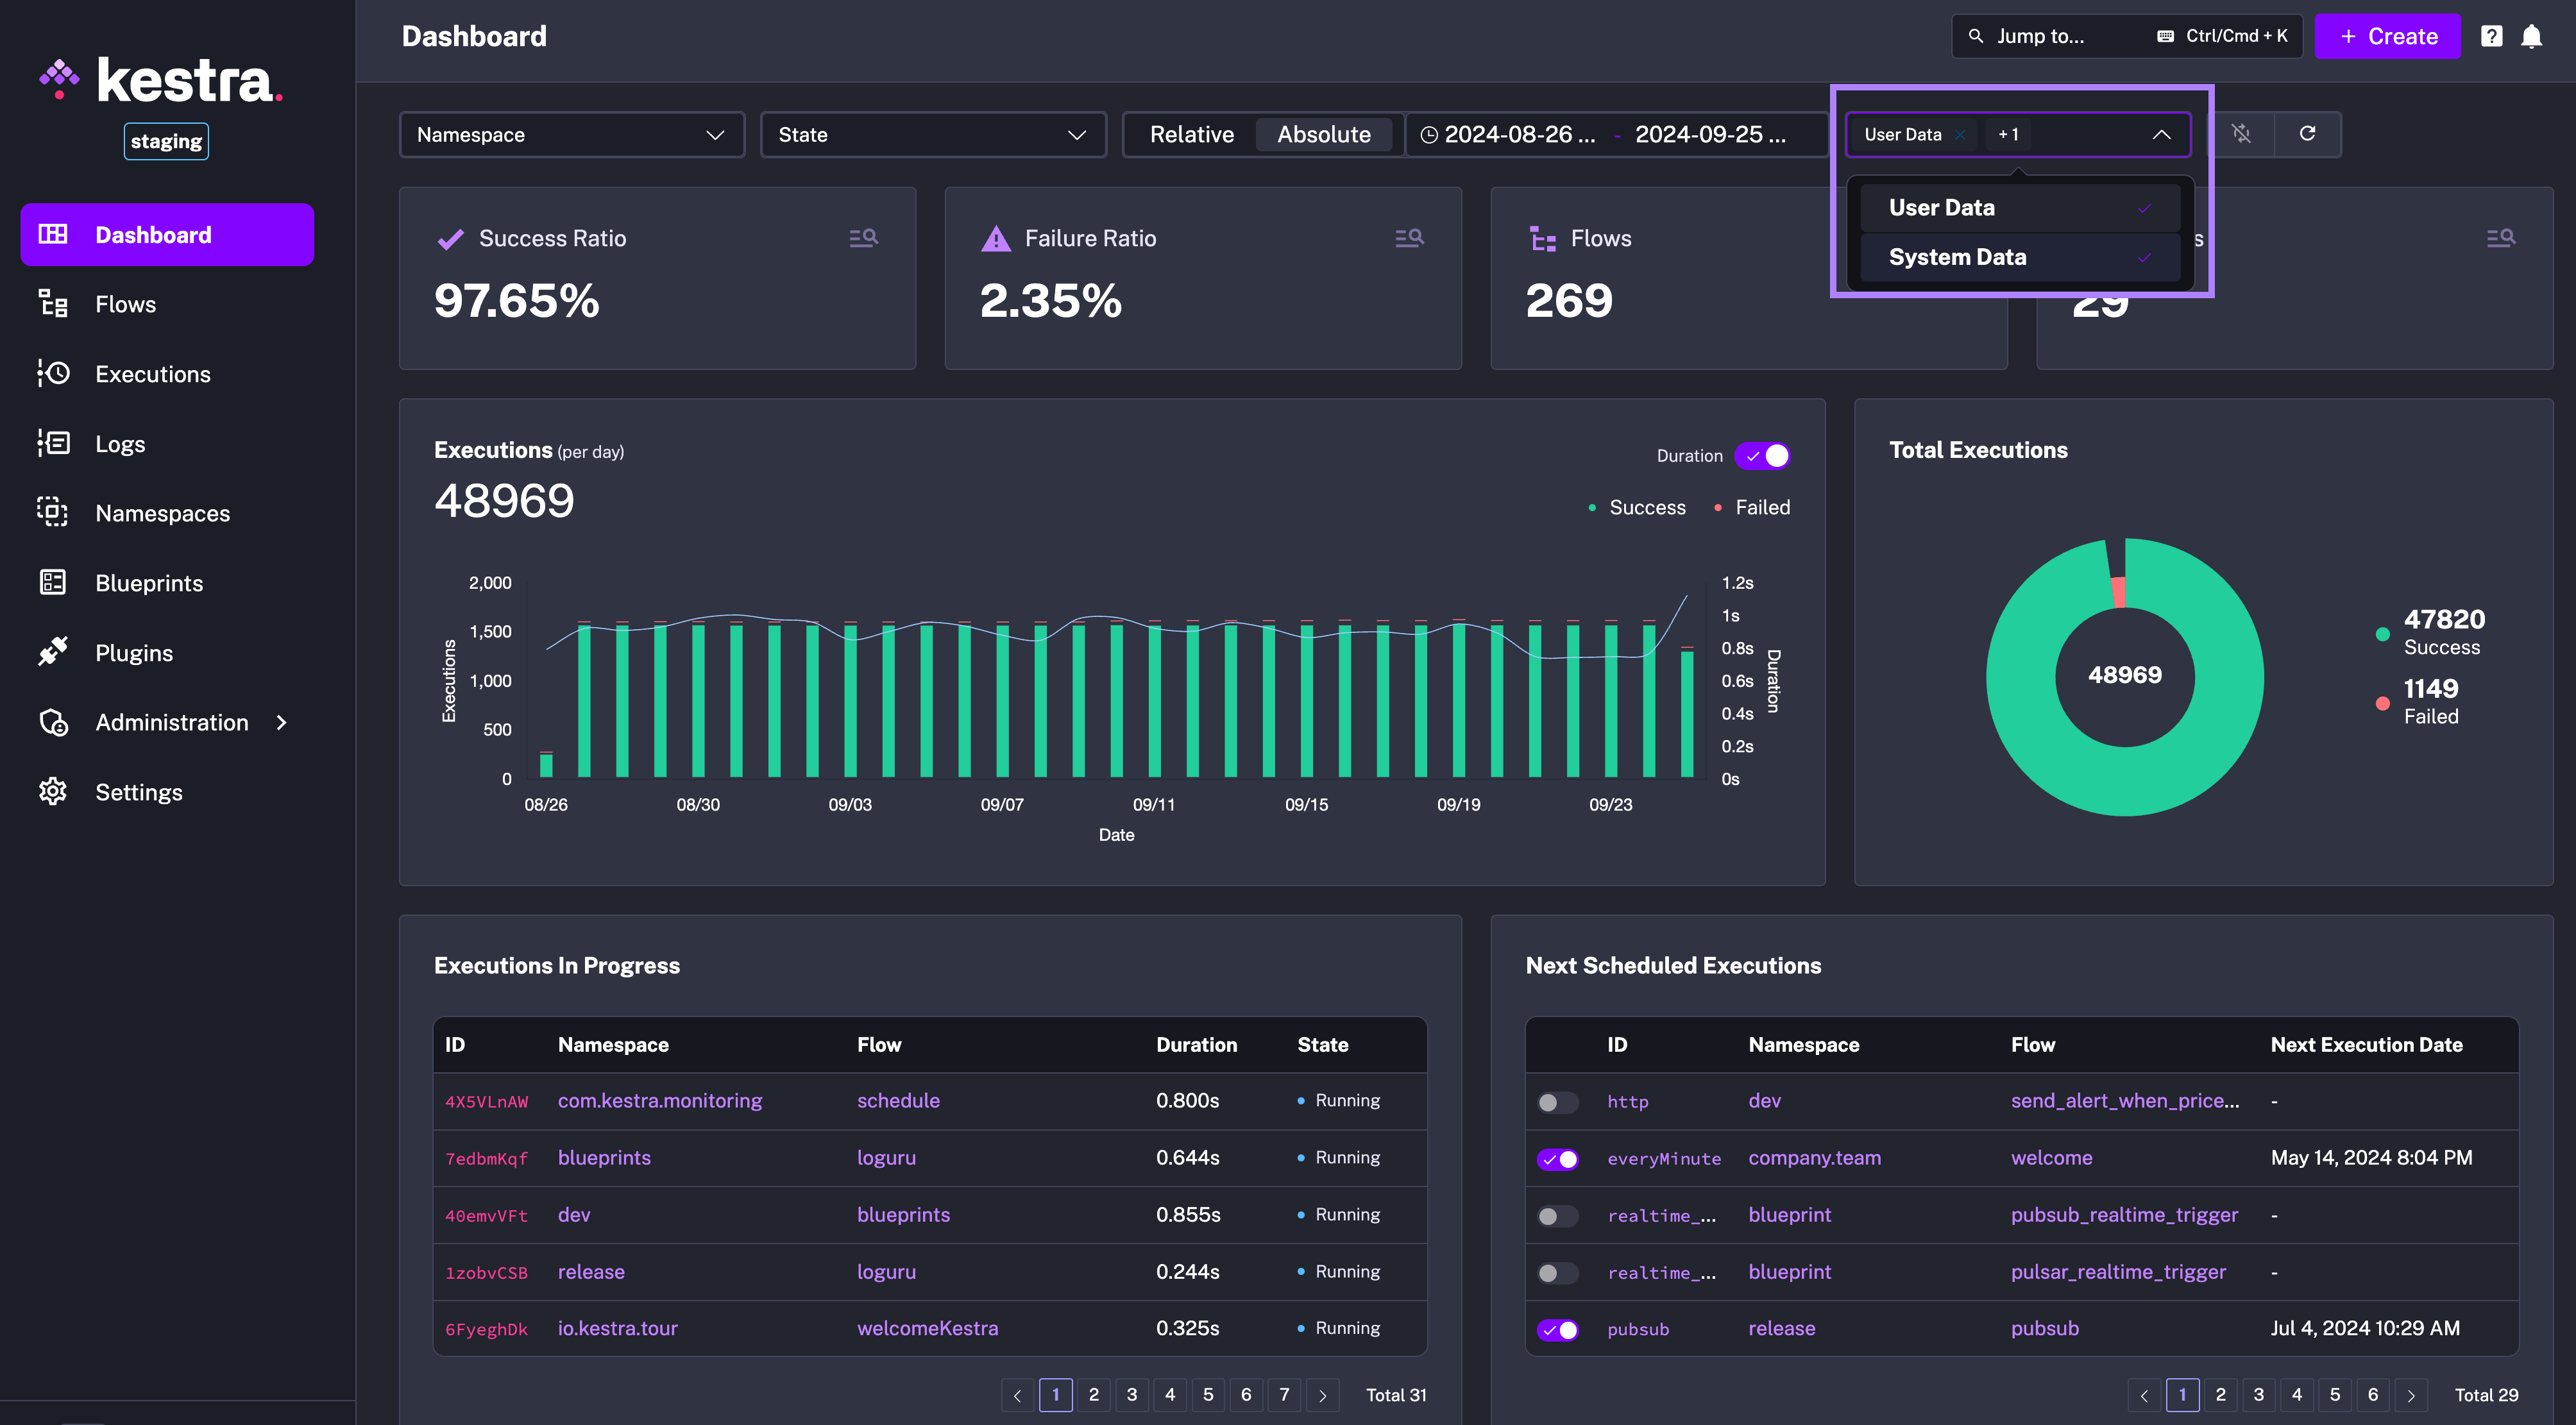
At Kestra, we know how critical it is to have a clear view of your orchestration platform’s health. We’ve redesigned the main dashboard to offer a more refined, focused experience, showing the information you need without overwhelming you with unnecessary details.
The previous dashboard aimed to display as much information as possible, but over time, it became cluttered and sometimes slow to load (see the image below).
Here’s what we’ve changed:
Simplified Visuals: The new dashboard replaces the previous donut charts with clear KPI numbers, instantly showing success and failure ratios.
Improved Color Scheme: To make the Dashboard more accessible, we’ve added a color-blind-friendly palette (scroll down to the image below) alongside the default classic red-green view. You can switch between the two color schemes in the Settings menu — choose either Classic (red-green) or Kestra (purple-pink).
Performance: We’ve removed redundant tables to ensure faster load times. The new Dashboard gives you an instant overview of the health of your platform, including information about currently running and the next scheduled executions.
This new layout brings clarity and faster load times, and is visually appealing! See the screenshot below.
In the future, we plan to add more customization options allowing you to set custom color palettes and create additional visuals.
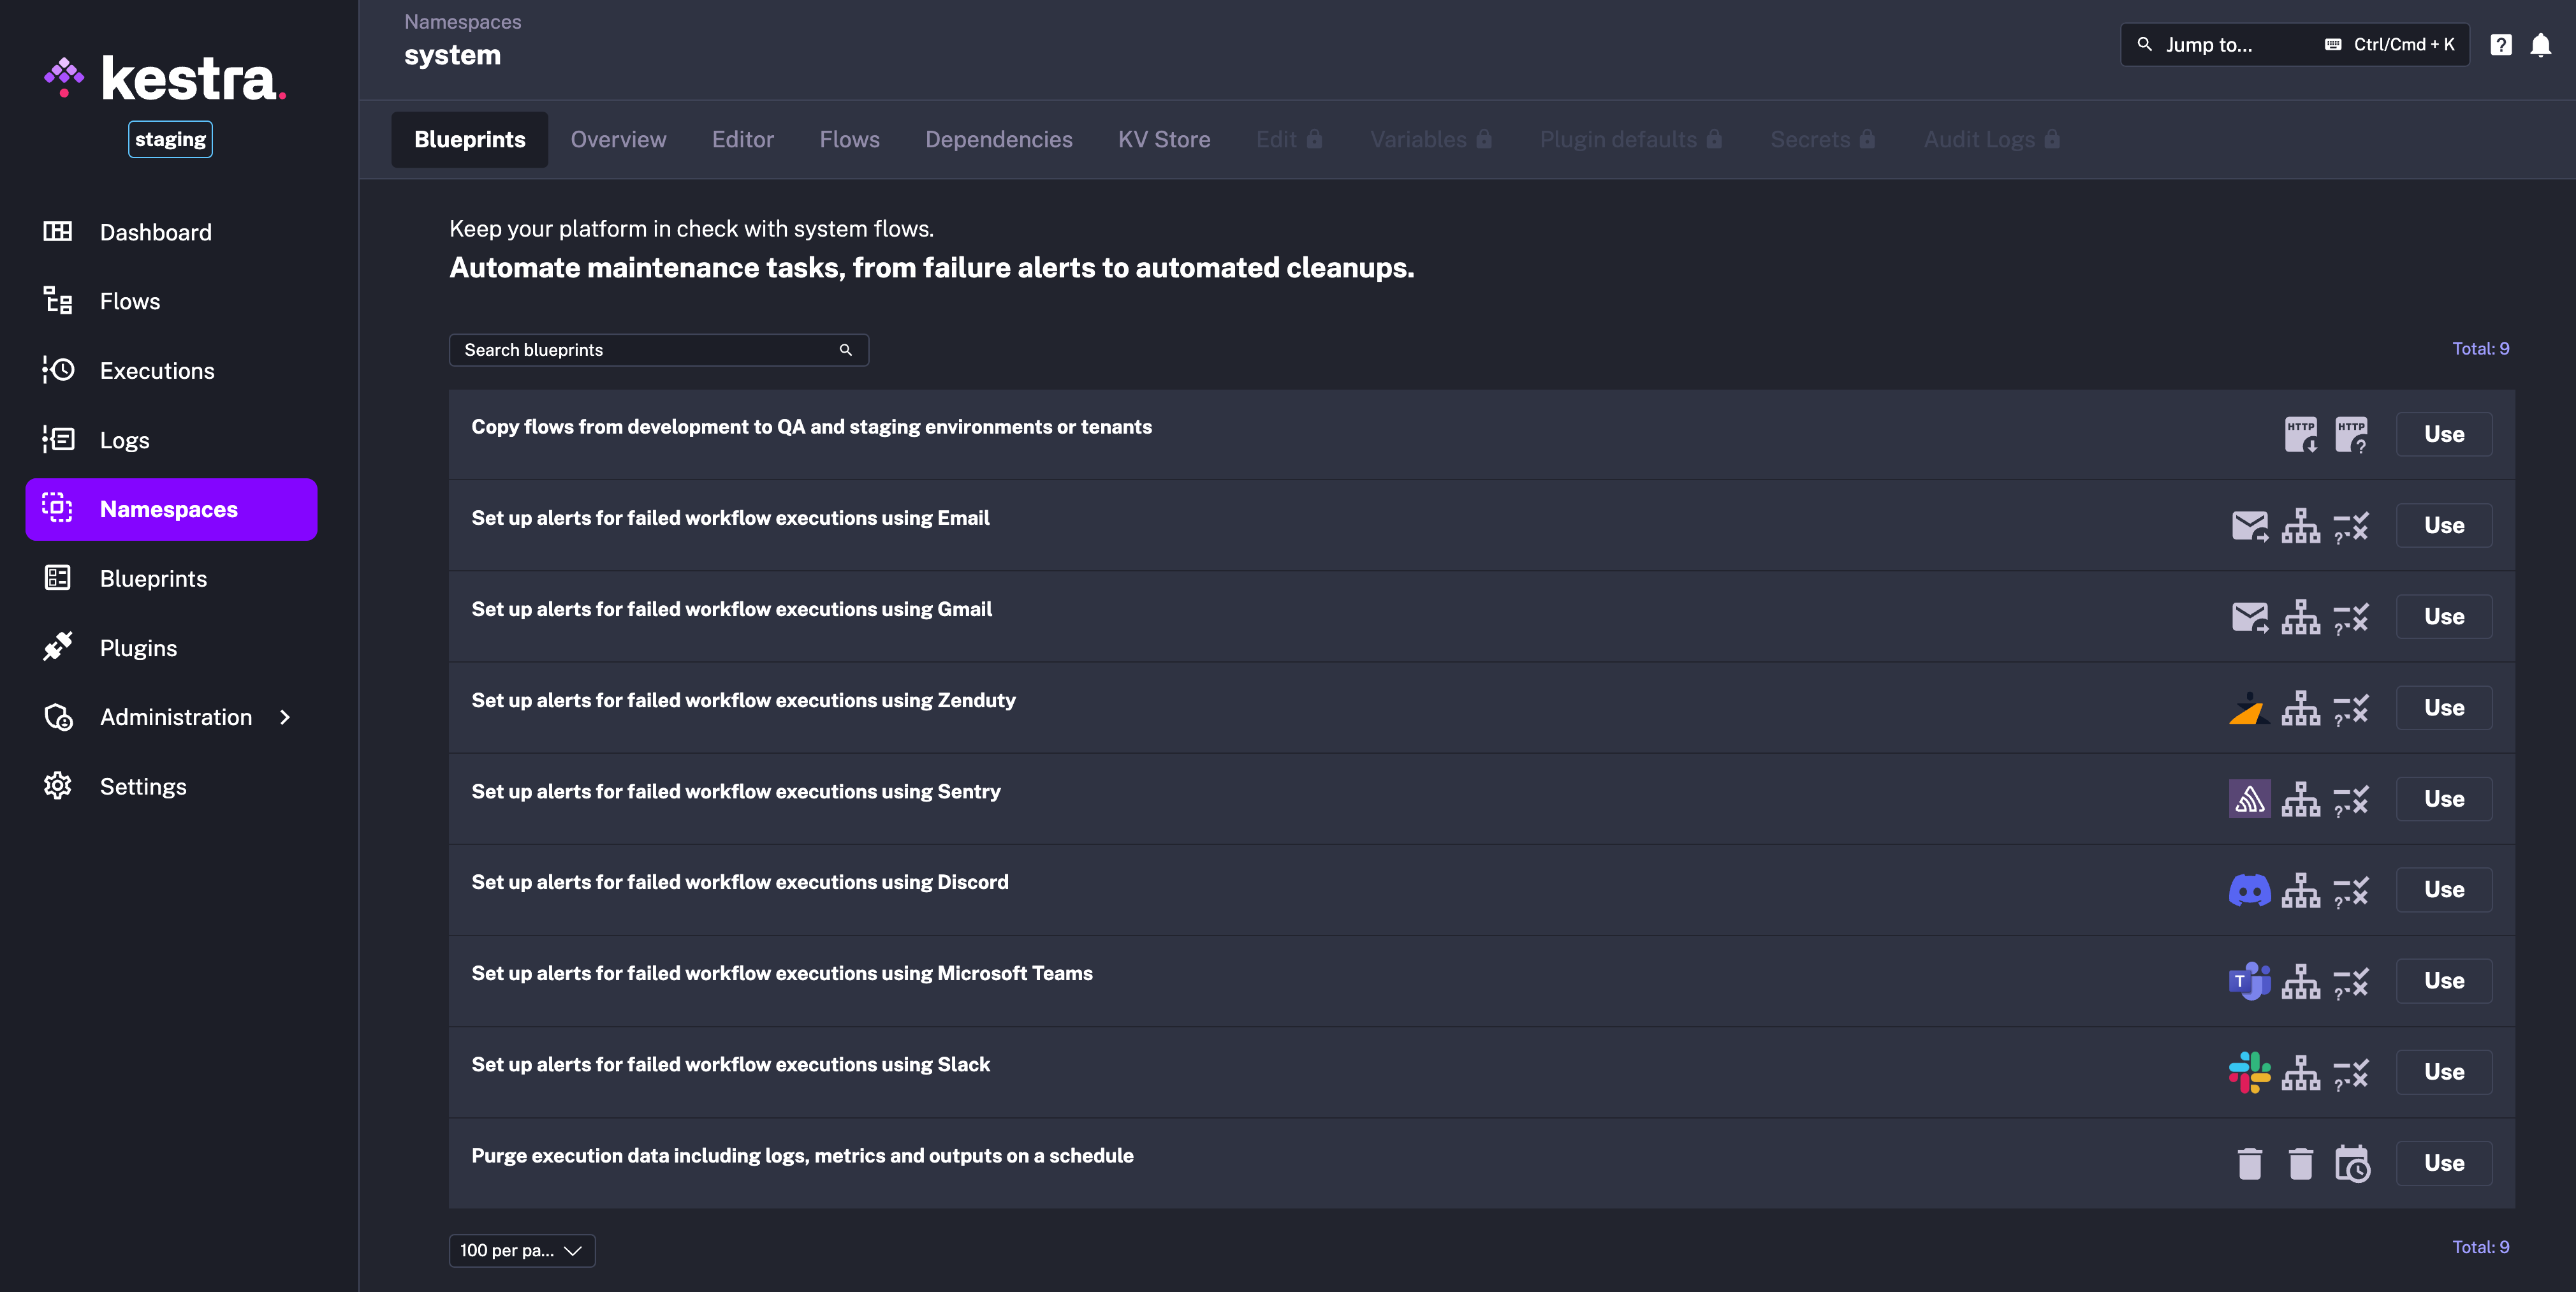
System Flows are designed to handle periodically executed background operations that keep your platform running but are generally kept out of sight. These flows automate maintenance workflows, such as:
We refer to these as System Flows because, by default, they are hidden from end users and only visible within the system namespace. This way, you can automate maintenance tasks without cluttering the UI for regular users. If you prefer, you can use a different namespace name instead of system by overwriting the following configuration:
kestra: systemFlows: namespace: systemTo access System Flows, navigate to the Namespaces section in the UI. The system namespace is pinned at the top for quick access.
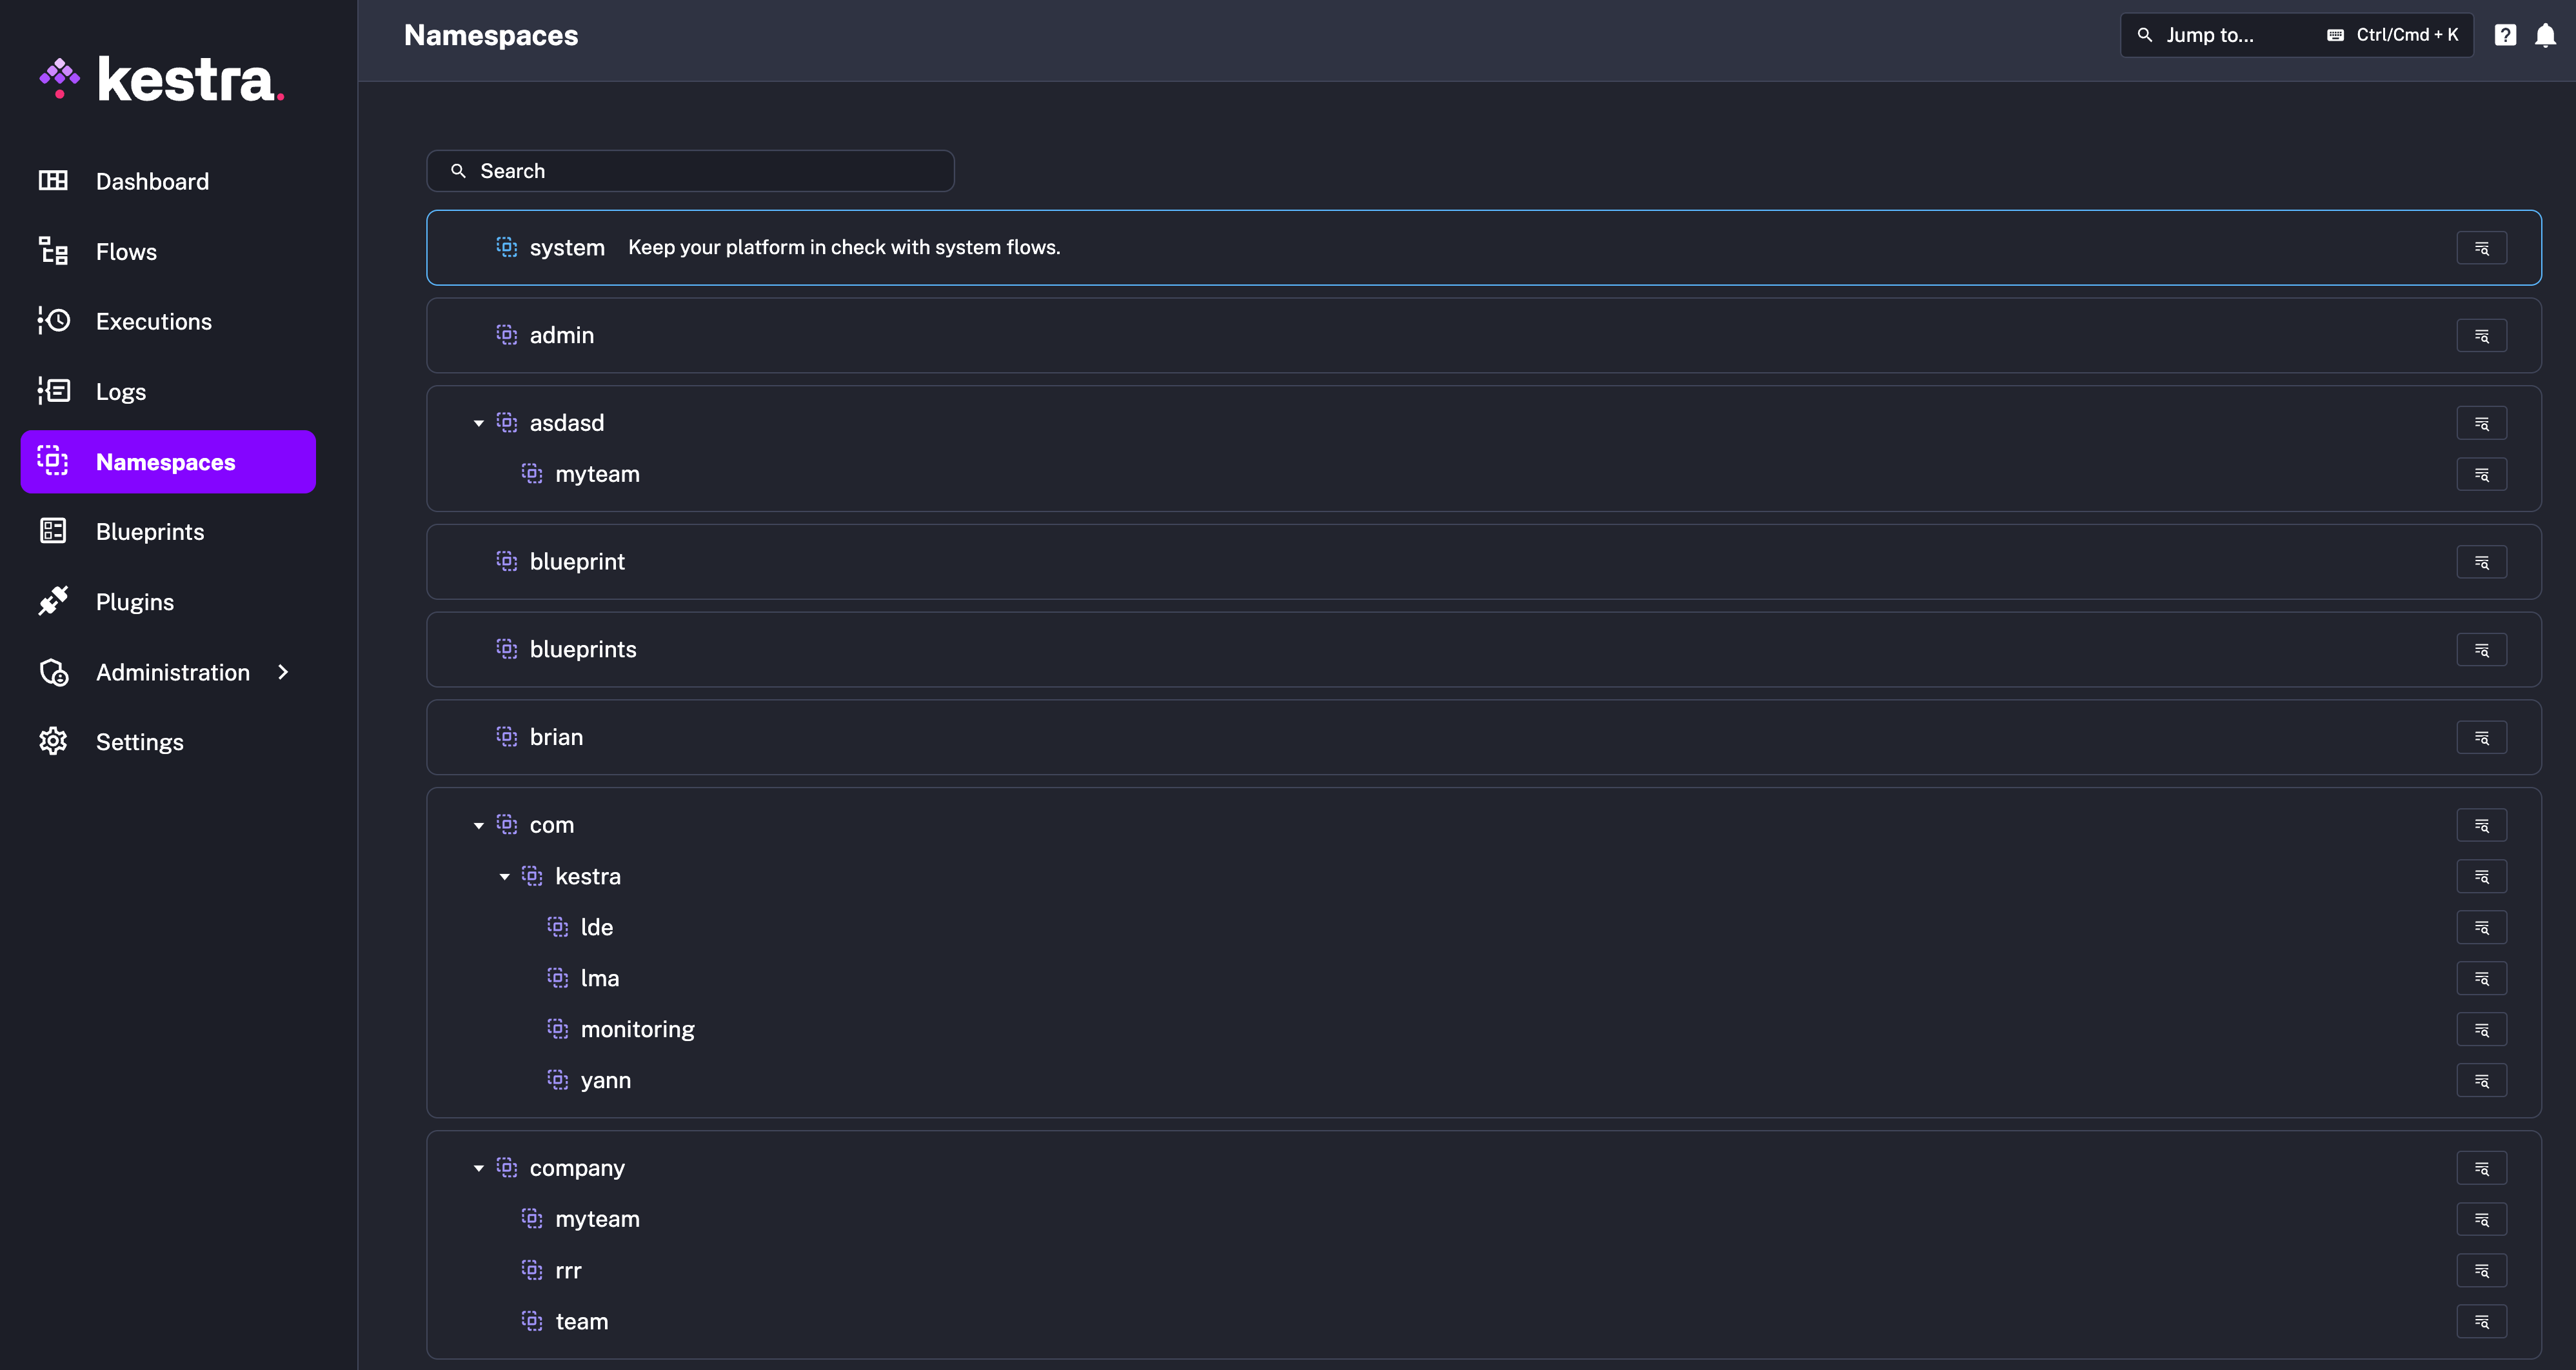
Here, you’ll find the System Blueprints tab, which provides fully customizable templates tagged for system use. You can modify these templates to suit your organization’s needs.
Video version:
Keep in mind that System Flows are not restricted to System Blueprints — any valid Kestra flow can become a System Flow if it’s added to the system namespace.
System Flows are intentionally hidden from the main UI, appearing only in the system namespace. The Dashboard, Flows, and Executions pages now offer a multi-select filter with options for User (default) and System (visible by default only within the system namespace). This makes it easy to toggle between user-facing workflows and background system flows and their executions, or view both simultaneously.
In terms of permissions, the system namespace is open by default. With the namespace-level RBAC functionality in the Enterprise Edition, you can restrict access to the system namespace only to Admins, while assigning company.* namespaces to your general user base.
The video below demonstrates how to set up System Flows:
You can now define inputs based on conditions, allowing one input to depend on another. This feature enables interactive workflows that adapt to prior user inputs, including approval workflows, dynamic resource provisioning, and many more.
To see it in action, first add the necessary JSON key-value pairs that will be used as selectable values in the conditional inputs:
id: add_kv_pairsnamespace: company.team
tasks: - id: access_permissions type: io.kestra.plugin.core.kv.Set key: "{{ task.id }}" kvType: JSON # 👈 New property value: | ["Admin", "Developer", "Editor", "Launcher", "Viewer"]id: add_kv_pairsnamespace: company.team
tasks: - id: access_permissions type: io.kestra.plugin.core.kv.Set key: "{{ task.id }}" kvType: JSON value: | ["Admin", "Developer", "Editor", "Launcher", "Viewer"]
- id: saas_applications type: io.kestra.plugin.core.kv.Set key: "{{ task.id }}" kvType: JSON value: | ["Slack", "Notion", "HubSpot", "GitHub", "Jira"]
- id: development_tools type: io.kestra.plugin.core.kv.Set key: "{{ task.id }}" kvType: JSON value: | ["Cursor", "IntelliJ IDEA", "PyCharm Professional", "Datagrip"]
- id: cloud_vms type: io.kestra.plugin.core.kv.Set key: "{{ task.id }}" kvType: JSON value: | { "AWS": ["t2.micro", "t2.small", "t2.medium", "t2.large"], "GCP": ["f1-micro", "g1-small", "n1-standard-1", "n1-standard-2"], "Azure": ["Standard_B1s", "Standard_B1ms", "Standard_B2s", "Standard_B2ms"] }
- id: cloud_regions type: io.kestra.plugin.core.kv.Set key: "{{ task.id }}" kvType: JSON value: | { "AWS": ["us-east-1", "us-west-1", "us-west-2", "eu-west-1"], "GCP": ["us-central1", "us-east1", "us-west1", "europe-west1"], "Azure": ["eastus", "westus", "centralus", "northcentralus"] }Did you notice the new kvType property in the io.kestra.plugin.core.kv.Set task? This new property allows you to specify the type of the key-value pair, which is an Enum that can be set to one of the following: BOOLEAN, DATE, DATETIME, DURATION, JSON, NUMBER, STRING. Storing strongly typed KV pairs like JSON objects or arrays allows you to dynamically retrieve those as SELECT or MULTISELECT values in your conditional inputs.
We can now create a flow with conditional inputs that will reference the key-value pairs we’ve just configured:
id: request_resourcesnamespace: company.team
inputs:  - id: resource_type    displayName: Resource Type # 👈 New property allowing to set a friendly name    type: SELECT    required: true    values:      - Access permissions      - SaaS application      - Development tool      - Cloud VM
  - id: access_permissions    displayName: Access Permissions    type: SELECT    expression: "{{ kv('access_permissions') }}"    allowCustomValue: true    dependsOn: # 👈 New property enabling conditional inputs      inputs:        - resource_type      condition: "{{ inputs.resource_type equals 'Access permissions' }}"
# 👇 Expand the field below for a full exampleid: request_resourcesnamespace: company.team
inputs: - id: resource_type displayName: Resource Type type: SELECT required: true values: - Access permissions - SaaS application - Development tool - Cloud VM
- id: access_permissions displayName: Access Permissions type: SELECT expression: "{{ kv('access_permissions') }}" allowCustomValue: true dependsOn: inputs: - resource_type condition: "{{ inputs.resource_type equals 'Access permissions' }}"
- id: saas_applications displayName: SaaS Application type: MULTISELECT expression: "{{ kv('saas_applications') }}" allowCustomValue: true dependsOn: inputs: - resource_type condition: "{{ inputs.resource_type equals 'SaaS application' }}"
- id: development_tools displayName: Development Tool type: SELECT expression: "{{ kv('development_tools') }}" allowCustomValue: true dependsOn: inputs: - resource_type condition: "{{ inputs.resource_type equals 'Development tool' }}"
- id: cloud_provider displayName: Cloud Provider type: SELECT values: - AWS - GCP - Azure dependsOn: inputs: - resource_type condition: "{{ inputs.resource_type equals 'Cloud VM' }}"
- id: cloud_vms displayName: Cloud VM type: SELECT expression: "{{ kv('cloud_vms')[inputs.cloud_provider] }}" allowCustomValue: true dependsOn: inputs: - resource_type - cloud_provider condition: "{{ inputs.resource_type equals 'Cloud VM' }}"
- id: region displayName: Cloud Region type: SELECT expression: "{{ kv('cloud_regions')[inputs.cloud_provider] }}" dependsOn: inputs: - resource_type - cloud_provider - cloud_vms condition: "{{ inputs.resource_type equals 'Cloud VM' }}"
variables: slack_message: | Validate resource request. To approve the request, click on the Resume button here http://localhost:28080/ui/executions/{{flow.namespace}}/{{flow.id}}/{{execution.id}}.
tasks: - id: send_approval_request type: io.kestra.plugin.slack.notifications.SlackIncomingWebhook url: https://kestra.io/api/mock payload: | { "channel": "#devops", "text": {{ render(vars.slack_message) | json }} }
- id: wait_for_approval type: io.kestra.plugin.core.flow.Pause onResume: - id: approved description: Whether to approve the request type: BOOLEAN defaults: true
- id: comment description: Extra comments about the provisioned resources type: STRING defaults: All requested resources are approved
- id: approve type: io.kestra.plugin.core.http.Request uri: https://kestra.io/api/mock method: POST contentType: application/json body: "{{ inputs }}"
- id: log type: io.kestra.plugin.core.log.Log message: | Status of the request {{ outputs.wait_for_approval.onResume.comment }}. Process finished with {{ outputs.approve.body }}.The above flow demonstrates how the dependsOn property allows you to set up a chain of dependencies, where one input depends on other inputs or conditions. In this example, the access_permissions, saas_applications, development_tools, and cloud_vms inputs are conditionally displayed based on the resource_type input value.
Conditional inputs enable interactive workflows that adapt to prior user inputs, incl. approval workflows, dynamic resource provisioning, and many more.
You might also notice a new allowCustomValue boolean property that, if set to true, allows users to enter custom values when the predefined ones don’t fit their needs. This enables you to provide a list of default values but still (optionally) allow users to enter custom ones.
A final addition to the input types is the new YAML type, which allows users to input YAML-formatted data directly in the UI. This new type is especially handy when you orchestrate applications that require YAML input such as Kubernetes manifests or configuration files.
For each Kestra execution, you can filter logs by specific levels, such as WARN or ERROR. However, this alone doesn’t give you the full context needed for troubleshooting. For instance, seeing only a WARN-level log in isolation, without the surrounding logs (before and after), may not provide the full picture to trace the root cause of an issue.
Kestra 0.19.0 makes logs view context-aware — you can see all log levels while still being able to jump directly to the next TRACE, DEBUG, INFO, WARN, or ERROR logs.
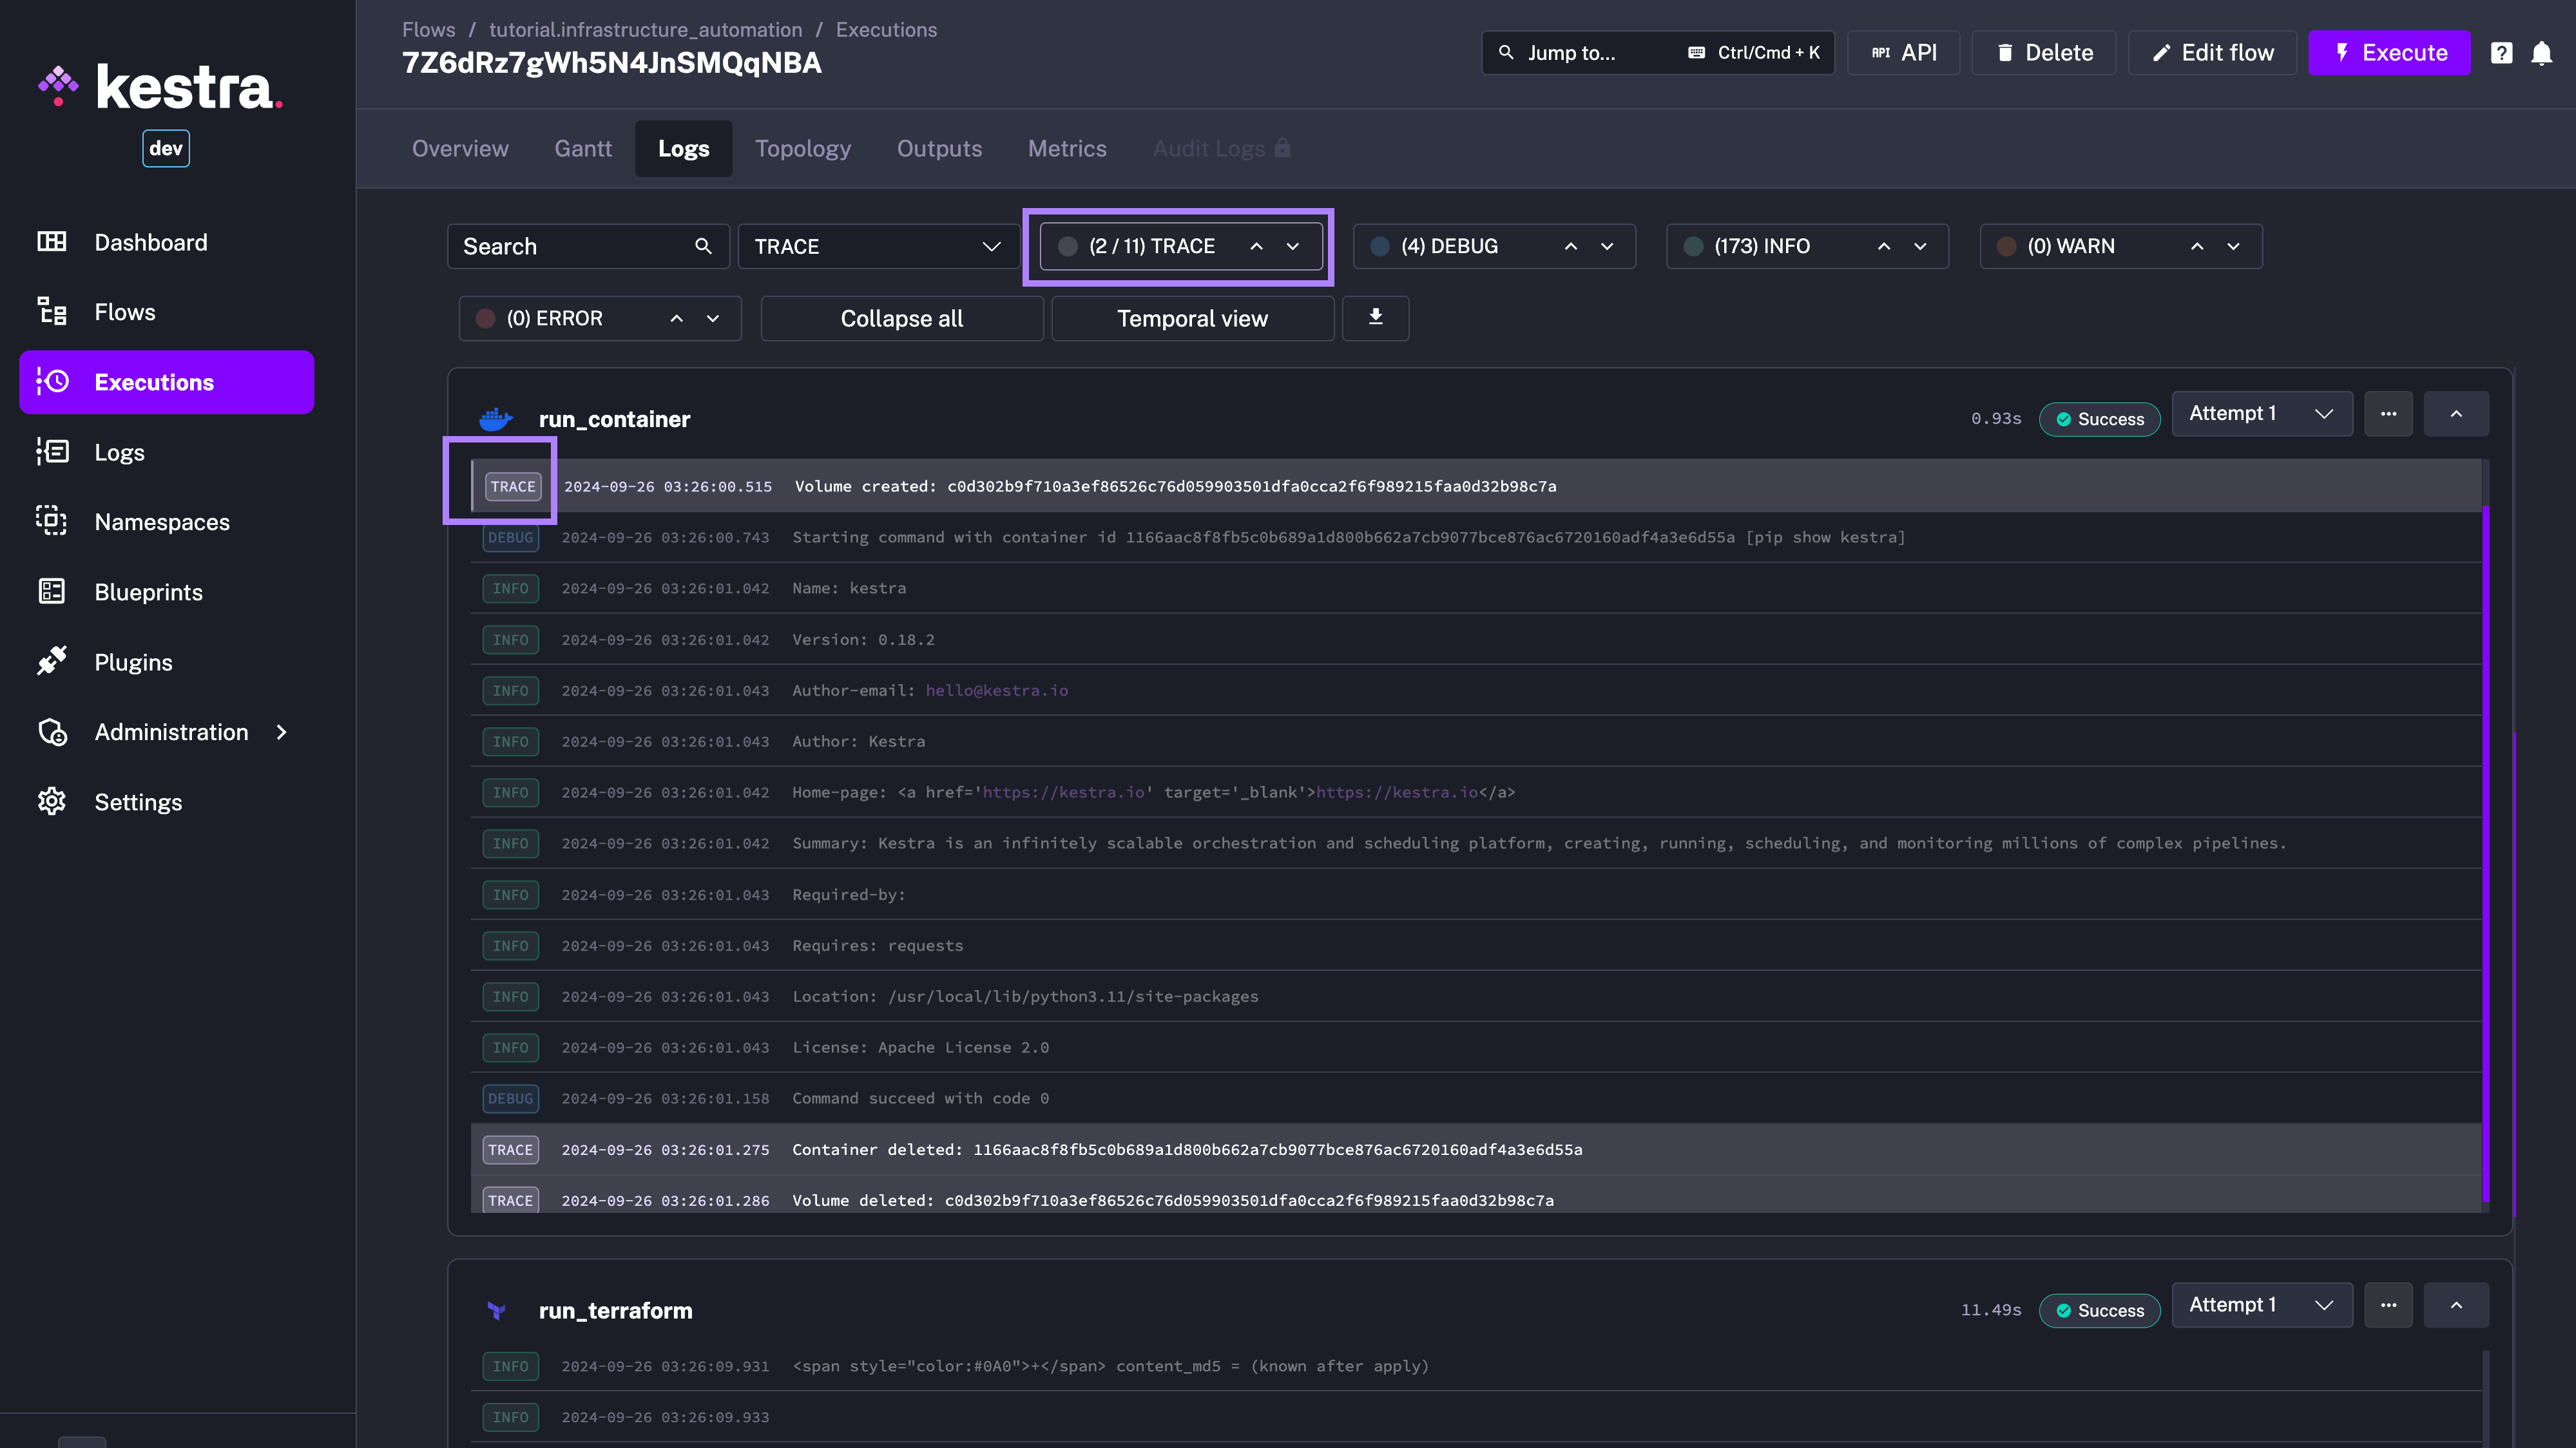
Using the new log-level navigation, you can quickly jump to the next log of a specific level while having the full context at your fingertips. With that additional context, it’s easier to understand what led up to an issue and what followed, simplifying troubleshooting.
See the video below for a quick demo of the new feature:
Additional log enhancements worth mentioning:
logToFile core property available on all tasks. This feature is particularly useful for tasks that produce a large amount of logs that would otherwise take up too much space in the database. The same property can be set on triggers.We’re thrilled to introduce versioned docs and blueprints built directly into the UI. This change addresses one of the biggest pain points users have faced: the lack of version-specific documentation and examples.
Until now, the documentation and blueprints were served on the website for the latest version of Kestra. As a result, if you were on an older version, some documentation and blueprints might have been overwritten by a new syntax or showing functionality that wasn’t available in your version.
From v0.19.0 on, Kestra dynamically fetches the correct documentation and blueprints based on the Kestra version you’re using. This is handled through new API endpoints pulling the relevant content when needed.
Note that the documentation you see on the website always reflects the latest stable release. However, when you’re working in the app, you’ll see documentation and blueprint examples for your Kestra version. We deliberately decided not to introduce versioning on the website for now to avoid confusion when you accidentally stumble upon docs for an older version, which often results in broken links and annoying banners constantly reminding you to switch to the latest version when browsing the documentation for an older version.
Overall, we believe that the best documentation is the one you don’t have to read. The second best is one that is always up-to-date and relevant to your current environment, and resurfaced when you need it. With this new feature, we aim to serve you the right documentation at the right time, making it easier to understand and use Kestra.
In the future, we plan to display the documentation pages next to the UI elements they describe. For example, you’ll be able to easily access the documentation for KV Store right when you access the KV Store UI tab.
With the release of Kestra 0.19.0, there’s an important change you should be aware of before upgrading. To support enhanced security features like authentication, backup & restore, and JWT signatures for refresh tokens, you’ll need to set an encryption key in your Kestra configuration.
This configuration step is critical to ensure that Kestra EE operates correctly after the upgrade. If you’re already using SECRET-type inputs, your encryption key should be in place, but if not, here’s what you need to add to your application.yaml:
kestra: encryption: secretKey: BASE64_ENCODED_STRING_OF_32_CHARCTERS # ✅ mandatory!The key needs to be at least 32 ASCII characters long (256 bits), so don’t forget to replace BASE64_ENCODED_STRING_OF_32_CHARCTERS with a secure, base64-encoded custom value. While this key never expires, the refresh token it signs is valid for 30 days, similar to a JWT token with a default 1-hour lifetime.
For more details, see the Configuration article.
If you want to use a separate secret for your JWT refresh token signature, you can optionally customize that as follows:
micronaut: security: token: jwt: signatures: secret: generator: secret: "${JWT_GENERATOR_SIGNATURE_SECRET:pleaseChangeThisSecret}" # ✅ optionalIn case you ever need to revoke a refresh token, it’s easy to do with a simple DELETE request to /users/{id}/refresh-token — this can be useful in emergency situations, e.g., when you suspect your computer has been compromised.
As always, if you have any questions or run into issues during the upgrade, our support team is here to help — just reach out via the Customer Portal or through your dedicated Slack channel.
The above mentioned breaking change addresses an issue where users were logged out due to session timeouts, even while they were still active. Previously, Kestra would log users out based on a fixed interval (for security reasons). If this happened during flow editing, it could result in unsaved changes and an unexpected logout.
With the new mechanism introduced in this release, Kestra now automatically refreshes your auth token or session cookie if you’re still active. If the token is close to expiring, Kestra silently refreshes it in the background. This small but critical change ensures your session stays alive while you’re working, without any interruptions.
Starting from version 0.19.0, Kestra Enterprise Edition introduces the ability to back up and restore metadata, making it easy to safeguard everything you’ve configured in the platform and move that configuration across different environments. Whether you’re migrating to another Kestra version or switching backends, this feature provides flexibility and peace of mind. By default, all backups are encrypted using Kestra’s built-in encryption key.
To back up your Kestra instance, simply run the following command:
kestra backups create FULL # or TENANTRestoring your instance is just as straightforward. Use the URI generated during the backup process to restore metadata with this command:
kestra backups restore kestra:///backups/full/backup-20241001163000.kestraWhen the restore process completes, Kestra provides a detailed summary, showing the number of items restored, ensuring you have full visibility into the process. Read more about the Backup & Restore feature in our documentation.
Enterprise Edition introduces a dedicated Worker Groups UI page. This feature ensures that worker groups are created before being used in flows, preventing runtime issues caused by a misconfigured workerGroup.key property.
Using an invalid worker group key in a task leads to task runs being stuck in a CREATED state. Some users experienced this when they mistakenly set an incorrect worker group key. Until now, there was no early detection of the problem while writing the flow, which only surfaced at runtime.
With the new Worker Groups UI page, worker groups are now treated as API-first objects — they must be created first from the UI, API, CLI, or Terraform before being used in flows. This ensures that worker group keys are valid and exist before they are referenced in tasks.
Check the Worker Group documentation to learn how to create and manage worker groups.
In short, this new feature improves the way worker groups are managed, reducing the risk of misconfigured flows and providing better visibility into workers’ health.
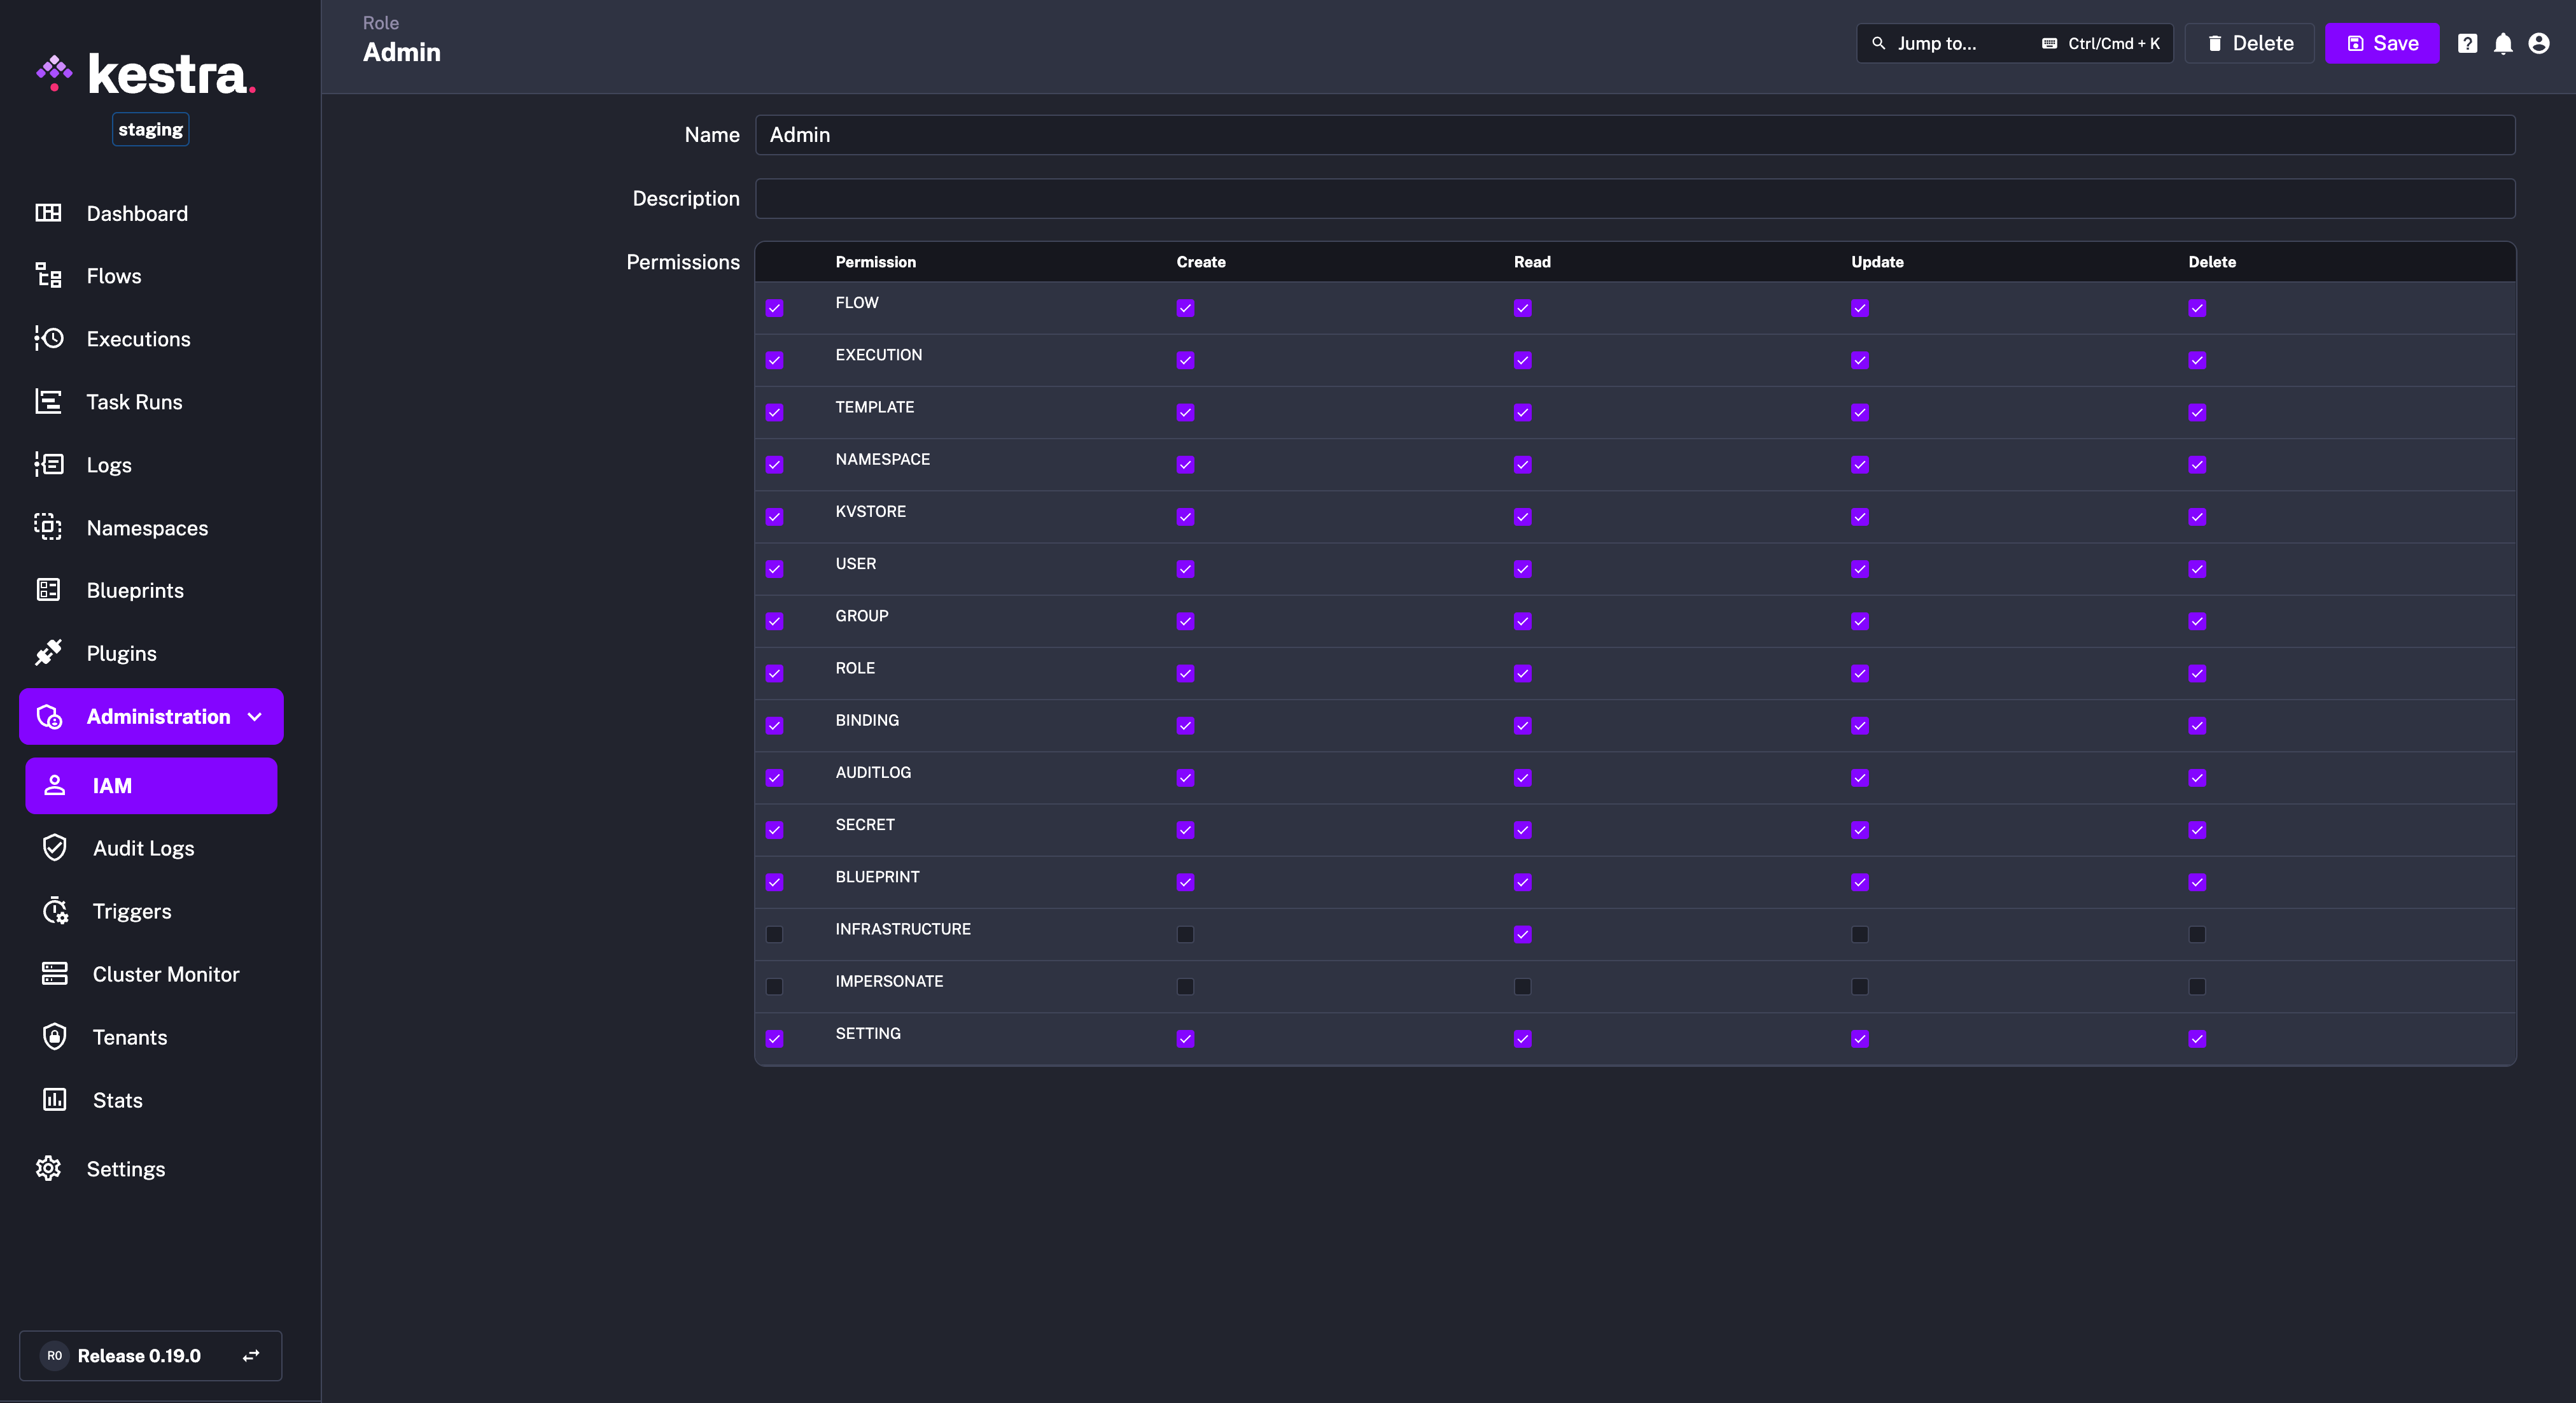
This release also adds Managed Roles, a set of read-only roles that are fully managed by Kestra. These roles — Admin, Editor, Launcher, Developer, and Viewer — are designed to simplify permission management, ensuring that users automatically receive the necessary permissions for new features without manual updates.
How Managed Roles Work: Managed Roles cannot be edited or customized. When users attempt to add or remove permissions from these roles, a friendly error message will appear: “Managed roles are read-only. Create a custom role if you need fine-grained permissions.”
One of the key advantages of Managed Roles is that they stay up to date automatically. When Kestra adds new features, such as KV Store, users with Managed Roles (like Admins) will automatically have the appropriate permissions to access these new capabilities. This removes the need for admins to manually update permissions for each new feature.
If more granular control is needed, you can still create custom roles tailored to specific requirements. For most users, Managed Roles provide a convenient, hands-off approach to role and permission management, ensuring access to all new features without any extra work.
Note that Managed Roles are not the same as Default Roles. A default role is a role that will be assigned by default to every new user joining your instance, which is useful for users automatically created via SSO. Managed Roles, on the other hand, are predefined roles that cannot be edited or customized. You can assign a Managed Role as a Default Role. In this release, we’ve enhanced the Default Role configuration to include an optional tenantId allowing you to restrict the default role access only to a specific tenant when needed (e.g., development, staging, production).
The previous permissions dropdown was a bit tedious, requiring you to manually select each permission and its corresponding actions in order to configure a role.
Kestra 0.19 introduces a more convenient view for permissions management to simplify selecting the required permissions without having to manually click through every dropdown element. This new view allows you to:
FLOWSCREATE, READ, UPDATE, DELETE).In short, the new permissions view eliminates tedious clicks needed to configure roles.
This release also adds a Password Reset functionality to the Enterprise Edition, allowing users to get an email link to reset a password directly from the login page.
Note that you’ll only see the “Forgot password” option if the email server is configured on your instance.
Here’s how you can configure the email server in your application.yaml file:
kestra: mailService: host: String port: Number username: String password: String from: String starttlsEnable: Boolean auth: StringOn the User detail page, users with basic authentication and an email set have the option to reset their password.

The Enterprise Edition of Kestra generates an audit log for every action taken on the platform. While these logs are essential for tracking changes and ensuring compliance, they can accumulate over time and take up significant space in the database.
We’ve added a new task called PurgeAuditLogs, which helps you manage the growing number of audit logs by removing those that are no longer needed.
You can set a date range for the logs you want to delete, choose a specific namespace, and even filter by permissions or actions (like CREATE, READ, UPDATE, DELETE). This task gives you a simple way to implement an Audit Logs retention policy that fits your organization’s needs.
For example, to purge logs older than one month, you can add the following System Flow:
id: audit_log_cleanupnamespace: systemtasks: - id: purge_audit_logs type: io.kestra.plugin.ee.core.log.PurgeAuditLogs endDate: "{{ now() | dateAdd(-1, 'MONTHS') }}"Combining the System Flows functionality with the new PurgeAuditLogs task provides a simple yet powerful way to manage your audit logs, ensuring you keep them as long as you need to stay compliant while keeping your database clean and performant.
This release comes with several useful improvements across our plugin ecosystem.
First, we’ve simplified our JDBC tasks and triggers by introducing a single fetchType property, cleaning up what used to be a confusing set of options like store, fetch, and fetchOne.
For those working with Apache Airflow or gradually migrating away from it, you can now orchestrate Airflow DAGs directly from Kestra. Similarly, Azure Data Factory pipelines can now be triggered from within a new Azure plugin, allowing better integration with your Azure workflows.
On the Google Cloud front, we’ve added the ability to create and delete Dataproc clusters with our new GCP plugin.
We’ve also introduced a few new plugins for popular open-source technologies:
For Java enthusiasts, the JBang plugin now lets you run JBang scripts directly from Kestra with support for Java, JShell, Kotlin, and Groovy.
We’ve also added a new Excel plugin to read from and write to multiple sheets, making it easier to export data from multiple sources into a single Excel file that can be used by business stakeholders.
The SSH Command plugin has been updated to support OpenSSH config authentication.
Starting from Kestra 0.19.0, you can schedule any flow to run at a specific date and time in the future. You can configure that directly using the Advanced configuration option in the Execute modal.
You can type the desired date directly, or use the date picker and click on the Execute button.
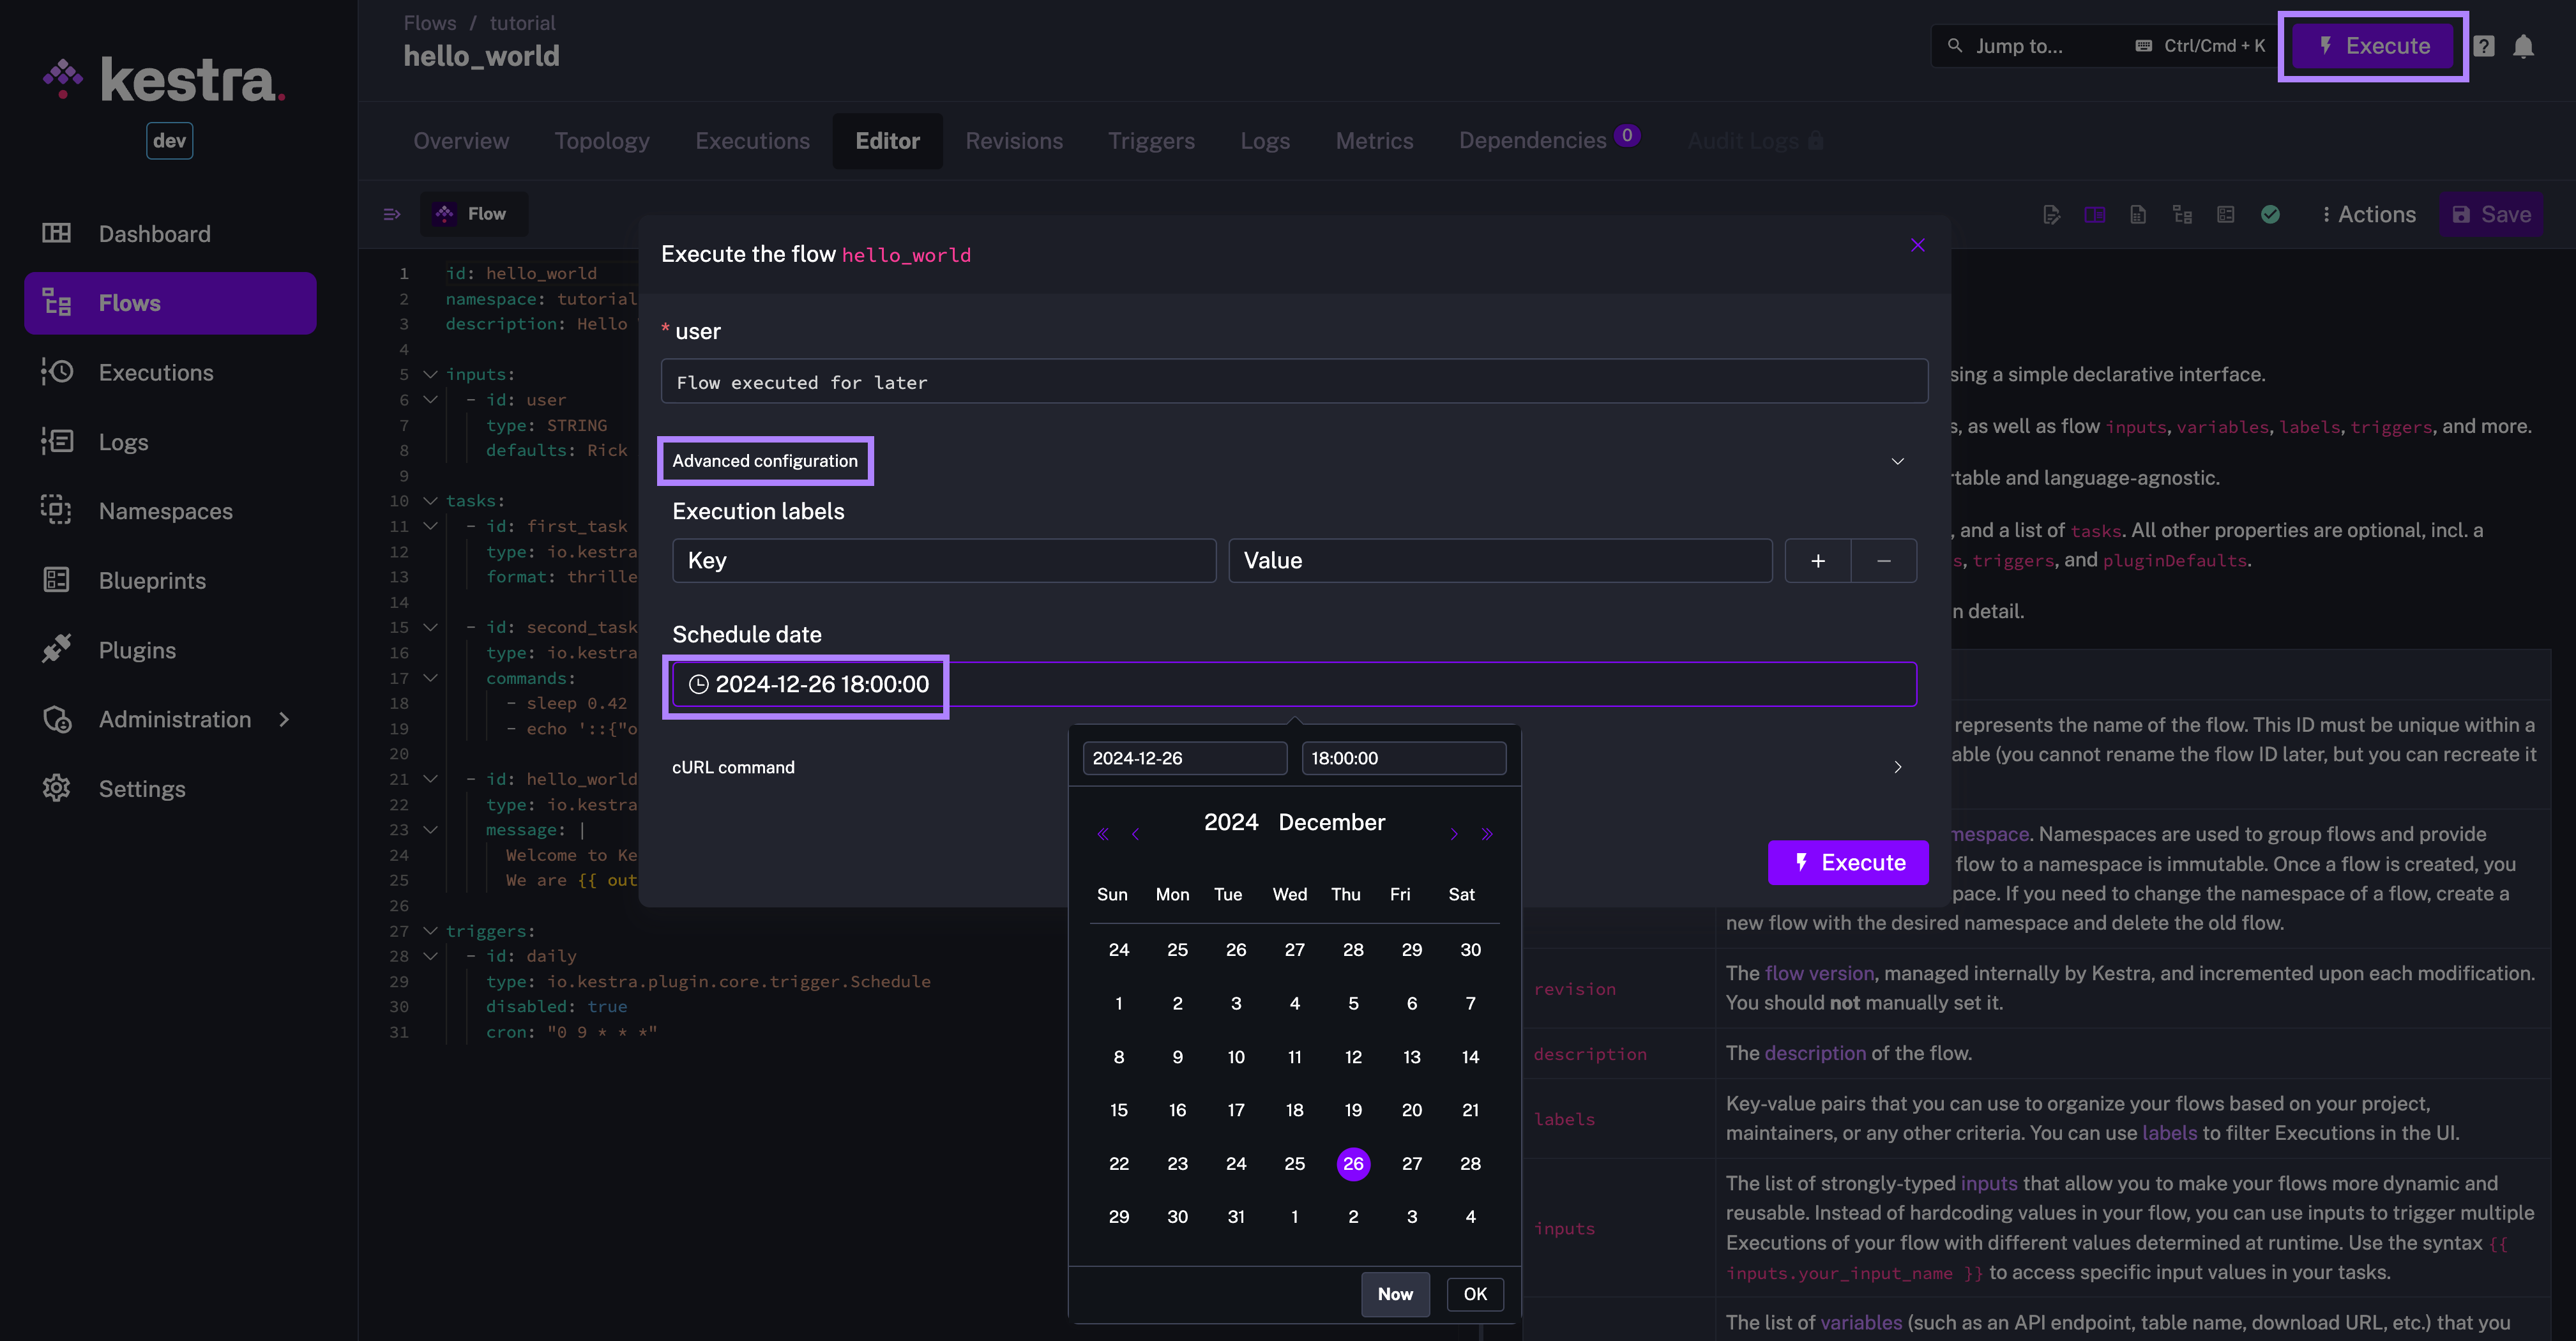
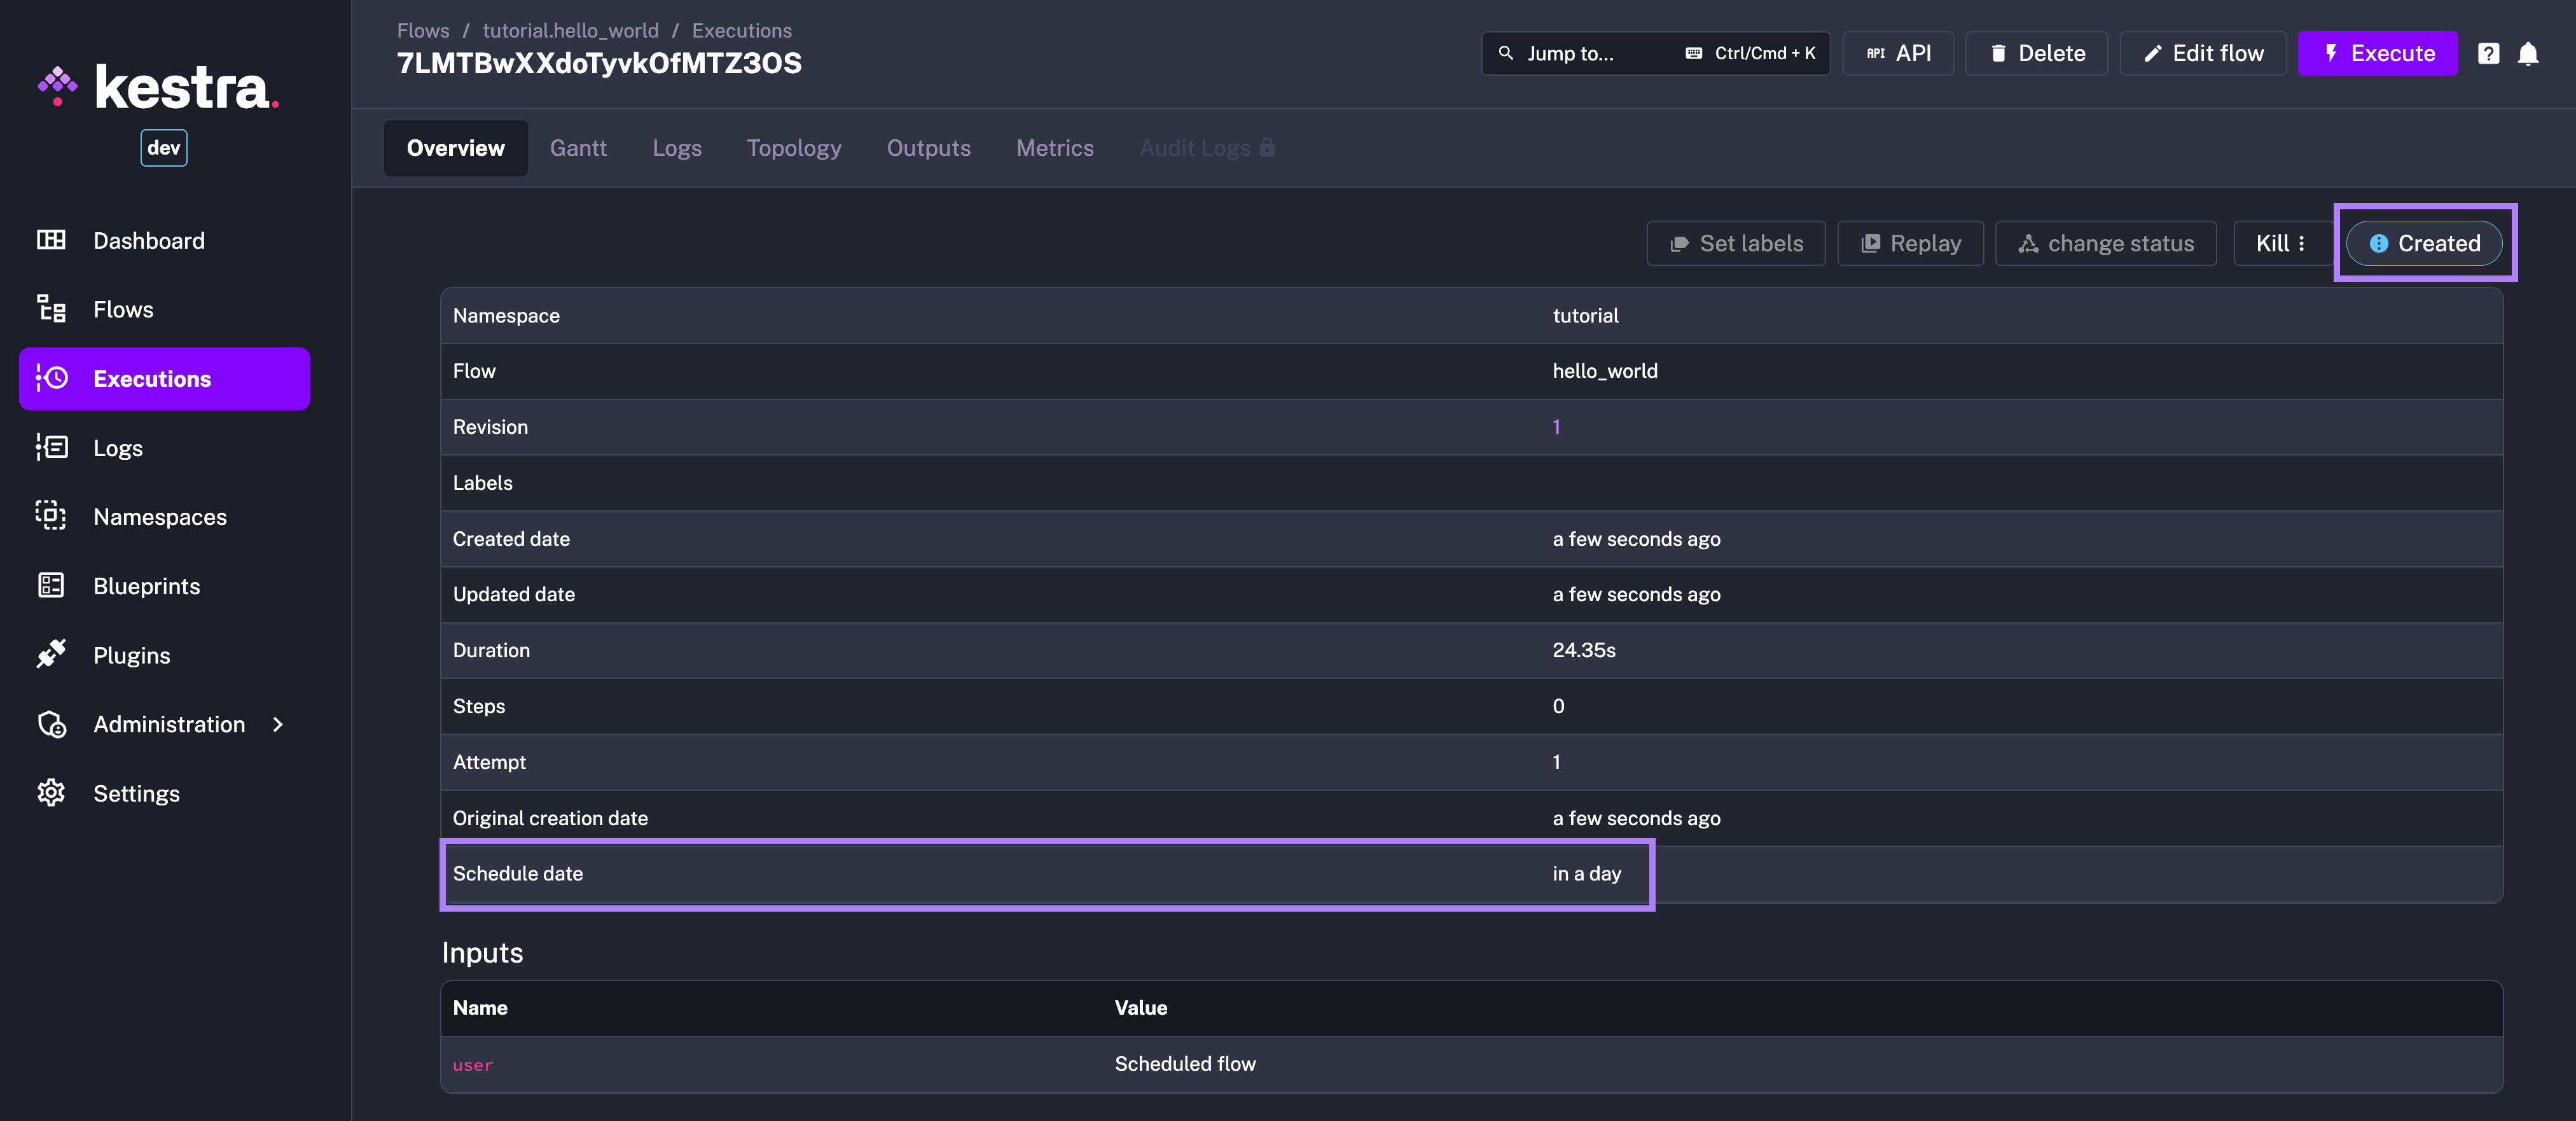
That execution will be shown in the CREATED state and will only move into the RUNNING state at the scheduled date. You can see the scheduled date in the created Execution’s Overview page:
If you prefer a programmatic approach, you can also schedule execution for later using one of the following methods:
scheduleDate property of the Subflow taskScheduleOnDates trigger.The API call would look as follows:
curl -v -X POST -H 'Content-Type: multipart/form-data' \ -F 'user=Scheduled Flow' \ 'http://localhost:28080/api/v1/executions/tutorial/hello_world?scheduleDate=2024-10-04T14:00:00.000000%2B02:00'Note that the time zone offset like +02:00 in the date 2024-12-24T17:00:00+02:00 needs to be URL-encoded. In URLs, the + sign is interpreted as a space, so it must be encoded as %2B. Therefore, the +02:00 time zone offset would be URL-encoded as %2B02:00 when passing the date and time in a URL.
Here is how the Subflow task would look:
id: parentnamespace: company.team
tasks:  - id: subflow    type: io.kestra.plugin.core.flow.Subflow    namespace: company.team    flowId: myflow    scheduleDate: "{{now() | dateAdd(1, 'MINUTES')}}"    wait: false
  - id: next_task    type: io.kestra.plugin.core.log.Log    message: Next task after the subflow
Assuming this child flow myflow is a long-running flow, the parent flow will not wait for it to finish (due to wait: false) and will continue executing other tasks. This is particularly useful when you want to schedule the subflow to run in the background when the right time comes and continue with other tasks in the parent flow.
id: myflownamespace: company.teamtasks: - id: sleep type: io.kestra.plugin.scripts.shell.Commands commands: - sleep 90 taskRunner: type: io.kestra.plugin.core.runner.ProcessThe scheduled execution will be CREATED, and will transition into the RUNNING state at the scheduleDate — you can inspect all details including that scheduled date from the Overview page of that Execution.
If you have multiple dates to schedule, you can combine the Subflow task with the ForEach task to create multiple scheduled executions in the future — useful especially if the dates are retrieved from an external source or calculated based on some internal business logic — see the example below.
id: schedule_subflowsnamespace: company.team
tasks:  - id: generate_dates    type: io.kestra.plugin.scripts.python.Script    beforeCommands:      - pip install pytz    script: |      from datetime import datetime, timedelta      import pytz      import random      from kestra import Kestra
      def generate_random_date():          start = datetime.now()          end = start + timedelta(weeks=1)
          random_date = start + (end - start) * random.random()          timezone = pytz.FixedOffset(120)  # 120 minutes = 2 hours          random_date = random_date.astimezone(timezone)          return random_date.strftime("%Y-%m-%dT%H:%M:%S%z")
      execution_dates = sorted([generate_random_date() for _ in range(10)])      Kestra.outputs(dict(execution_dates=execution_dates))
- id: each type: io.kestra.plugin.core.flow.ForEach values: "{{ outputs.generate_dates.vars.execution_dates }}" concurrencyLimit: 0 tasks: - id: subflow type: io.kestra.plugin.core.flow.Subflow namespace: company.team flowId: myflow scheduleDate: "{{ taskrun.value }}" wait: falseFinally, you can also use the new ScheduleOnDates trigger to start a flow at specific dates known ahead of time. This trigger is useful when you know the exact dates when you want to start the flow:
id: scheduled_atnamespace: company.team
tasks:  - id: print_date    type: io.kestra.plugin.core.log.Log    message: Hello at {{ trigger.date }}
triggers:  - id: schedule    type: io.kestra.plugin.core.trigger.ScheduleOnDates    timezone: Europe/Berlin    recoverMissedSchedules: LAST    dates:      - 2024-12-24T17:00:00+02:00 # Christmas Eve      - 2024-12-25T17:00:00+02:00 # Christmas Day      - 2024-12-31T17:00:00+02:00 # New Year's Eve      - 2025-01-01T17:00:00+02:00 # New Year's Day      - "{{now() | dateAdd(1, 'HOURS')}}"      - "{{now() | dateAdd(2, 'DAYS')}}"      - "{{now() | dateAdd(3, 'WEEKS')}}"      - "{{now() | dateAdd(4, 'MONTHS')}}"
We look forward to seeing what you will build with these new Schedule-for-later enhancements! Here’s how a community member reacted to this feature:
“This is a game changer for me. I have jobs that need to be run whose schedule time and date can only be derived as a delta from a specific event. This would allow me to calculate the runs for the week, and schedule the jobs that need to run!”
Let us know how you plan to use these scheduling enhancements to make your flows (literally) future-proof.
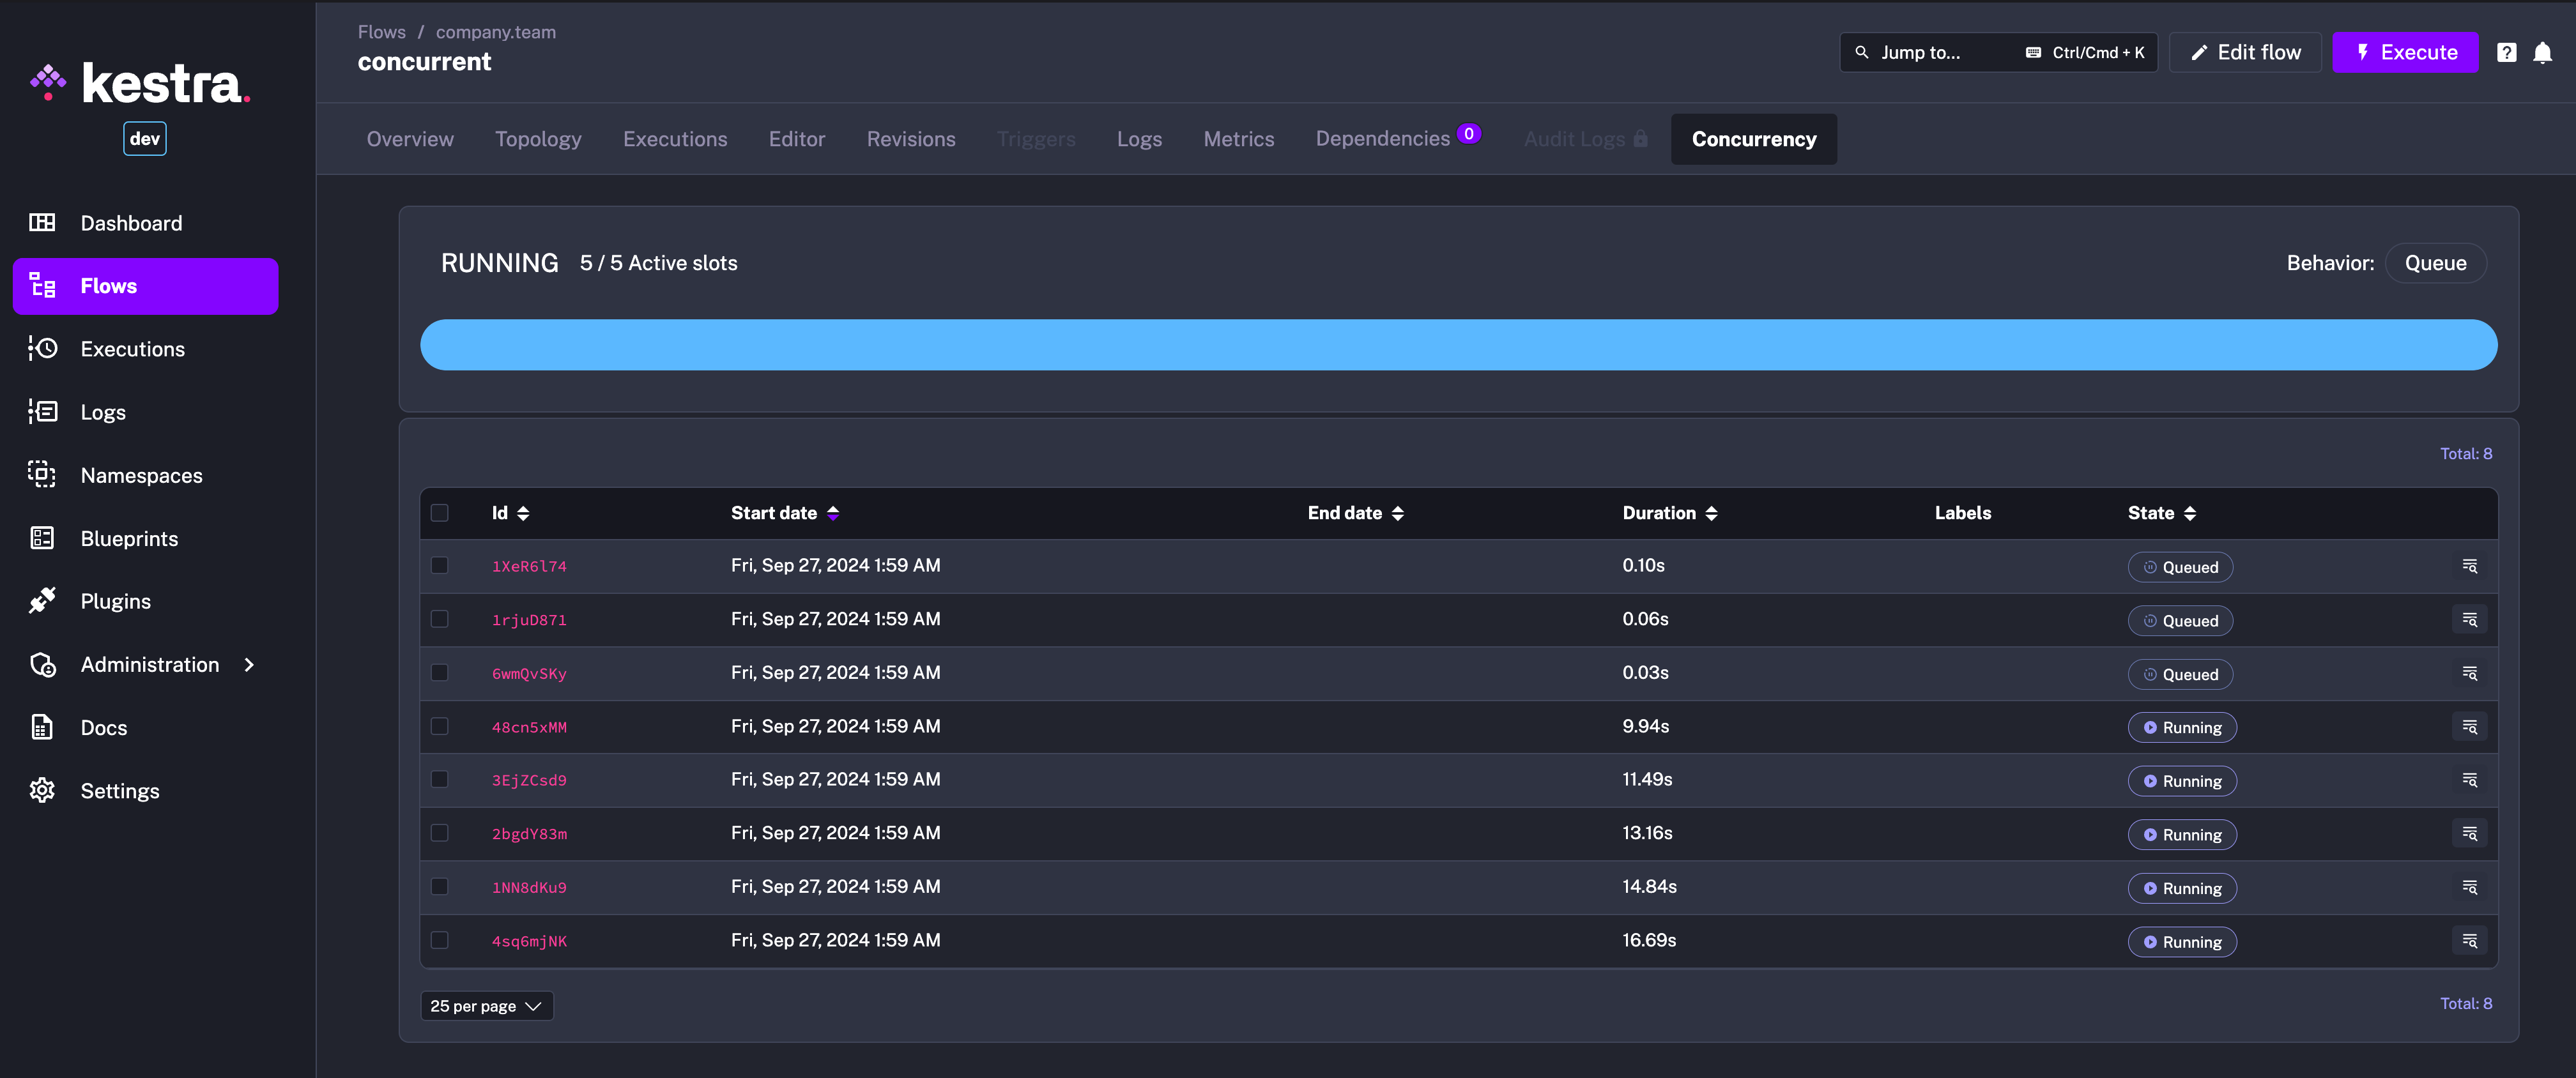
The new Concurrency tab in the Flow UI page allows you to track and troubleshoot concurrency issues. This new tab shows a progress bar with the number of active slots compared to the total number of slots available. Below that progress bar, you can see a table showing currently running and queued Executions, providing a clear overview of the flow’s concurrency status.
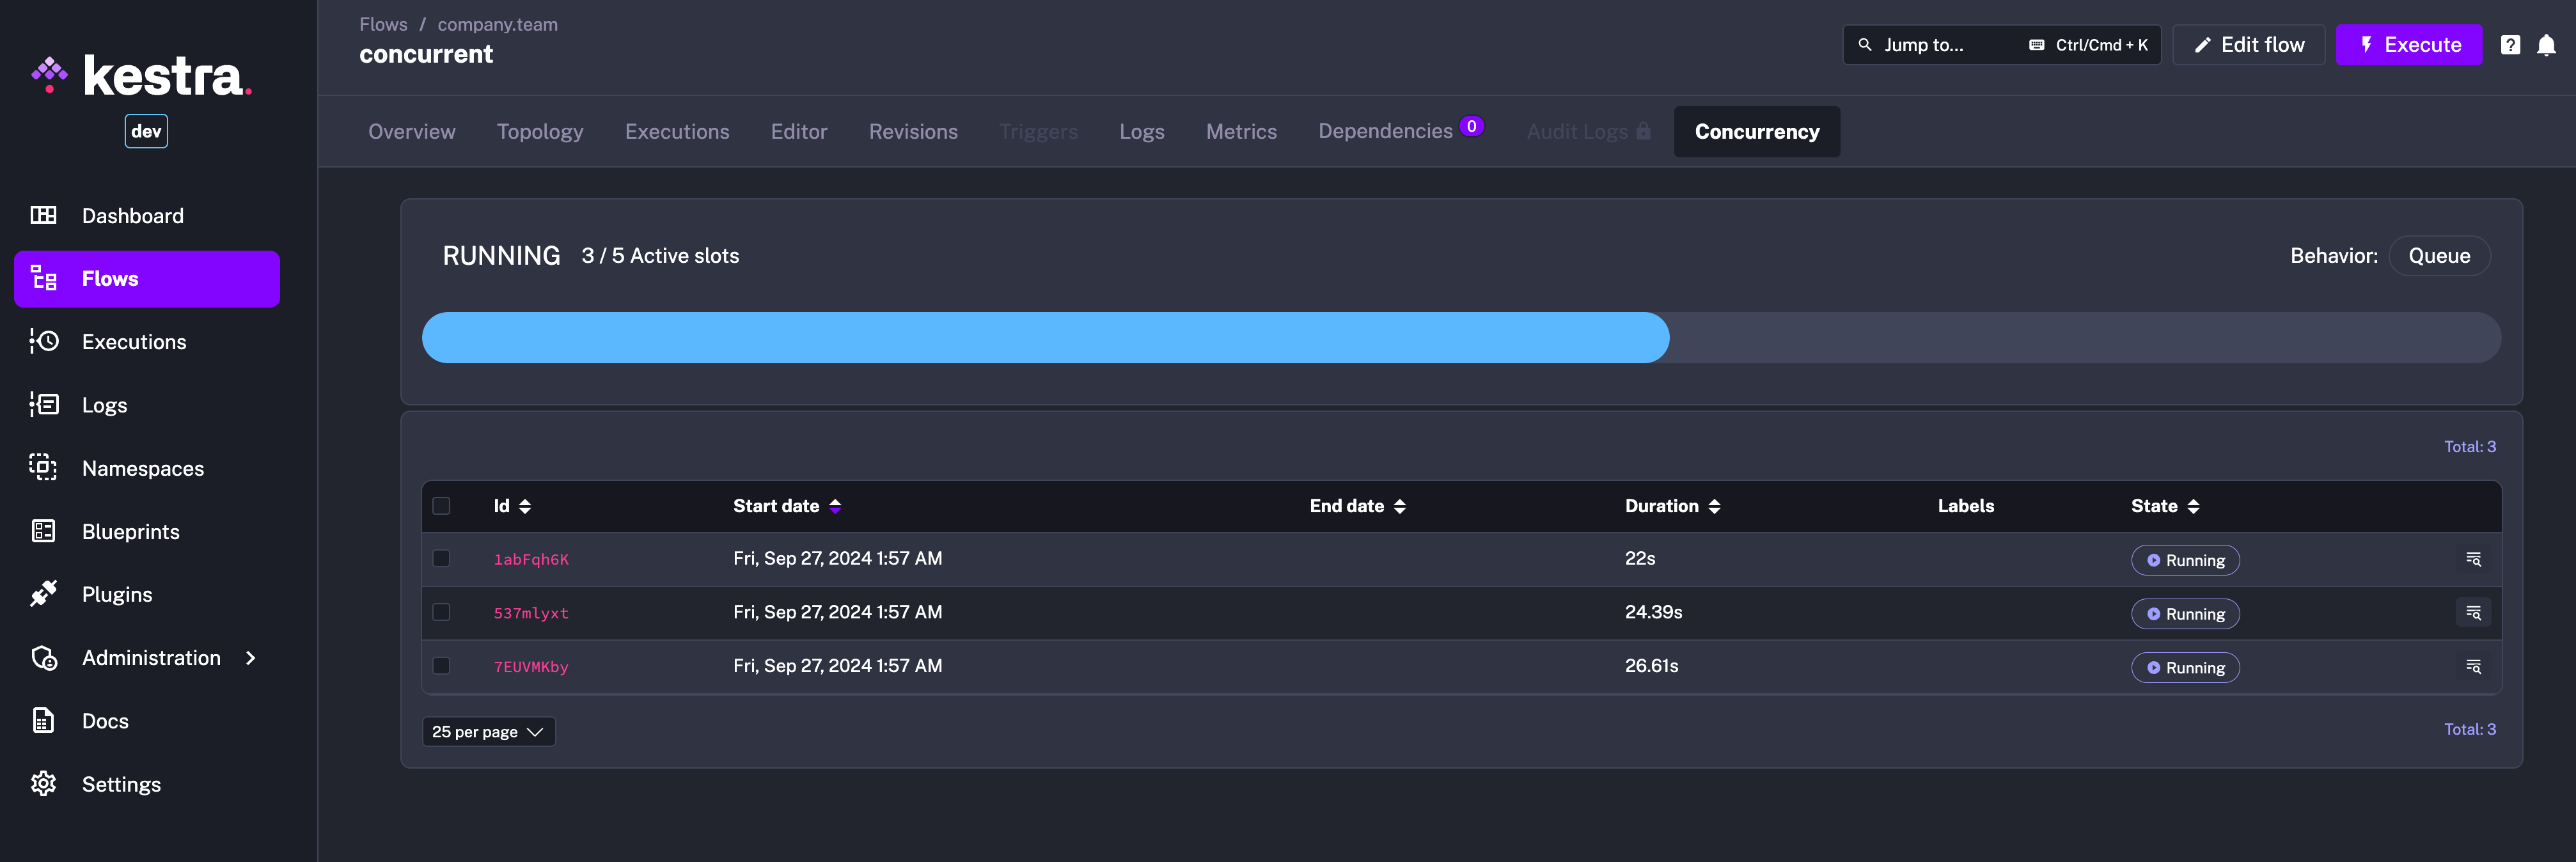
To see the concurrency behavior in action, you can configure a flow with a concurrency limit as follows:
id: concurrentnamespace: company.team
concurrency:  behavior: QUEUE  limit: 5
tasks:  - id: long_running_task    type: io.kestra.plugin.scripts.shell.Commands    commands:      - sleep 90    taskRunner:      type: io.kestra.plugin.core.runner.Process
Then trigger multiple Executions of that flow and watch the Concurrency tab showing the active slots and queued Executions.
The Executions endpoint now returns a URL allowing users to follow the Execution progress from the UI. This is particularly helpful for externally triggered long-running executions that require users to follow the workflow progress. Check the Executions documentation for a hands-on example.
{{trigger.uri}} and try to run the flow via the Execute button. This prevents accidental execution of flows that rely on data passed from external triggers."Message of size XXX has exceeded the configured limit of XXX".We’d like to thank all existing and new contributors who helped make this release possible. Your feedback, bug reports, and pull requests are invaluable to us.
In this release, we welcome a record number of new contributors. We’re thrilled to see the community growing and contributing to the project. Thank you for your time and effort in making Kestra better with each release.
If you want to contribute to Kestra, check out our Contributing Guide and a list of issues with the good first issue label. Join our Slack community to get help and guidance from the core team and other contributors.
This post covered new features and enhancements added in Kestra 0.19.0. Which of them are your favorites? What should we add next? Your feedback is always appreciated.
If you have any questions, reach out via Slack or open a GitHub issue.
If you like the project, give us a GitHub star ⭐️ and join the community.

Stay up to date with the latest features and changes to Kestra