
Authors
Shruti Mantri
Shruti Mantri
Airbyte is an open-source data integration platform designed to simplify the process of collecting, integrating, and moving data across various sources. This post demonstrates how we can integrate Airbyte using Kestra and perform operations on Airbyte using Kestra’s Airbyte plugin.
Airbyte, introduced in 2020, stands out as an open-source data integration platform known for its user-friendly interface and large community. Airbyte has hundreds of connectors for extracting, transforming, and loading data from various sources to destinations. This extensive library of pre-built connectors ensures flexibility and efficiency in managing data pipelines, catering to the diverse needs of both technical and non-technical users.
Airbyte also offers a fully managed product called Airbyte Cloud.
Kestra is a powerful tool for orchestrating business-critical operations and workflows. It helps you easily trigger your Airbyte syncs and track their status.
In this post, we will set up Airbyte and Kestra on two different AWS EC2 instances, create a new connection in Airbyte that will capture data from the RDS MySQL database, and sync it to an S3 bucket, use Kestra to invoke the Sync operation, and check the status of the Sync job. We can then go to the S3 bucket and confirm that the Kestra tasks indeed interacted with Airbyte and performed the requested sync.
To create an Airbyte cluster on an AWS EC2 machine, we will create an Amazon Linux OS-based EC2 machine. Make sure to use at least a “t2.medium” machine with 30GB of disk space. Once the machine is running, we will SSH into it and install Airbyte using docker-compose. Follow the Airbyte documentation page on AWS EC2 installation to get the Airbyte running on EC2.
Once Airbyte is running, you can go to the Security Group of your EC2 machine and edit the inbound rules to open port 8000 across all hosts using 0.0.0.0/0. You will now use the Airbyte cluster using your EC2 machine’s public IP address on port 8000. If you followed the instructions as is, airbyte and password would be your username and password, respectively, to log into the Airbyte UI.
Now, we will be creating the RDS MySQL instance. Go to the AWS RDS service, and create a new database. You can use the Standard Create option, choose MySQL engine and use any MySQL 8 version. You can choose the deployment options as per your preference. Then, you can proceed to provide an appropriate DB cluster name, master username and password. Select Yes for public access, as this helps us to easily connect to the database from any machine (we are not discussing the networking details in this blog that would be required in case the public access is disabled). The database will still be protected using the username and password. With all the settings in place, click on the button “Create Database”. The database will be provisioned in a few minutes.
Once the database is provisioned, you can use the RDS instance’s public endpoint, port, username and password to connect to the database. Let us connect to this database using any MySQL client like MySQL Workbench or DB Visualizer from your local machine. Once connected to the database, we will create a test database, an employees table in that database, and insert three rows into the table using the following commands:
CREATE database test;USE test;
CREATE TABLE employees (id int, first_name varchar(25), last_name varchar(25), city varchar(25));INSERT INTO employees values(1, "John", "Doe", "Seattle");INSERT INTO employees values(2, "Rita", "Thomas", "Houston");INSERT INTO employees values(3, "Ravi", "Singh", "Bengaluru");
We will be syncing this table onto S3 using Airbyte.
Create an S3 bucket with the name of your choice. In the bucket, create a folder airbyte, and within this folder, create a folder rds.
On the Airbyte homepage, click on “Create your first connection”. First, create the Source connection for which we will choose MySQL. Here, put in the appropriate DB host name, port, database, username and password. Select “Scan Changes with User Defined Cursor” option. This is how your connection settings should appear:
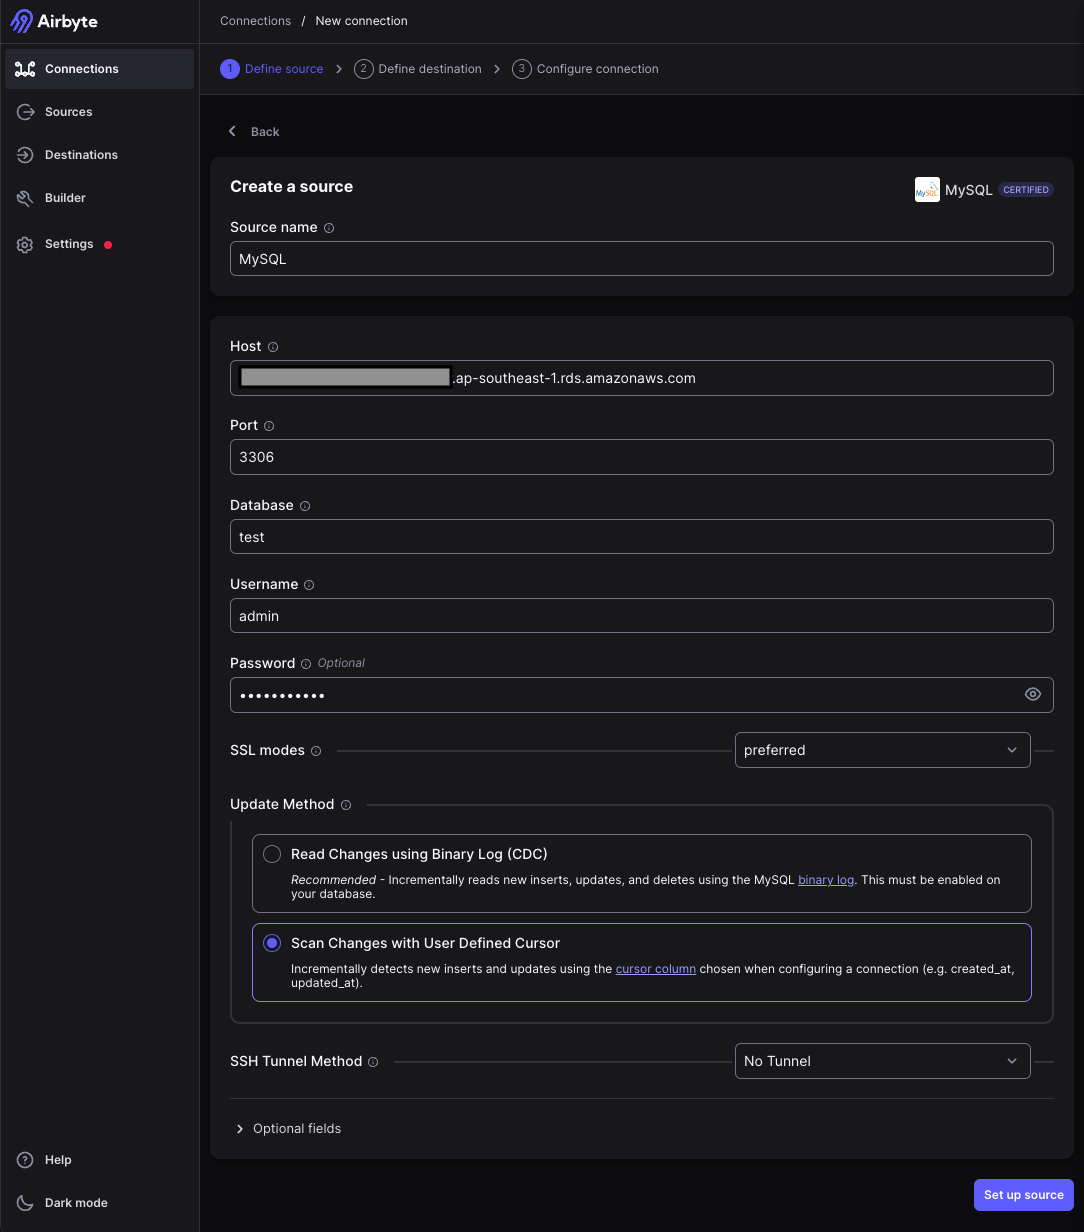
Now, click on the “Set up source” button, which will first test the connection, and if the connection is successful, proceed to the next page.
For the destination connection, select S3. You will have to provide the AWS access key, AWS secret key, bucket name, bucket region and the folder path within the bucket. For the rest of the form, you can leave the default to have the output format as CSV: Comma-Separated Values with no compression and no flattening. This is how your connection settings should appear:
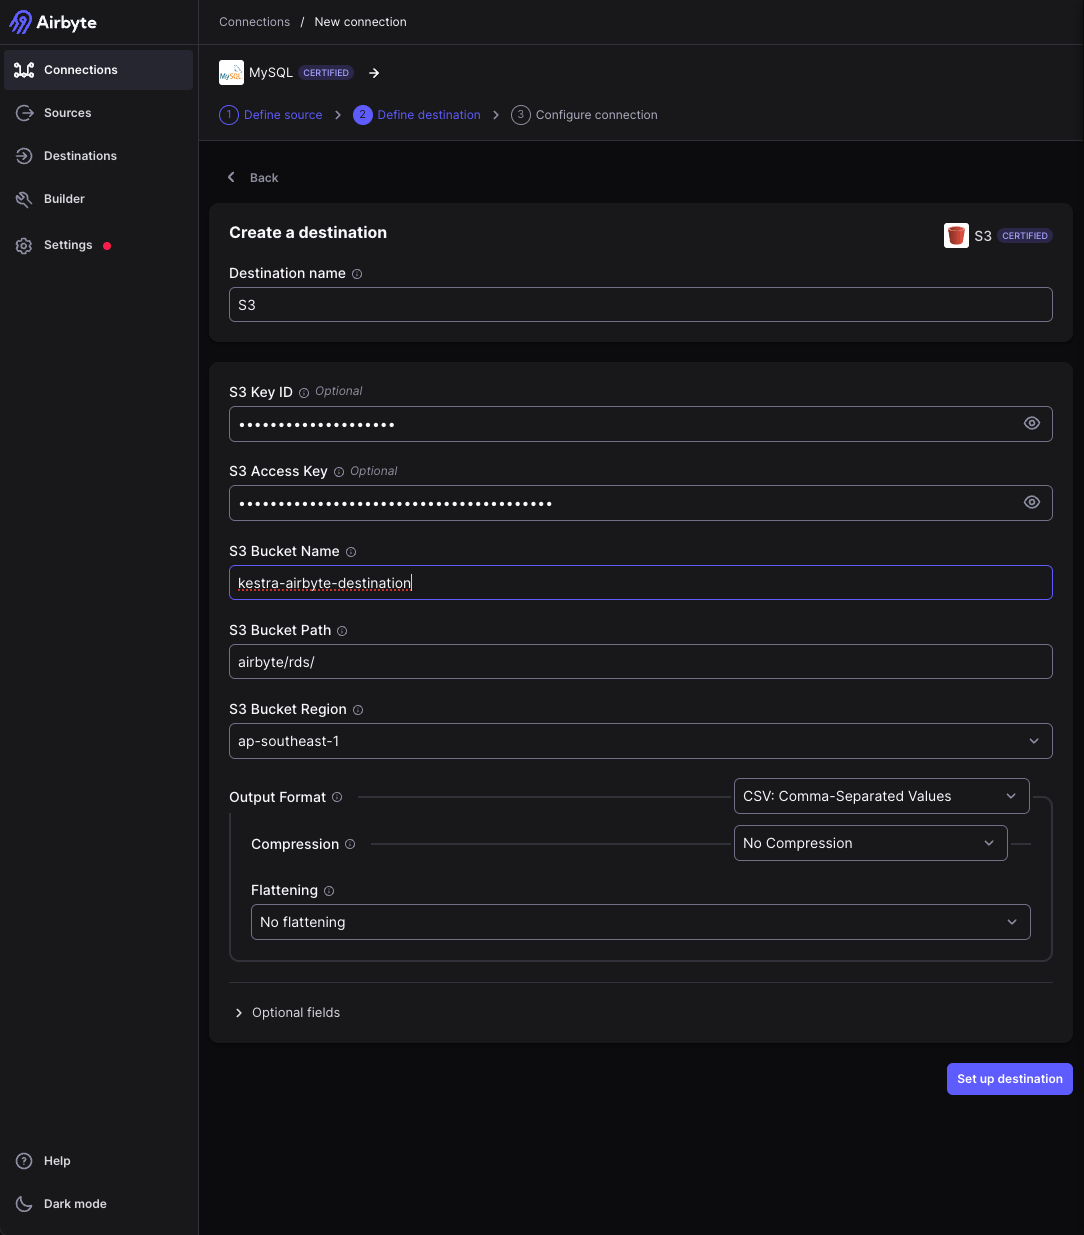
Now, click on “Set up destination” button, which will first test the connection to the destination, and if the connection is successful, proceed to the next page.
On this page is the final connection configuration. Leave everything default. Ensure that the employees stream shows up in the below table, and the sync mode for the stream is Full refresh | Overwrite.
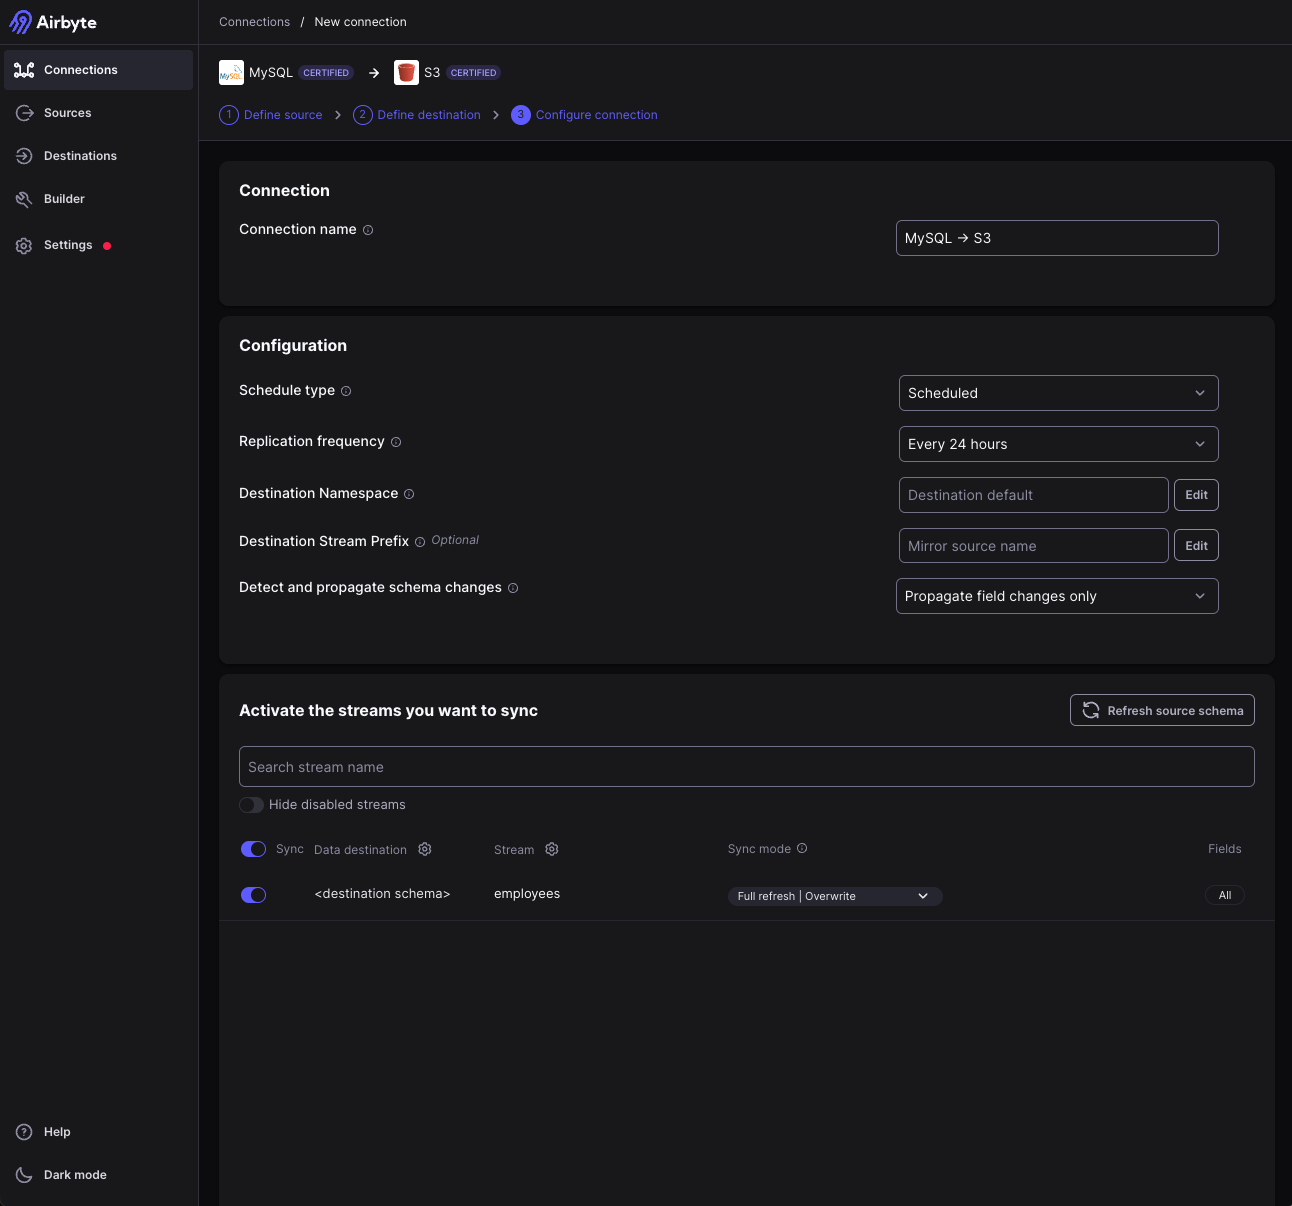
Click on “Set up connection”, and you are ready to go!
You can test this connection right away by clicking on “Sync now” on the connection page. When the sync is successful, you can go to the S3 bucket and check the CSV file that has got created in the S3 bucket at the given folder path. You can download the CSV file, and open it to check its contents. It should have three lines similar to the image below:

Let us now proceed to setup Kestra cluster on EC2 machine. You can follow the Kestra documentation page that explains in detail how we can install Kestra on AWS EC2 machine. Post the installation, you should be able to access the Kestra UI using the EC2 machine’s external IP address on port 8080.
We will be using the Kestra Airbyte plugin in order to invoke the sync operation on Airbyte from Kestra.
Firstly, let us add a couple more rows to the employees table. You can go to your MySQL client installed locally, connect to the RDS instance, and run the following commands:
USE test;INSERT INTO employees values(4, "Harry", "Davidson", "London");INSERT INTO employees values(5, "Kavita", "Malhotra", "Mumbai");Now, create a flow on the Kestra UI. We will be using the Sync task which will invoke the sync on the corresponding connection. When you open the connection that you want to sync on Airbyte UI, you will have the URL in the format: http://<hostname>:8000/workspaces/<workspace_id>/connections/<connection_id>/status. Pick the connection_id from this URL. Use this in the Sycn task. The Kestra flow with the Sync task should appear like this:
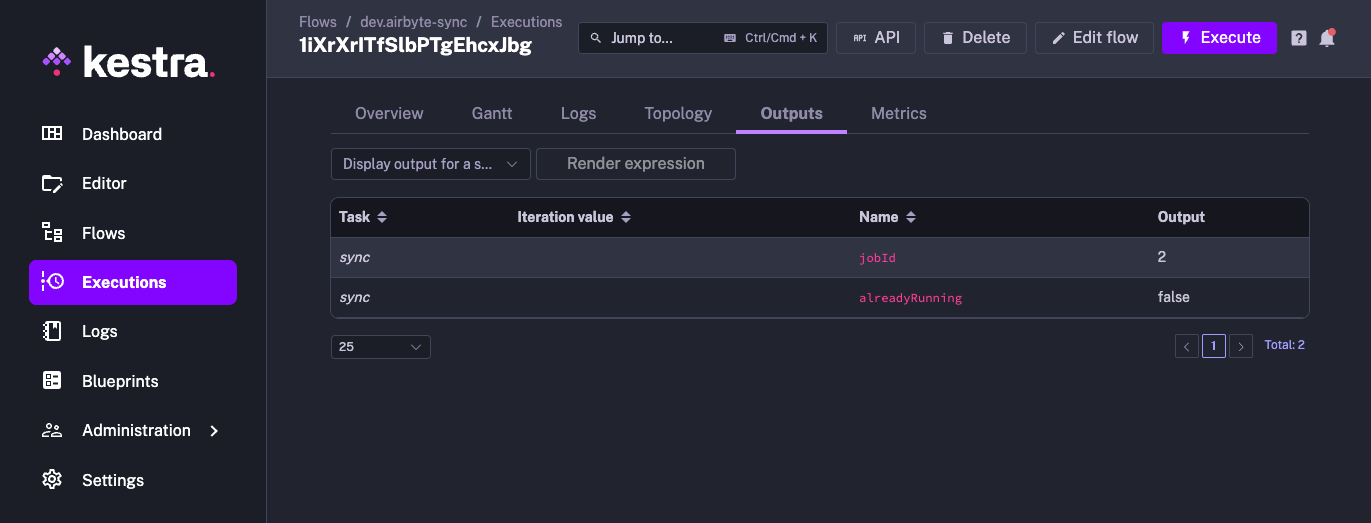
id: airbyte-syncnamespace: company.teamtasks: - id: sync type: io.kestra.plugin.airbyte.connections.Sync url: "http://<hostname>:8000" connectionId: "<conenction_id>" username: airbyte password: passwordWhen you run this task, the sync operation should be invoked on the connection. The output of this task should have the job ID of the sync job as shown in the screenshot below.
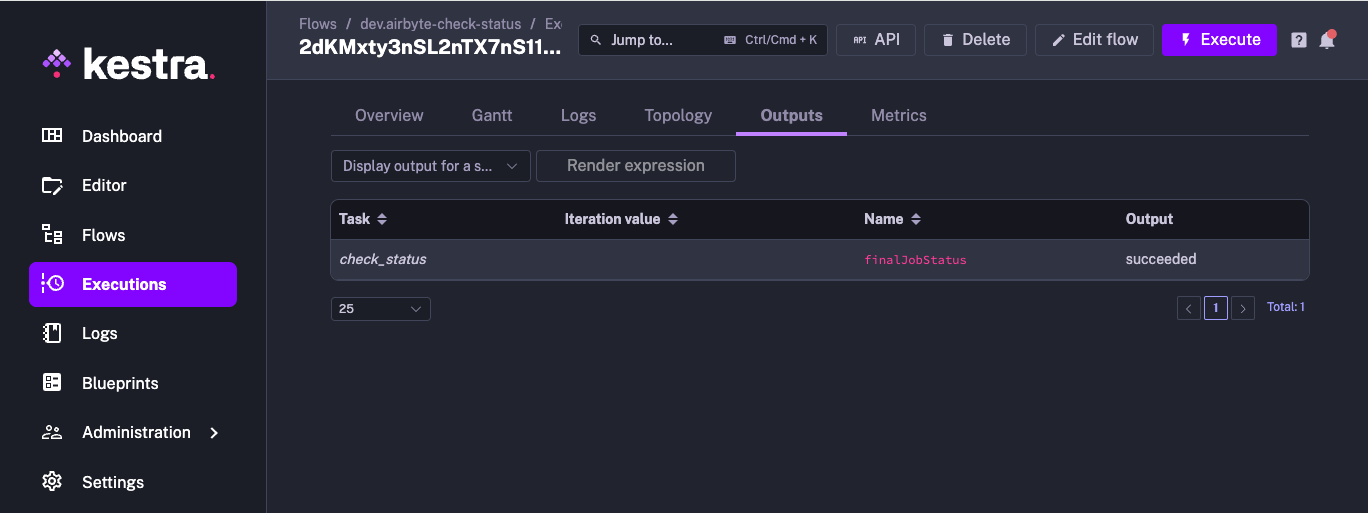
Now, let us use this job ID and check the status of this job using another Kestra flow where we will use the CheckStatus task.
The flow should look as follows:
id: airbyte-check-statusnamespace: company.teamtasks: - id: check_status type: io.kestra.plugin.airbyte.connections.CheckStatus url: http://<hostname>:8080 jobId: 2 username: airbyte password: passwordThe output of this flow should have the Sync job status.
When the Sync job has succeeded, you can verify that the Full refresh | Overwrite actually took place by going to the S3 bucket and to the appropriate folder path. Download the newly generated CSV file, and check its contents. It should now have 5 rows and should appear as:

This example demonstrated how we can integrate Airbyte with Kestra. Kestra can orchestrate any kind of workflow, exposing a rich UI that monitors all executions.
Join the Slack community if you have any questions or need assistance. Follow us on Twitter for the latest news. Check the code in our GitHub repository and give us a star if you like the project.

Stay up to date with the latest features and changes to Kestra