 Deploy Kestra on AWS EC2 – RDS and S3 Backend
Install Kestra on AWS EC2 with PostgreSQL RDS database and S3 internal storage backend.
Prefer a one-click option? You can launch Kestra directly from the AWS Marketplace listing.
Deploy Kestra on AWS EC2 with RDS and S3
This guide provides instructions for deploying Kestra on Amazon Web Services (AWS). We use an EC2 with Docker to host Kestra server, a PostgreSQL RDS database, and AWS S3 as storage backend.
Prerequisites:
- Basic knowledge about using a command line interface
- Basic knowledge about EC2, S3 and PostgreSQL.
You can find the corresponding full Terraform configuration in this repository.
Step 1: Create an EC2 instance & install Docker
First, create an EC2 instance. To do so, go to the AWS console and choose EC2.
- Give a name to your instance.
- Choose Ubuntu as your OS.
- Instance type: Kestra requires at least 4GiB of memory and 2 vCPUs to run correctly. Choosing t3-medium is a good starting point.
- Create a key-pair to securely connect to your instance. This key is needed to connect through SSH in the following steps.
- Create a security group that allows SSH traffic from your IP and also allow HTTPS traffic.
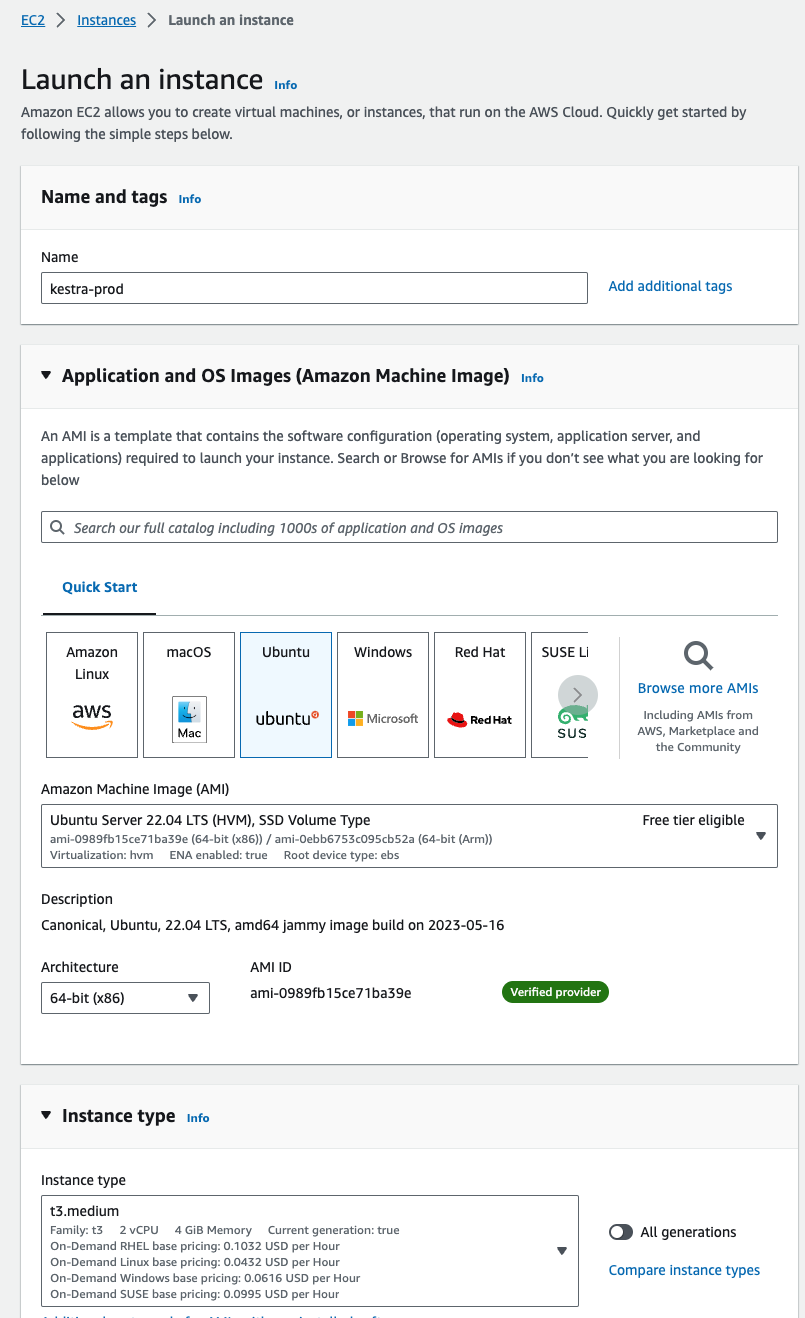

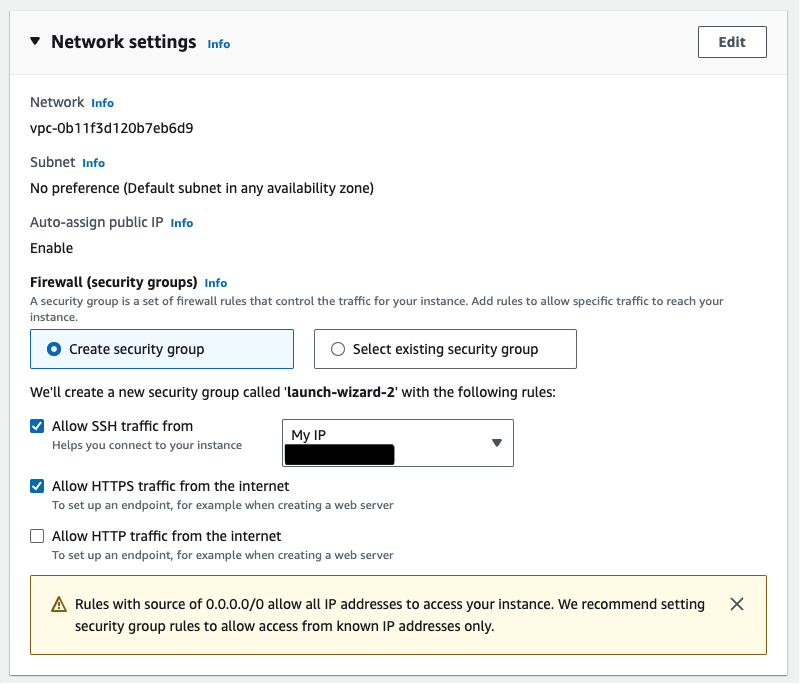
You can now click on Launch instance and wait a few seconds for the instance to be up and running.
Once running, open a terminal on your laptop and connect to your instance through SSH: ssh -i <your-key-pair.pem> ubuntu@<your-EC2-public-IP>
Kestra can be run directly from the .jar binary or using Docker. We use Docker here for quicker setup:
- Install Docker on the EC2 instance. You can find the last updated instruction on the Docker website.
- Install docker-compose.
To check your installation, run docker version and docker-compose version. You’re now ready to download and launch the Kestra server.
Step 2: Download and run Kestra
Download the official Docker-Compose file:
curl -o docker-compose.yml \https://raw.githubusercontent.com/kestra-io/kestra/develop/docker-compose.ymlUse an editor such as Vim to modify the docker-compose.yml and set basic authentication to true and configure your basic authentication credentials to secure your Kestra instance. Make sure to add a valid email address too.
kestra: server: basic-auth: enabled: true username: admin@kestra.io # it must be a valid email address password: kestraNext, use the following command to start the Kestra server:
`docker compose up -d`Step 3: Allow external traffic
Kestra is now running and the Kestra server is exposing traffic on the 8080 port. To connect through your web browser, update the inbound traffic rules in the EC2 security group.
Go to the EC2 console and select Security Group. Choose the security group attached to your EC2 instance and add a new inbound rule to open access to the 8080 port. If you did not select an existing security group when creating the instance, the security group will be prefixed with “launch-wizard-”.
If you want to only allow traffic coming from your IP address, set the source to your own IP. If you want to make it open to the entire Internet, leave it at 0.0.0.0.
Note that if you haven’t set up basic authentication in the previous step, your Kestra instance will be publicly available to anyone without any access restriction.

You can now access your Kestra instance and create, edit, and run Flows.
Step 4: Use AWS RDS PostgreSQL as a database backend
This first installation relies on a PostgreSQL database running alongside the Kestra server on the EC2 instance (see the PostgreSQL service running thanks to the docker-compose).
For a simple proof of concept (PoC), you can keep the PostgreSQL database running in Docker.
However, for a production-grade installation, we recommend a managed database service such as AWS RDS.
Create a AWS RDS database
- Go to the RDS console.
- Create a database and choose PostgreSQL (Kestra also supports MySQL, but PostgreSQL is recommended)
- Set a username and password.
- On the connectivity configuration choose “Connect to an EC2 compute resource” and choose your EC2 instance.
- Also select the existing DB subnet group and existing VPC security group and choose the one attached to your EC2 instance.
- Fine-tune instance class and storage type to avoid import AWS costs. For a first step, a small PostgreSQL instance is enough.
- Click create and wait for completion
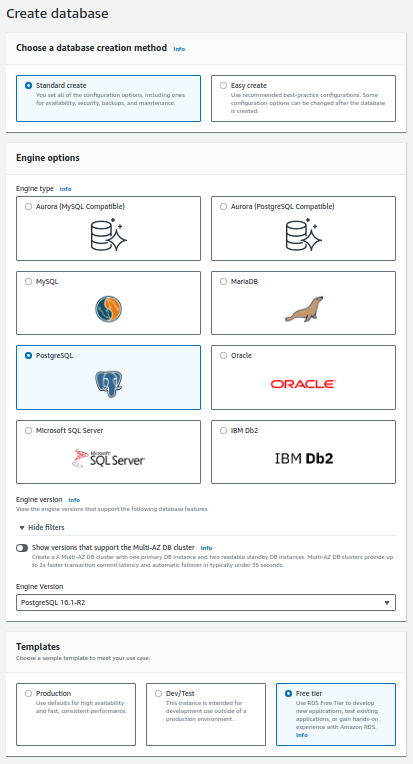
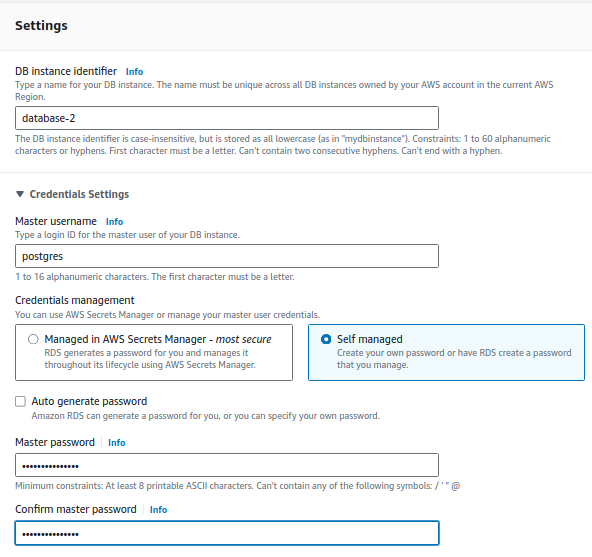
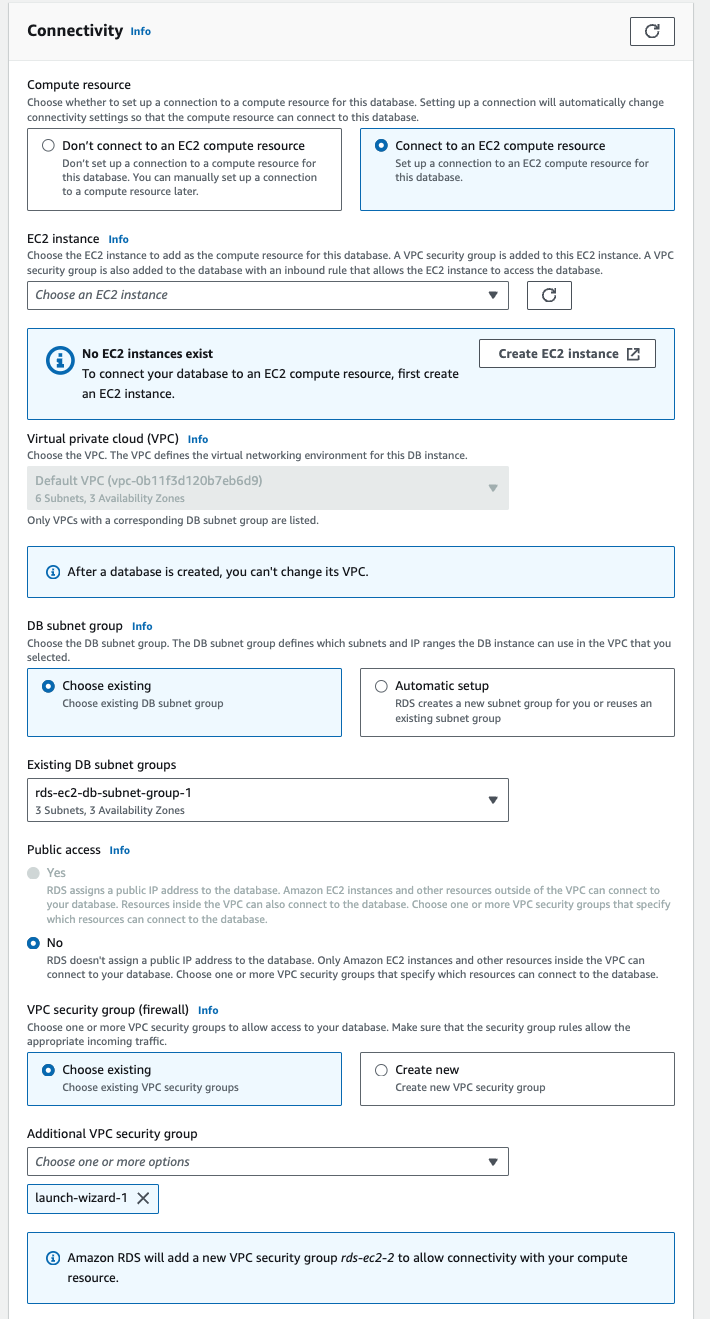
Create Kestra database
Before attaching your Kestra server to the new database backend, initialize the database with a base schema as follows:
- Connect to your EC2 instance with ssh.
- Install a PostgreSQL client:
sudo apt-get install postgresql-client. - Create the Kestra database:
createdb -h <your-rds-url-endpoint> -U <your-username> -p 5432 kestra.
Update Kestra configuration
In the Docker compose configuration, edit the datasources property of the Kestra service in the following way:
datasources: postgres: url: jdbc:postgresql://<your-rds-url-endpoint>:5432/kestra driver-class-name: org.postgresql.Driver username: <your-username> password: <your-password>Because you now use RDS service, you do not need the PostgreSQL service anymore. Remove it from the docker-compose.yml file.
In order for the changes to take effect, restart the docker services with docker compose restart or docker compose up -d.
Step 5: Use AWS S3 for storage
By default, internal storage is implemented using the local file system. This section guides you how to change the storage backend to S3 to ensure a more reliable, durable, and scalable storage.
- Go to the S3 console and create a bucket.
- Go to IAM and create a new User Group with AWS S3 full access.
- Create a new user and attach it to the user group.
- For the new user, go to Security Credentials and create an access key. Choose “Application running on an AWS compute service” and retrieve the access and secret keys.
- Edit the Kestra storage configuration.
kestra: storage: type: s3 s3: access-key: "<your-aws-access-key-id>" secret-key: "<your-aws-secret-access-key>" region: "<your-aws-region>" bucket: "<your-s3-bucket-name>"- Restart docker services.
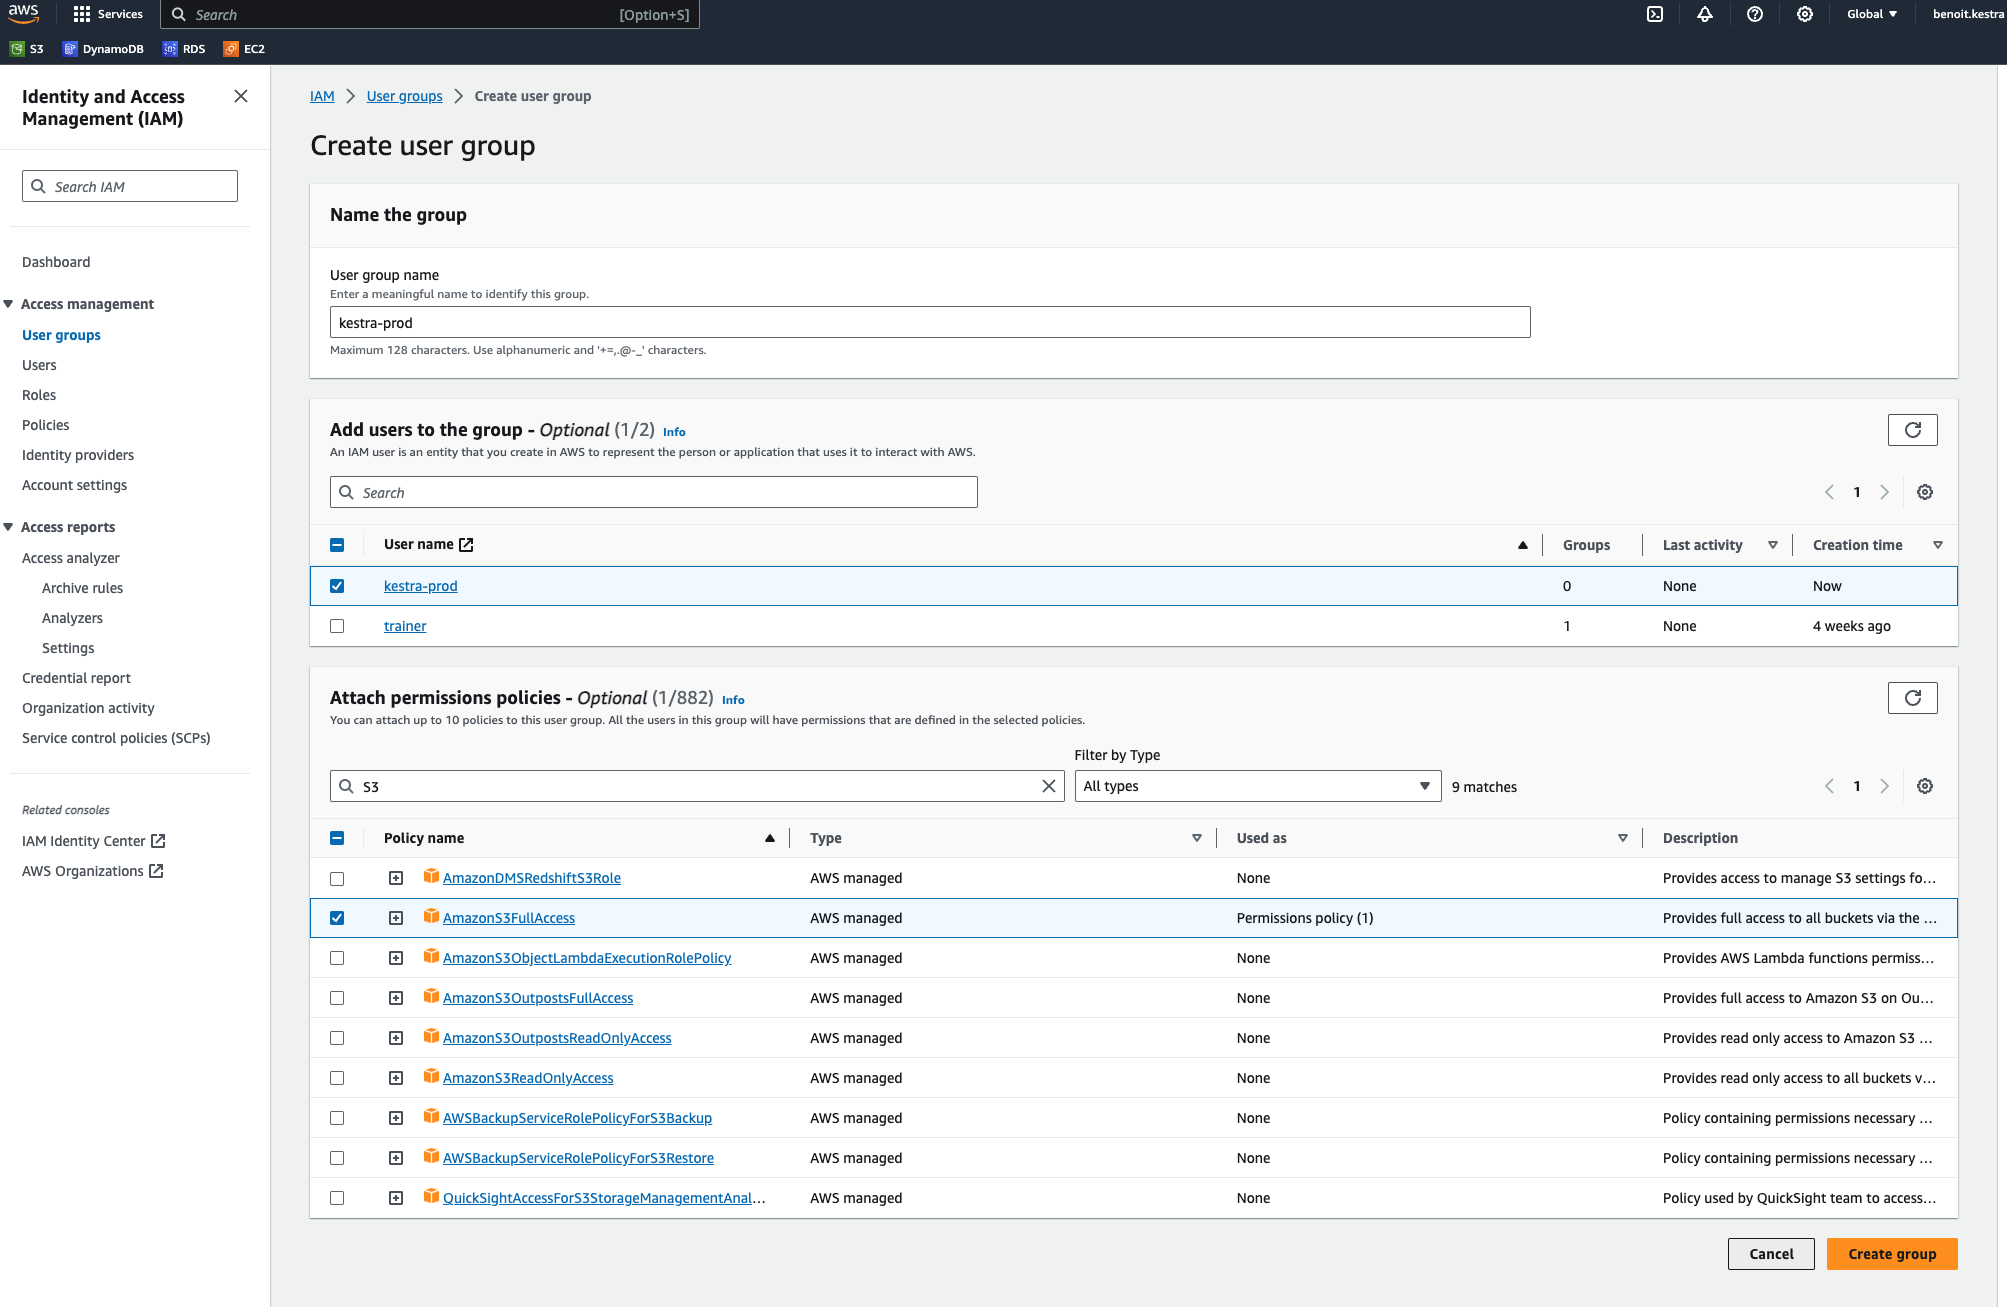
For more information on S3 storage configuration, check out the S3 configuration guide.
Next steps
This guide walked you through installing Kestra on an AWS EC2 instance with RDS database and S3 storage backend.
This setup provides the easiest starting point for running Kestra in production on a single machine. For a deployment to a distributed cluster, check the Kubernetes deployment guide.
Reach out via Slack if you encounter any issues, or if you have any questions regarding deploying Kestra to production.
Make sure to also check the CI/CD guide to automate your workflow deployments based on changes in Git.
Was this page helpful?