Execute Kestra Tasks as AWS Batch Jobs on ECS Fargate, EC2, or EKS
For the complete documentation index, see llms.txt. For a full content snapshot, see llms-full.txt. Append.mdto anykestra.io/docs/*URL for plain Markdown.
Run tasks as AWS Batch jobs on ECS Fargate, EC2, or EKS compute environments.
Offload tasks to AWS Batch
To launch tasks on AWS Batch, you need to understand three key concepts:
- Compute environment — mandatory; it won’t be created by the task. The compute environment defines the infrastructure for your tasks and can be ECS Fargate, EC2, or EKS.
- Job queue — optional; it will be created by the task if not specified. Creating a queue adds some latency to the script’s runtime.
- Job — created by the task runner; contains information about the image, commands, and resources to use.
To get started quickly, use this blueprint to provision all required resources for running containers on ECS Fargate.
How does the AWS Batch task runner work?
To support inputFiles, namespaceFiles, and outputFiles, the task runner creates sidecar containers that handle S3 file transfers alongside the main container. The approach differs by compute environment type.
ECS (Fargate and EC2): Uses multi-container ECS jobs with three containers per job:
- A before-container that uploads input files to S3.
- The main container that fetches input files into the
{{ workingDir }}directory and runs the task. - An after-container that fetches output files using
outputFilesto make them available from the Kestra UI for download and preview.
EKS: Uses EKS job definitions with a Kubernetes pod. Sidecar containers run as pod containers using the same S3-based file transfer pattern. The main container command is wrapped in /bin/sh -c, so the container image must include /bin/sh.
The container does not start in the Kestra working directory. Use {{ workingDir }} or WORKING_DIR to reference input and output files — for example, cat {{ workingDir }}/myFile.txt instead of cat myFile.txt.
Exit codes
The task runner maps AWS Batch job statuses to exit codes as follows:
| AWS Batch status | Exit code |
|---|---|
SUCCEEDED | 0 |
FAILED | 1 |
RUNNING | 2 |
RUNNABLE | 3 |
PENDING | 4 |
STARTING | 5 |
SUBMITTED | 6 |
| Unknown | -1 |
Minimum permissions required
Running on Kestra Cloud? The Cloud control plane runs outside your AWS account and has no EC2 instance profile or EKS IRSA to supply a base AWS identity. Static accessKeyId / secretKeyId credentials are required. See Running from Kestra Cloud for the full details before configuring authentication.
To submit and monitor AWS Batch jobs, the IAM principal used by Kestra needs permission to create, tag, inspect, and clean up Batch job definitions and jobs. It also needs permission to pass the ECS roles used by the job and to read the AWS Batch log group.
The following policy is the minimum set required by the task runner:
{ "Version": "2012-10-17", "Statement": [ { "Action": [ "logs:DescribeLogGroups", "batch:TagResource", "batch:SubmitJob", "batch:RegisterJobDefinition", "batch:ListJobs", "batch:DescribeJobs", "batch:DescribeJobDefinitions", "batch:DescribeComputeEnvironments", "batch:DeregisterJobDefinition", "batch:TerminateJob", "batch:CreateJobQueue", "batch:UpdateJobQueue", "batch:DeleteJobQueue", "batch:DescribeJobQueues" ], "Effect": "Allow", "Resource": "*" }, { "Action": [ "iam:PassRole" ], "Effect": "Allow", "Resource": [ "<executionRoleArn>", "<serviceRoleArn>", "<taskRoleArn>" ] }, { "Action": [ "logs:StartLiveTail" ], "Effect": "Allow", "Resource": "arn:aws:logs:eu-central-1:<accountId>:log-group:/aws/batch/job" } ]}The batch:CreateJobQueue, batch:UpdateJobQueue, batch:DeleteJobQueue, and batch:DescribeJobQueues permissions are only required when jobQueueArn is not configured — the task runner will create and clean up a job queue automatically in that case. If you always provide a jobQueueArn, you can omit those four permissions.
logs:StartLiveTail is only required when streamLogs is left at its default of true. If you set streamLogs: false, you can omit this permission — see Log streaming below.
Replace <executionRoleArn>, <serviceRoleArn>, <taskRoleArn>, and <accountId> with the values from your AWS account. If you use a different region, update the CloudWatch Logs ARN accordingly.
The iam:PassRole entries for <executionRoleArn> and <taskRoleArn> apply to ECS compute environments only. For EKS, these roles are ignored — use serviceAccountName with IRSA to grant IAM permissions to your EKS pods instead.
S3 permissions when using bucket
When you set the bucket property, the Kestra worker itself (not the ECS task container) uploads inputFiles and namespaceFiles to S3 before the job starts and downloads outputFiles after it finishes. It also deletes the working-directory prefix from the bucket on cleanup. The Kestra IAM principal therefore needs the following additional permissions when bucket is configured:
{ "Version": "2012-10-17", "Statement": [ { "Action": [ "s3:GetObject", "s3:PutObject", "s3:DeleteObject", "s3:ListBucket" ], "Effect": "Allow", "Resource": "*" } ]}The ECS task container separately needs S3 access via its taskRoleArn to read input files and write output files at runtime. Refer to the Create the ecsTaskRole IAM role section for the task-level policy. For EKS compute environments, grant S3 access to the pod’s IAM role via IRSA and set serviceAccountName on the task runner.
Resource sizing
Default resources
By default, each job runs with 1 vCPU and 2048 MiB of memory. Override this with the resources property:
taskRunner: type: io.kestra.plugin.ee.aws.runner.Batch # ... resources: request: cpu: "2" memory: "4096"Fargate CPU and memory constraints
AWS Fargate enforces strict combinations of vCPU and memory. The task runner validates these at runtime and will throw an error if an invalid combination is used.
| vCPU | Allowed memory (MiB) |
|---|---|
0.25 | 512, 1024, 2048 |
0.5 | 1024, 2048, 3072, 4096 |
1 | 2048, 3072, 4096, 5120, 6144, 7168, 8192 |
2 | 4096 – 16384 (increments of 1024) |
4 | 8192 – 30720 (increments of 1024) |
8 | 16384 – 61440 (increments of 4096) |
16 | 32768 – 122880 (increments of 8192) |
For EC2 compute environments, the vCPU value must be a whole integer (e.g. "1", "2") and must be ≥ 1.
For EKS compute environments, CPU is specified as a decimal (e.g. "0.5", "1") and memory as an integer in MiB. The Fargate combination restrictions above do not apply.
Sidecar container resources
When inputFiles, namespaceFiles, or outputFiles are used, the task runner adds sidecar containers that handle S3 file transfers. Default sidecar resources are:
- ECS Fargate:
0.25 vCPU/512 MiB - ECS EC2:
1 vCPU/128 MiB
On Fargate, AWS Batch enforces resource limits at the task level. To keep the overall task resources equal to the value set in resources.request, the sidecar resources are automatically subtracted from the main container. For example, with resources.request = 1 vCPU / 2048 MiB and one sidecar at the default 0.25 vCPU / 512 MiB, the main container will receive 0.75 vCPU / 1536 MiB.
If your resources.request is too small to accommodate the sidecars, the task runner will throw an error at startup. You can either increase resources.request or override sidecar sizing with sidecarResources:
taskRunner: type: io.kestra.plugin.ee.aws.runner.Batch # ... resources: request: cpu: "1" memory: "2048" sidecarResources: request: cpu: "0.25" memory: "512"Fargate always assigns a public IP address to each task. If your subnets do not have a route to the internet (no internet gateway or NAT gateway), the containers will not be able to pull Docker images from public registries.
For EKS compute environments, sidecar resource limits are applied at the container level rather than the pod level, so the task-level resource subtraction described above does not apply.
How to run tasks on AWS ECS Fargate
The example below demonstrates how to use the AWS Batch task runner to offload Python scripts to a serverless container running on AWS ECS Fargate:
id: aws_batch_runnernamespace: company.team
tasks:  - id: scrape_environment_info    type: io.kestra.plugin.scripts.python.Script    containerImage: ghcr.io/kestra-io/pydata:latest    taskRunner:      type: io.kestra.plugin.ee.aws.runner.Batch      region: eu-central-1      accessKeyId: "{{ secret('AWS_ACCESS_KEY_ID') }}"      secretKeyId: "{{ secret('AWS_SECRET_KEY_ID') }}"      computeEnvironmentArn: "arn:aws:batch:eu-central-1:707969873520:compute-environment/kestraFargateEnvironment"      jobQueueArn: "arn:aws:batch:eu-central-1:707969873520:job-queue/kestraJobQueue"      executionRoleArn: "arn:aws:iam::707969873520:role/kestraEcsTaskExecutionRole"      taskRoleArn: arn:aws:iam::707969873520:role/ecsTaskRole      bucket: kestra-product-de    namespaceFiles:      enabled: true    outputFiles:      - "*.json"    script: |      import platform      import socket      import sys      import json      from kestra import Kestra
      print("Hello from AWS Batch and kestra!")

      def print_environment_info():          print(f"Host's network name: {platform.node()}")          print(f"Python version: {platform.python_version()}")          print(f"Platform information (instance type): {platform.platform()}")          print(f"OS/Arch: {sys.platform}/{platform.machine()}")
          env_info = {              "host": platform.node(),              "platform": platform.platform(),              "OS": sys.platform,              "python_version": platform.python_version(),          }          Kestra.outputs(env_info)
          filename = "{{ workingDir }}/environment_info.json"          with open(filename, "w") as json_file:              json.dump(env_info, json_file, indent=4)

if __name__ == "__main__": print_environment_info()For a full list of available properties, see the AWS plugin documentation or view them in the built-in Code Editor in the Kestra UI.
How to run tasks on AWS Batch with EKS
The example below shows how to run a shell command using an EKS compute environment. The container image must include /bin/sh. Use serviceAccountName with IRSA to grant the pod access to AWS services like S3 — taskRoleArn and executionRoleArn are ignored for EKS.
id: run_container_on_eksnamespace: company.team
variables:  region: us-east-1  compute_environment_arn: arn:aws:batch:us-east-1:123456789:compute-environment/kestraEksEnvironment  job_queue_arn: arn:aws:batch:us-east-1:123456789:job-queue/kestraEksQueue
tasks:  - id: shell    type: io.kestra.plugin.scripts.shell.Commands    containerImage: amazonlinux:2    taskRunner:      type: io.kestra.plugin.ee.aws.runner.Batch      region: "{{ vars.region }}"      accessKeyId: "{{ secret('AWS_ACCESS_KEY_ID') }}"      secretKeyId: "{{ secret('AWS_SECRET_KEY_ID') }}"      computeEnvironmentArn: "{{ vars.compute_environment_arn }}"      jobQueueArn: "{{ vars.job_queue_arn }}"      serviceAccountName: kestra-sa    commands:      - echo "Hello from AWS Batch on EKS"
EKS log streaming requires the amazon-cloudwatch-observability addon to be installed on your cluster. Without it, task logs will not appear in Kestra. See step 4 below.
Setting up an EKS cluster for AWS Batch
The steps below walk through creating an EKS cluster and configuring it for AWS Batch. Replace <cluster>, <region>, and <account-id> with your values throughout.
1. Create the cluster
If you do not already have an EKS cluster, create one using eksctl. This also configures kubectl:
eksctl create cluster --name <cluster> --region <region>2. Create the namespace and apply RBAC
AWS Batch runs jobs in a dedicated Kubernetes namespace and requires specific RBAC permissions:
kubectl create namespace aws-batchDownload the RBAC manifests from the AWS getting started guide, save them to aws-batch-rbac.yaml, then apply:
kubectl apply -f aws-batch-rbac.yaml3. Add the IAM identity mapping
AWS Batch uses a service-linked role to manage pods. Because access entries do not work for service-linked roles, use eksctl create iamidentitymapping to register it:
eksctl create iamidentitymapping --cluster <cluster> --region <region> \ --arn arn:aws:iam::<account-id>:role/AWSServiceRoleForBatch --username aws-batch4. Install the CloudWatch addon
To stream pod logs to CloudWatch, install the amazon-cloudwatch-observability addon. The node IAM role must have the CloudWatchAgentServerPolicy policy attached:
aws eks create-addon \ --cluster-name <cluster> \ --addon-name amazon-cloudwatch-observability \ --region <region>5. Create the compute environment
Create an EKS-backed Batch compute environment. Use an instance type supported by AWS Batch such as m5 — t3 is rejected. Do not set a service role; Batch uses its service-linked role automatically:
aws batch create-compute-environment \ --region <region> \ --compute-environment-name kestra-eks \ --type MANAGED \ --state ENABLED \ --eks-configuration eksClusterArn=<cluster-arn>,kubernetesNamespace=aws-batch \ --compute-resources type=EC2,allocationStrategy=BEST_FIT_PROGRESSIVE,minvCpus=0,maxvCpus=16,instanceTypes=m5.large,subnets=<subnets>,securityGroupIds=<sg>,instanceRole=<node-instance-profile>The instanceRole value is the ARN of the EC2 instance profile attached to your EKS node group (not a bare IAM role ARN).
6. Create the job queue
aws batch create-job-queue \ --region <region> \ --job-queue-name kestra-eks-q \ --state ENABLED \ --priority 1 \ --compute-environment-order order=1,computeEnvironment=kestra-eksOnce both resources are created, copy the compute environment ARN and job queue ARN into your flow’s computeEnvironmentArn and jobQueueArn properties.
Full step-by-step guide: setting up AWS Batch from scratch
To use the AWS Batch task runner, you must configure resources in your AWS account. You can set up the environment in two ways:
- Use Terraform to provision all required resources with a single
terraform applycommand. - Create the resources step by step from the AWS Management Console.
Before you begin
You will need:
- An AWS account.
- A Kestra Enterprise Edition instance running version 0.18.0 or later with AWS credentials stored as secrets.
Terraform setup
Follow the instructions in the aws-batch README in the terraform-deployments-templates repository to provision resources using Terraform. You can also use this blueprint, which creates all required resources in a single Kestra workflow execution.
The Terraform configuration creates the following resources:
- AWS Security Group: a security group for AWS Batch jobs with egress to the internet (required to be able to download public Docker images in your script tasks).
- AWS IAM Roles and Policies: IAM roles and policies for AWS Batch and ECS Task Execution, including permissions for S3 access (S3 is used to store input and output files for container access).
- AWS Batch Compute Environment: a managed ECS Fargate compute environment named
kestraFargateEnvironment. - AWS Batch Job Queue: a job queue named
kestraJobQueuefor submitting batch jobs.
AWS Management Console setup
Create the ecsTaskExecutionRole IAM role
Create an execution role that allows AWS Batch to manage resources on your behalf.
- Open the IAM console.
- In the navigation menu, choose Roles.
- Choose Create role.
- In the Select trusted entity, choose Custom trust policy and paste the following trust policy JSON:
{"Version": "2012-10-17","Statement": [{"Sid": "","Effect": "Allow","Principal": {"Service": "ecs-tasks.amazonaws.com"},"Action": "sts:AssumeRole"}]}

- Click on Next and add the
AmazonECSTaskExecutionRolePolicy. - Then, for Role Name, enter
ecsTaskExecutionRole - Finally, click on Create role.
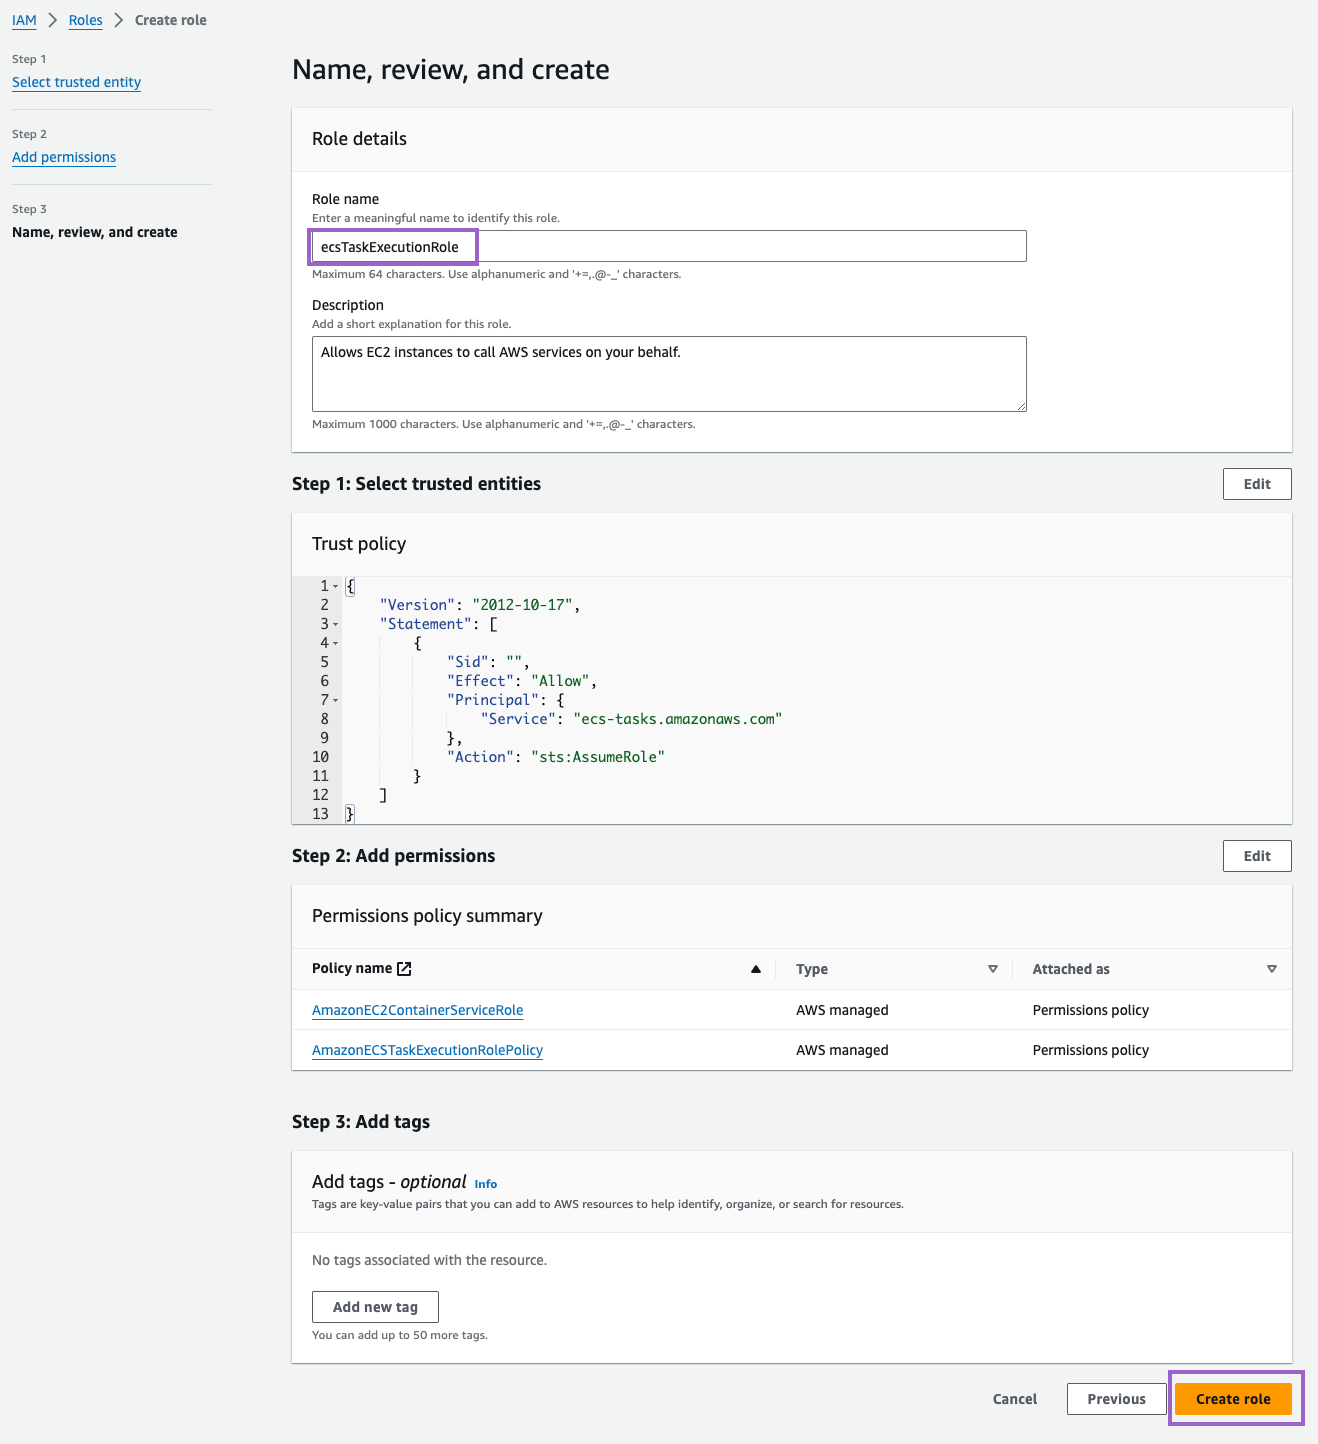
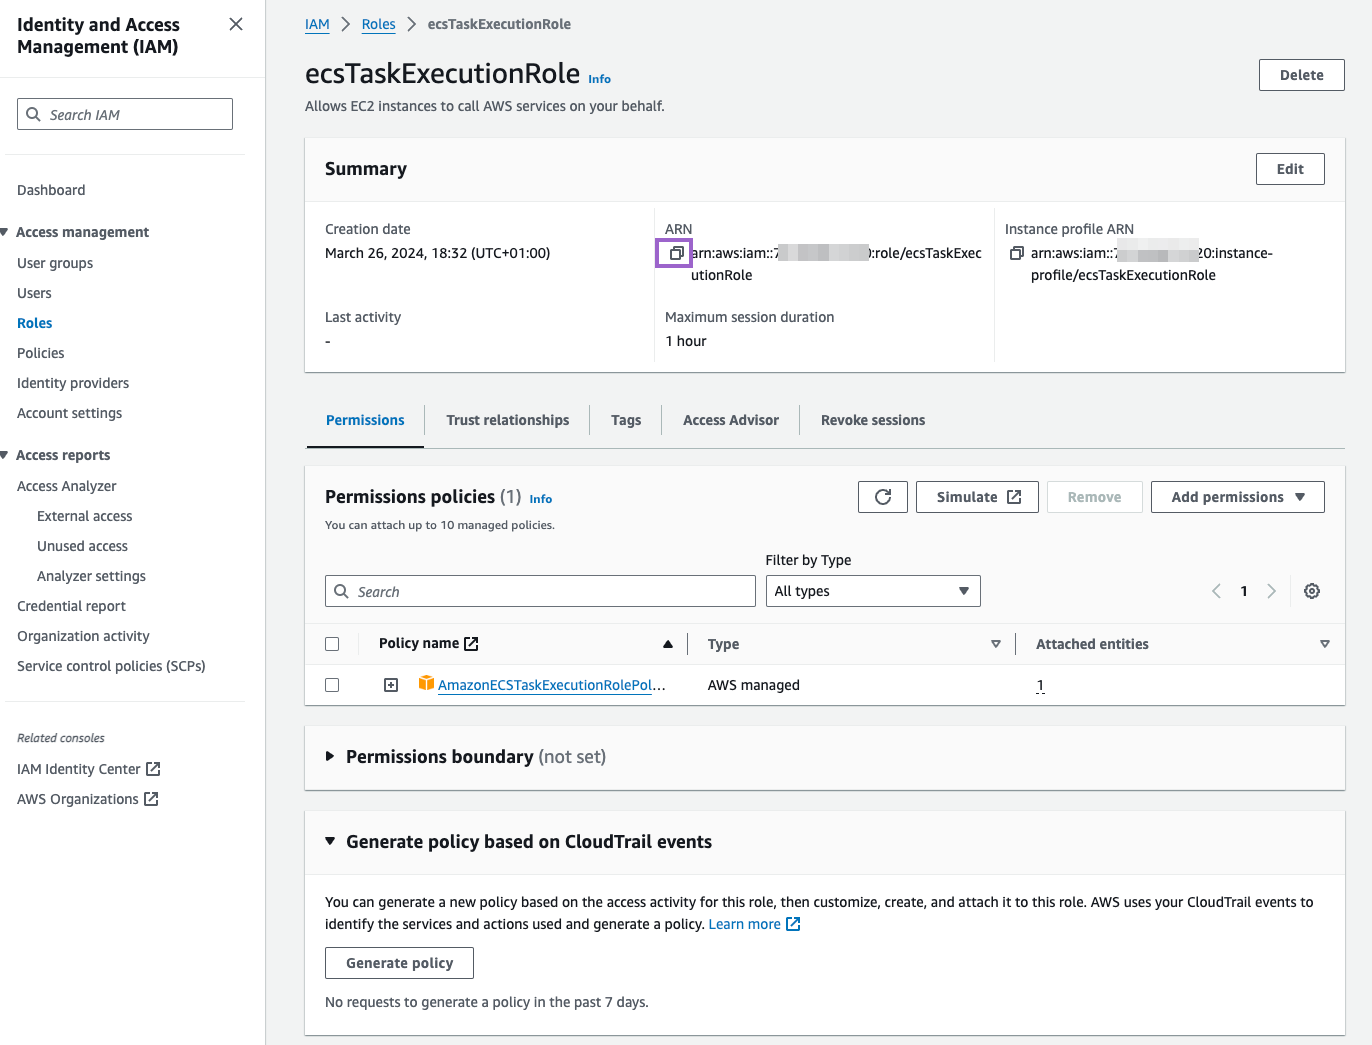
Make sure to copy the ARN of the role. You will need it later.
Create the ecsTaskRole IAM role
In addition to the execution role, you need a task role with S3 access permissions.
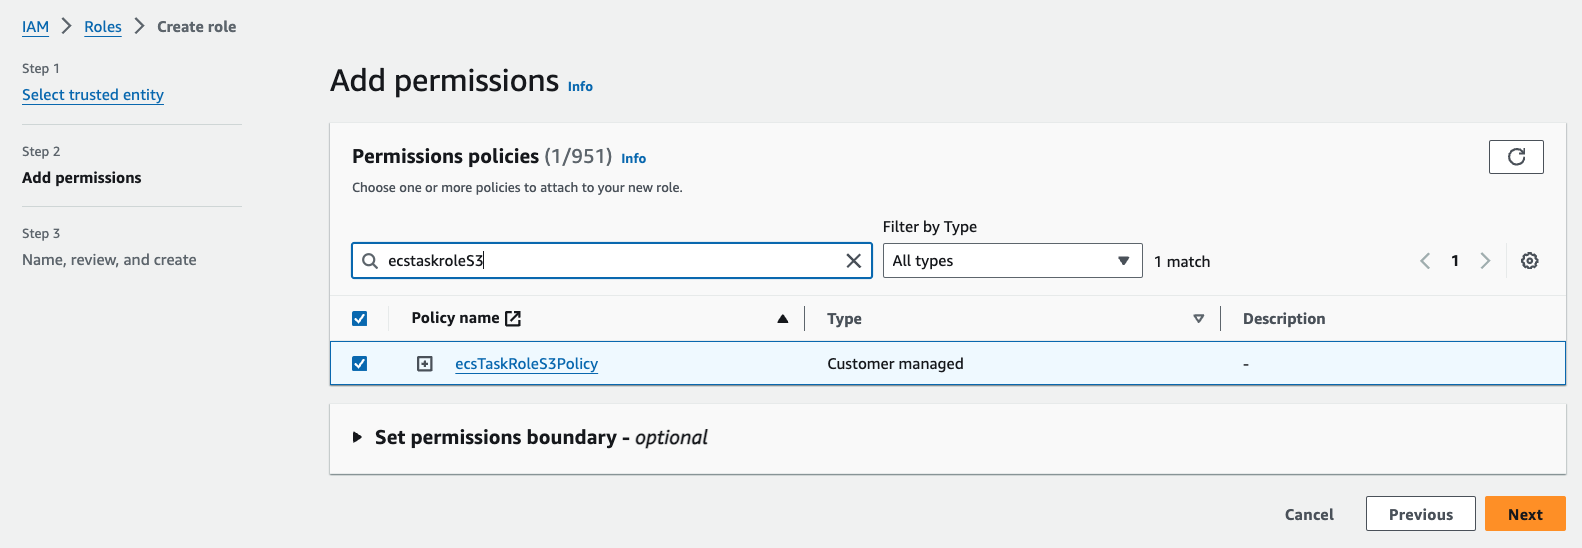
First, create a policy for S3 access.
- Open the IAM console.
- In the navigation menu, choose Policies.
- Select JSON and paste the following into the
Policy editor:{"Version": "2012-10-17","Statement": [{"Action": ["s3:GetObject","s3:PutObject","s3:DeleteObject","s3:ListBucket"],"Effect": "Allow","Resource": "*"}]}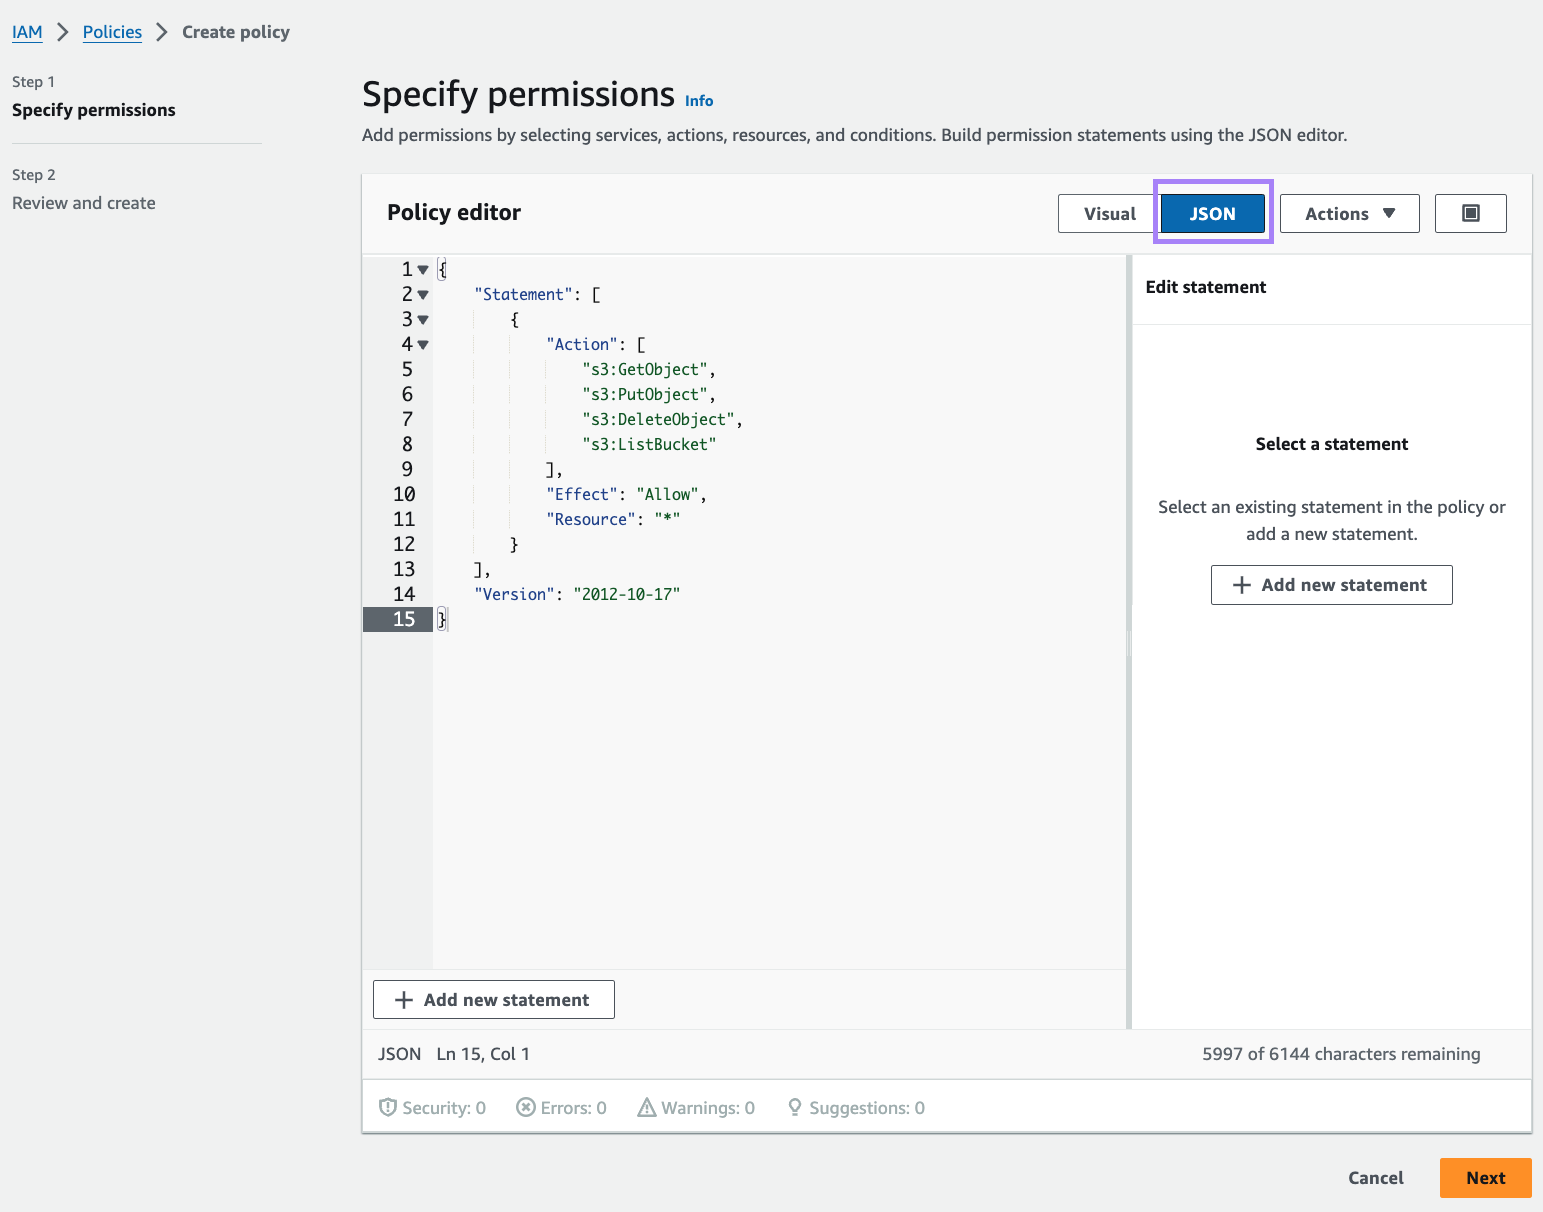
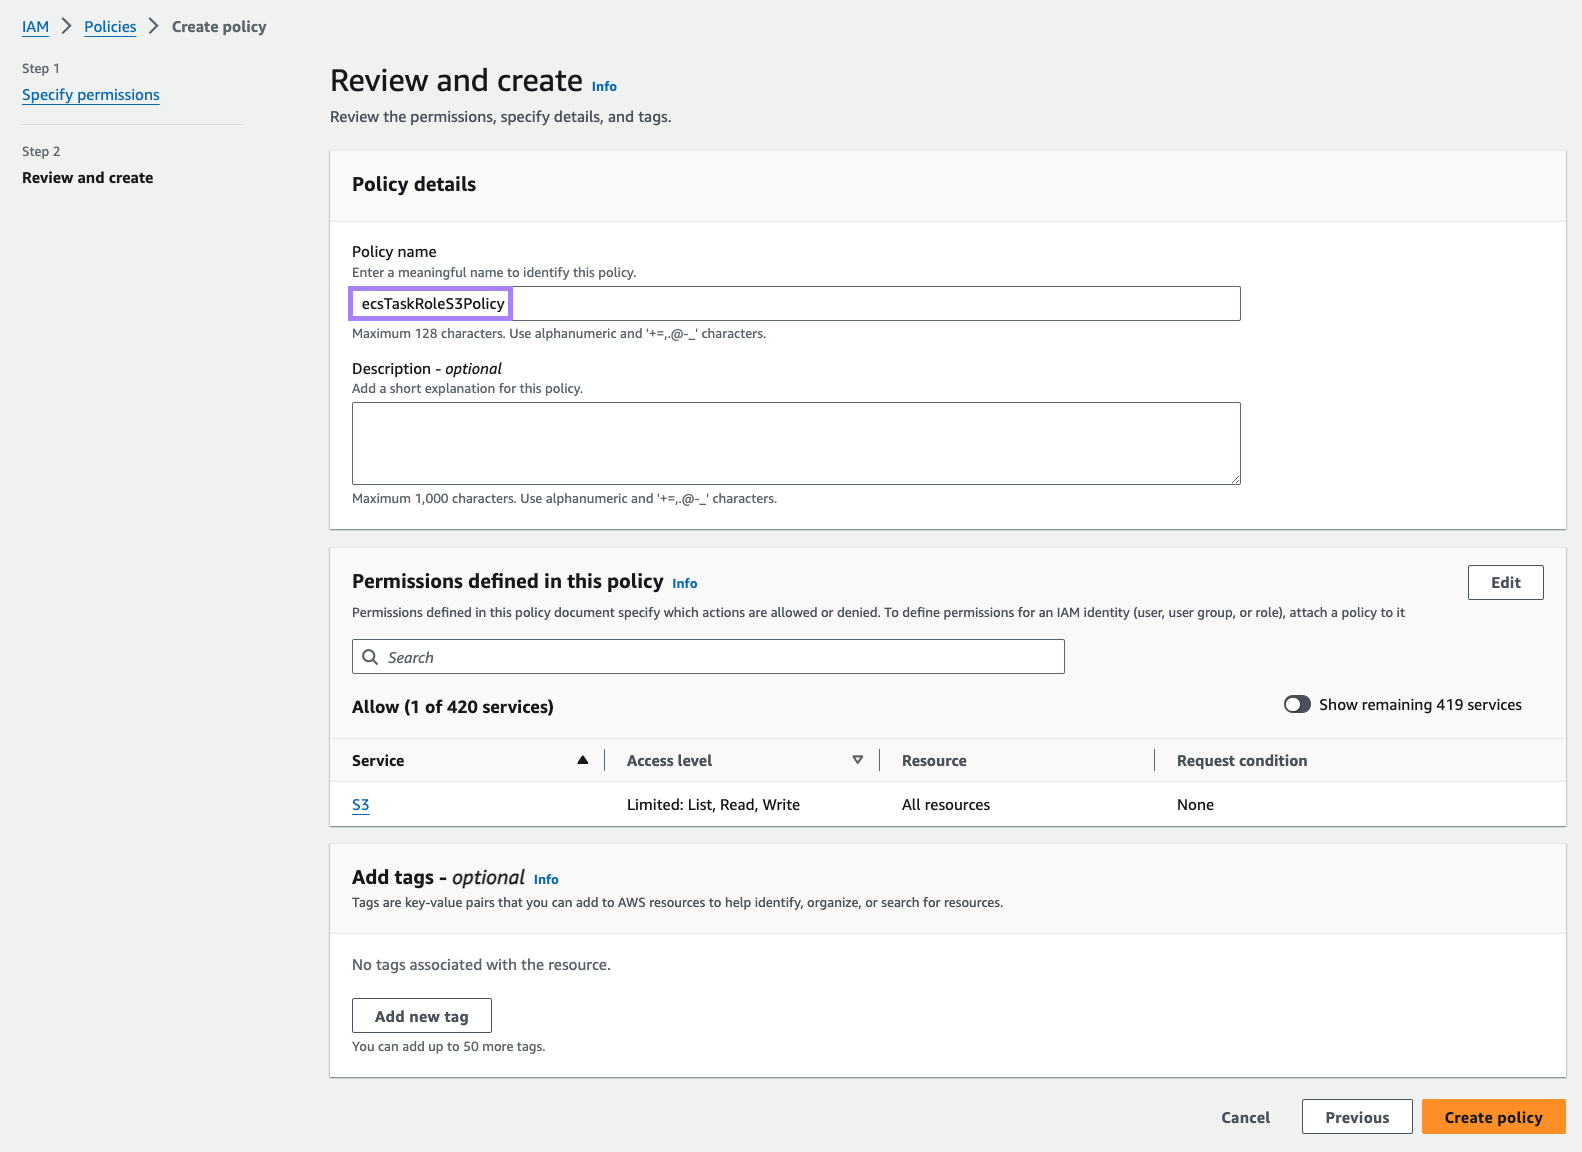
- Select Next and type in a name for the policy, such as
ecsTaskRoleS3Policy. - Once you’re done, select Create policy.
Now create a new role with the same trust policy as above. Attach the new policy before completing.
- Open the IAM console.
- In the navigation menu, choose Roles.
- Choose Create role.
- In the Select trusted entity, choose Custom trust policy and paste the following trust policy JSON:
{"Version": "2012-10-17","Statement": [{"Sid": "","Effect": "Allow","Principal": {"Service": "ecs-tasks.amazonaws.com"},"Action": "sts:AssumeRole"}]}
- Select Next.
- Search for the new policy and check the box on the left, then select Next.
- For Role Name, enter
ecsTaskRole. - Select Create role.
AWS Batch setup
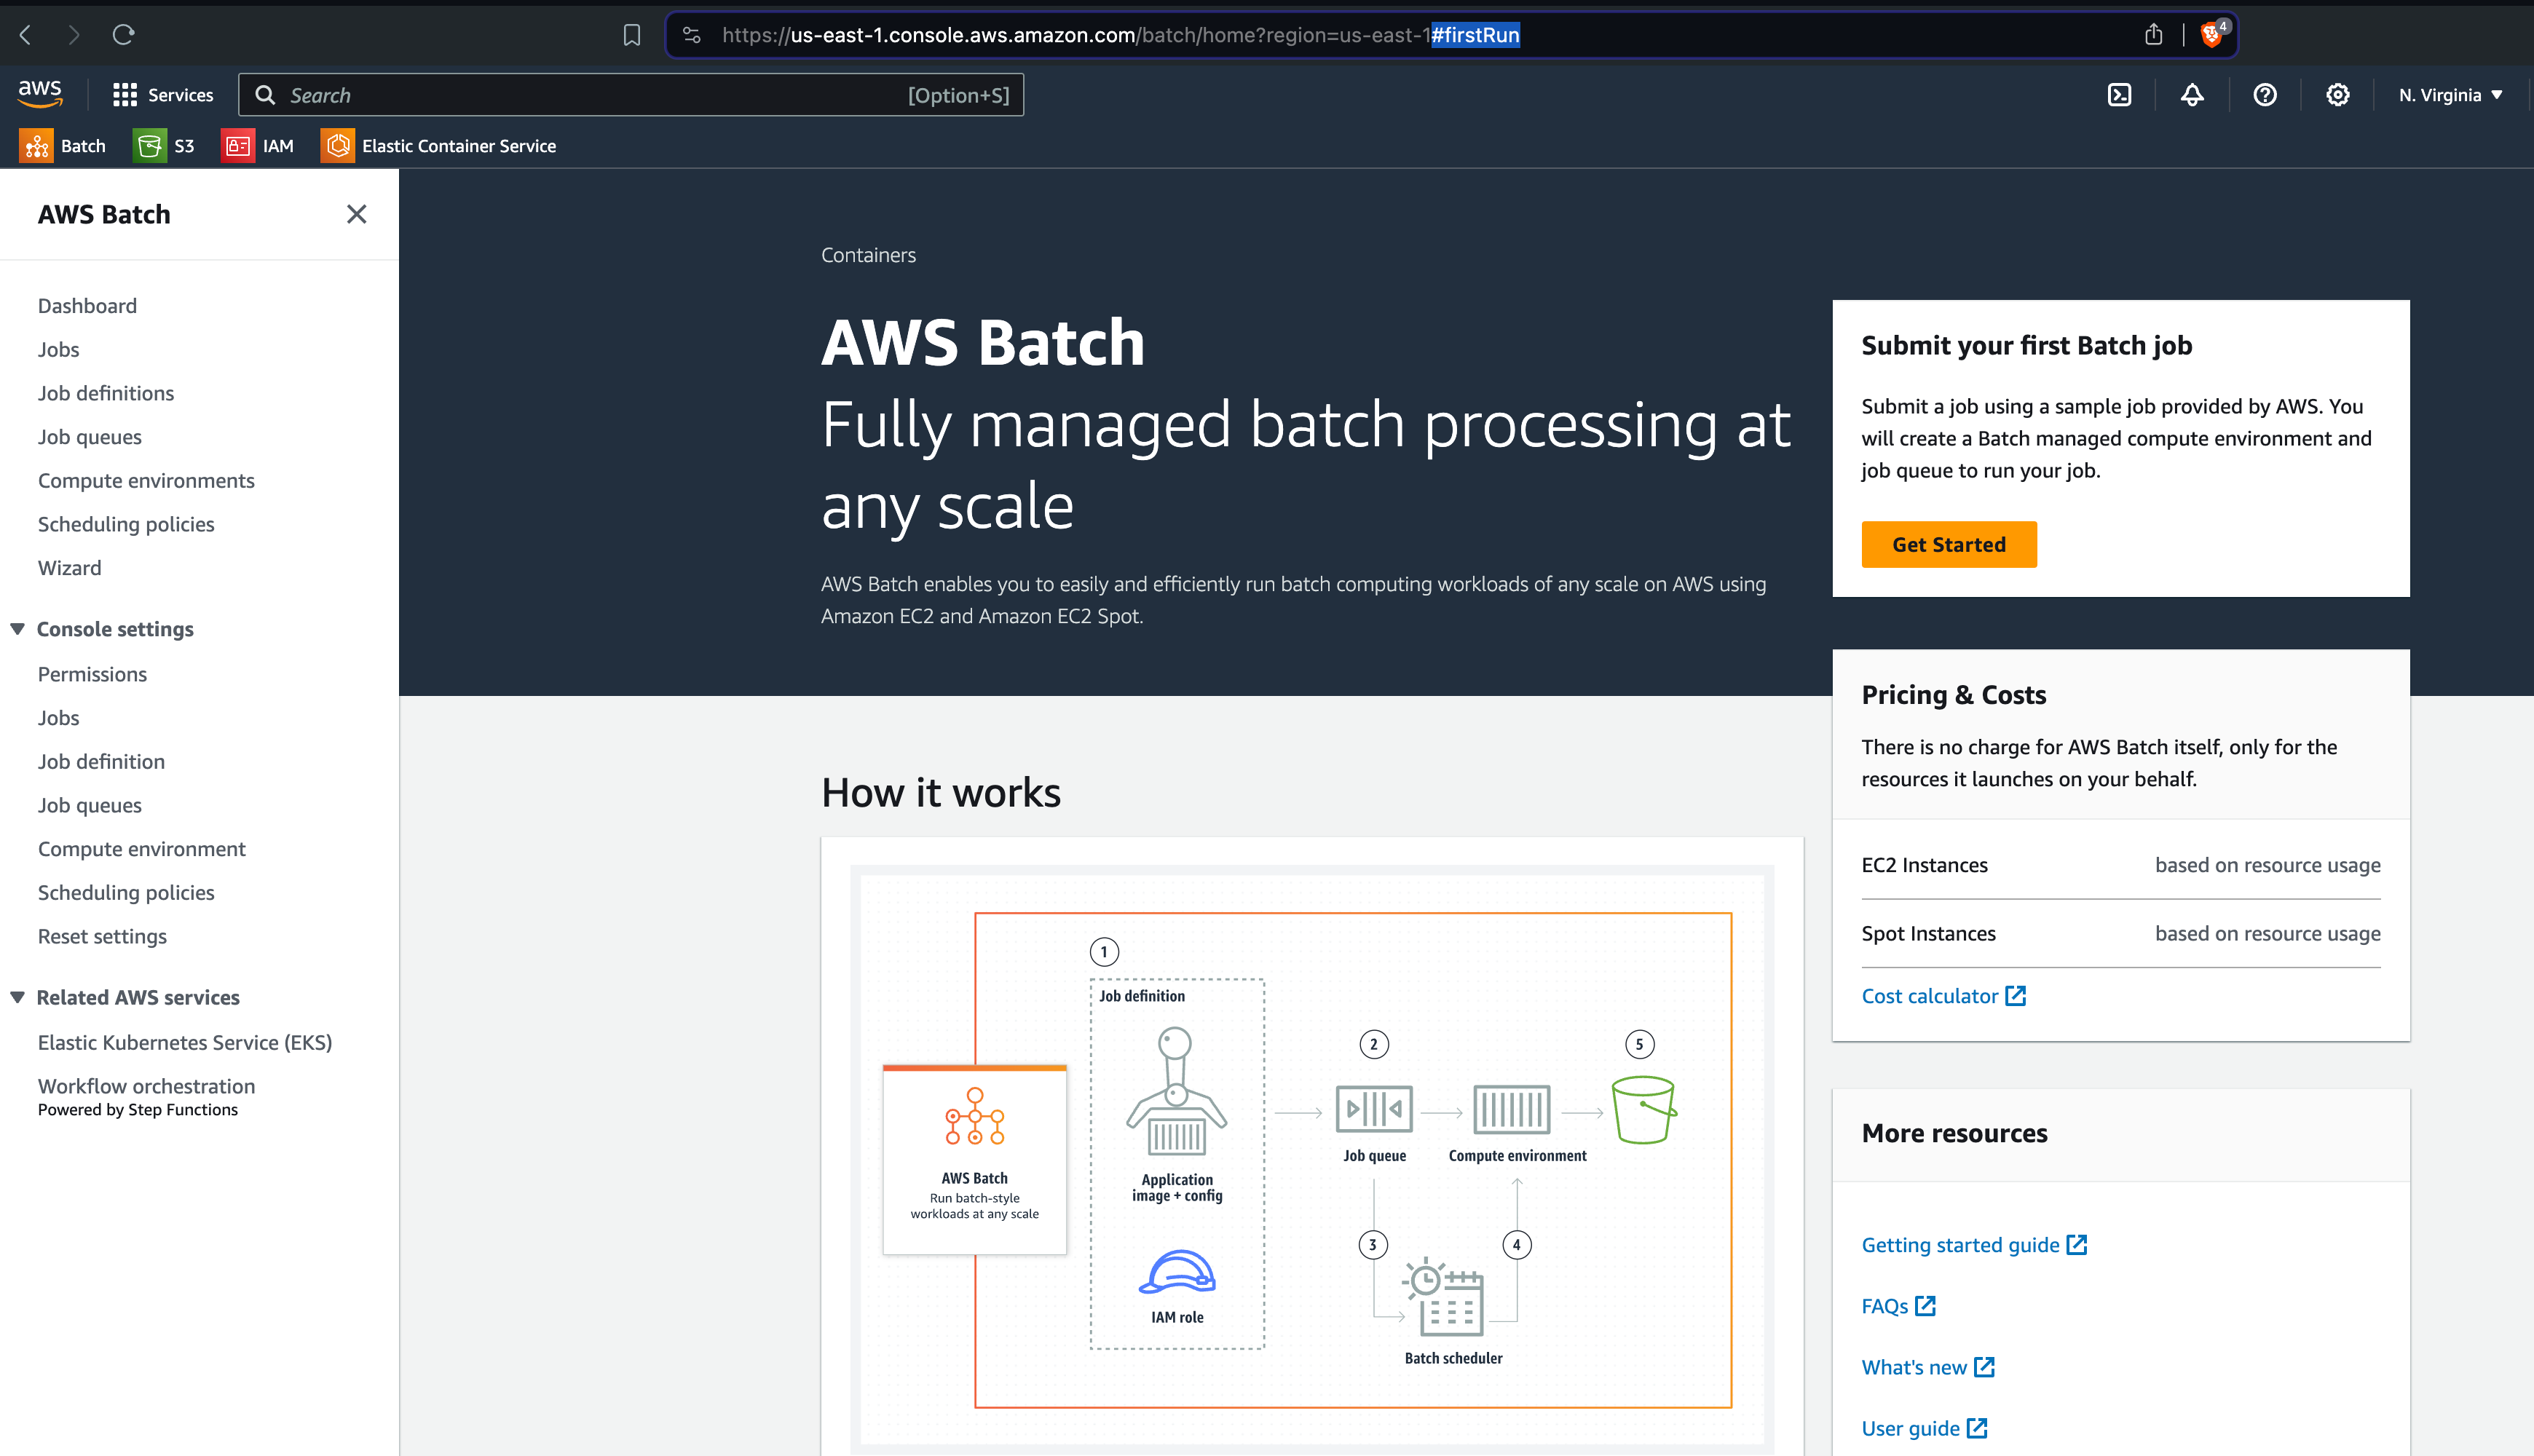
Go to the AWS Batch console.
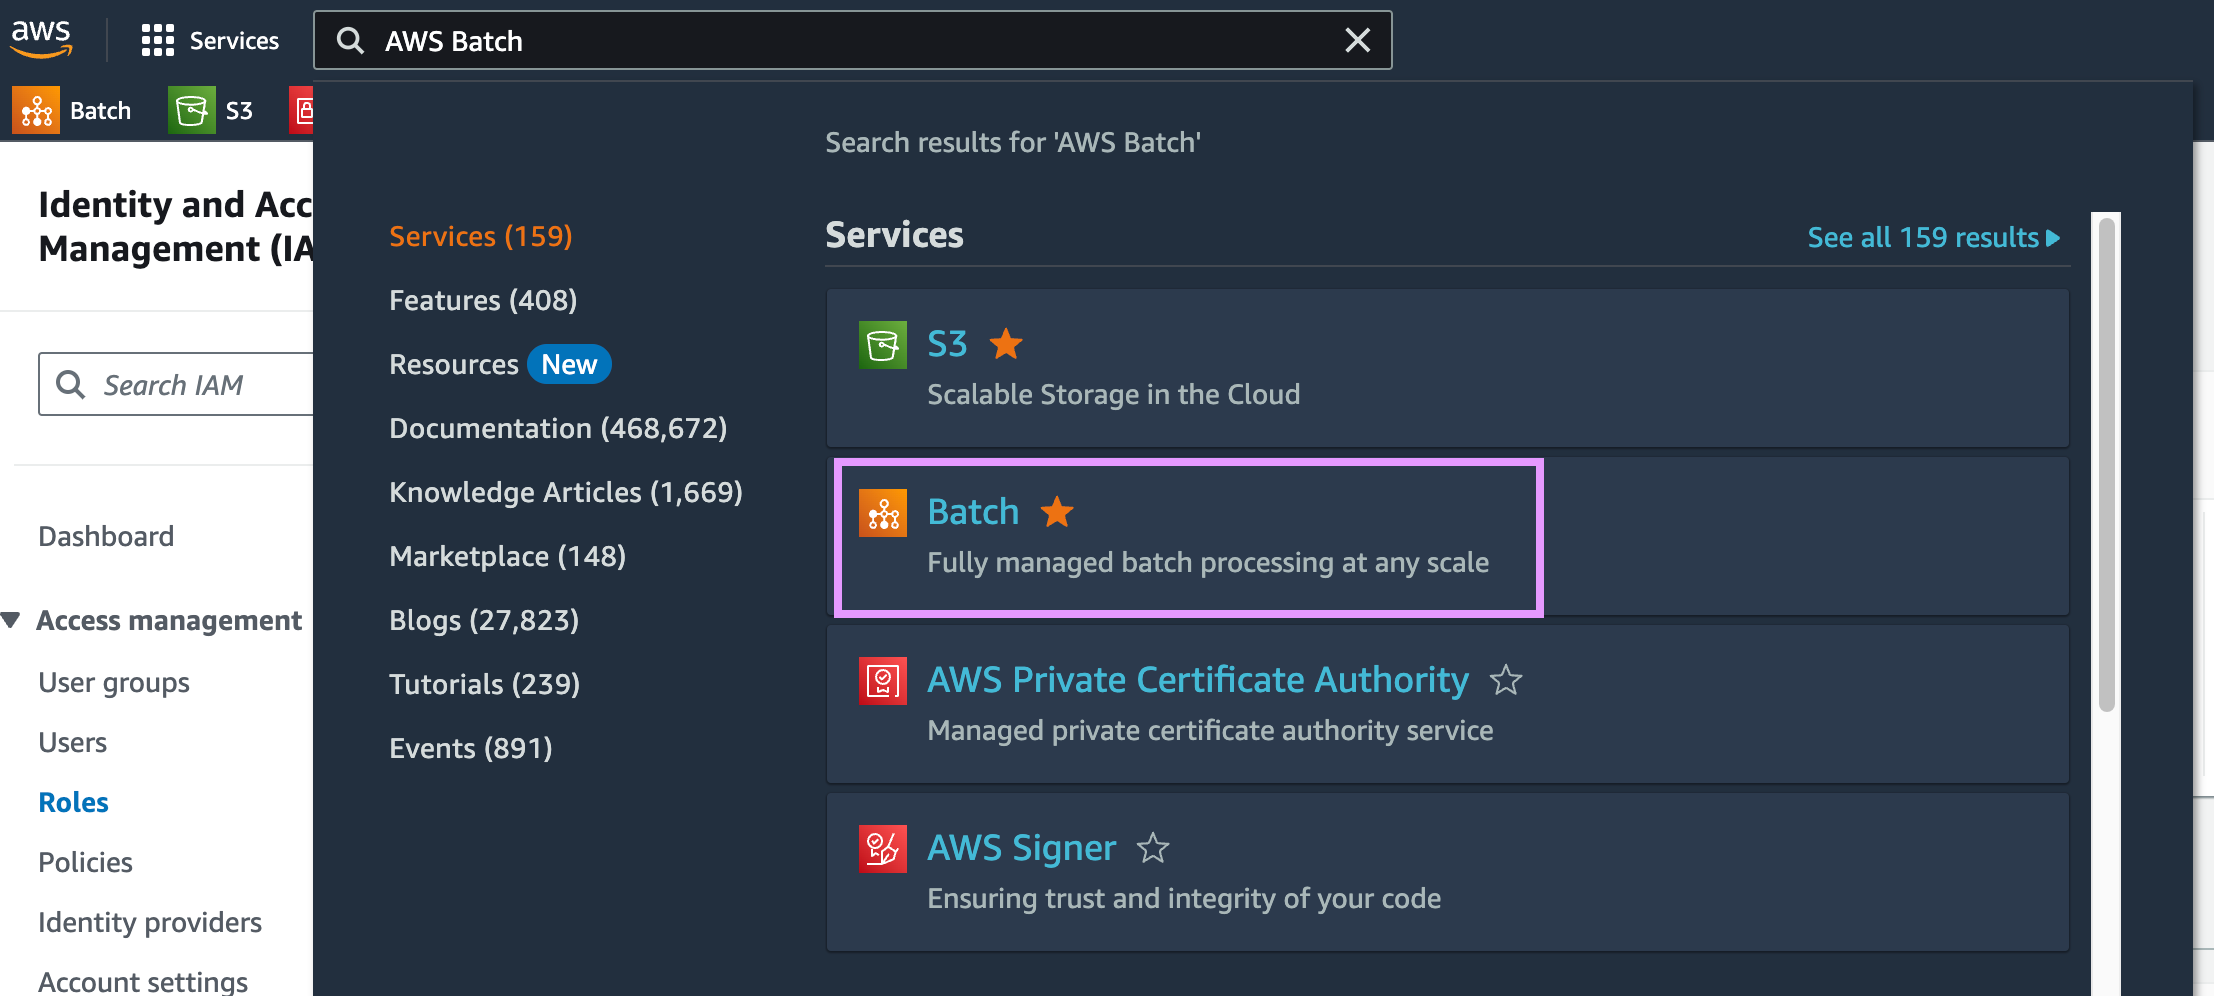
Then, click on Get Started. If you don’t see the Get Started button, add #firstRun to the URL:
Follow the wizard to create a new compute environment.
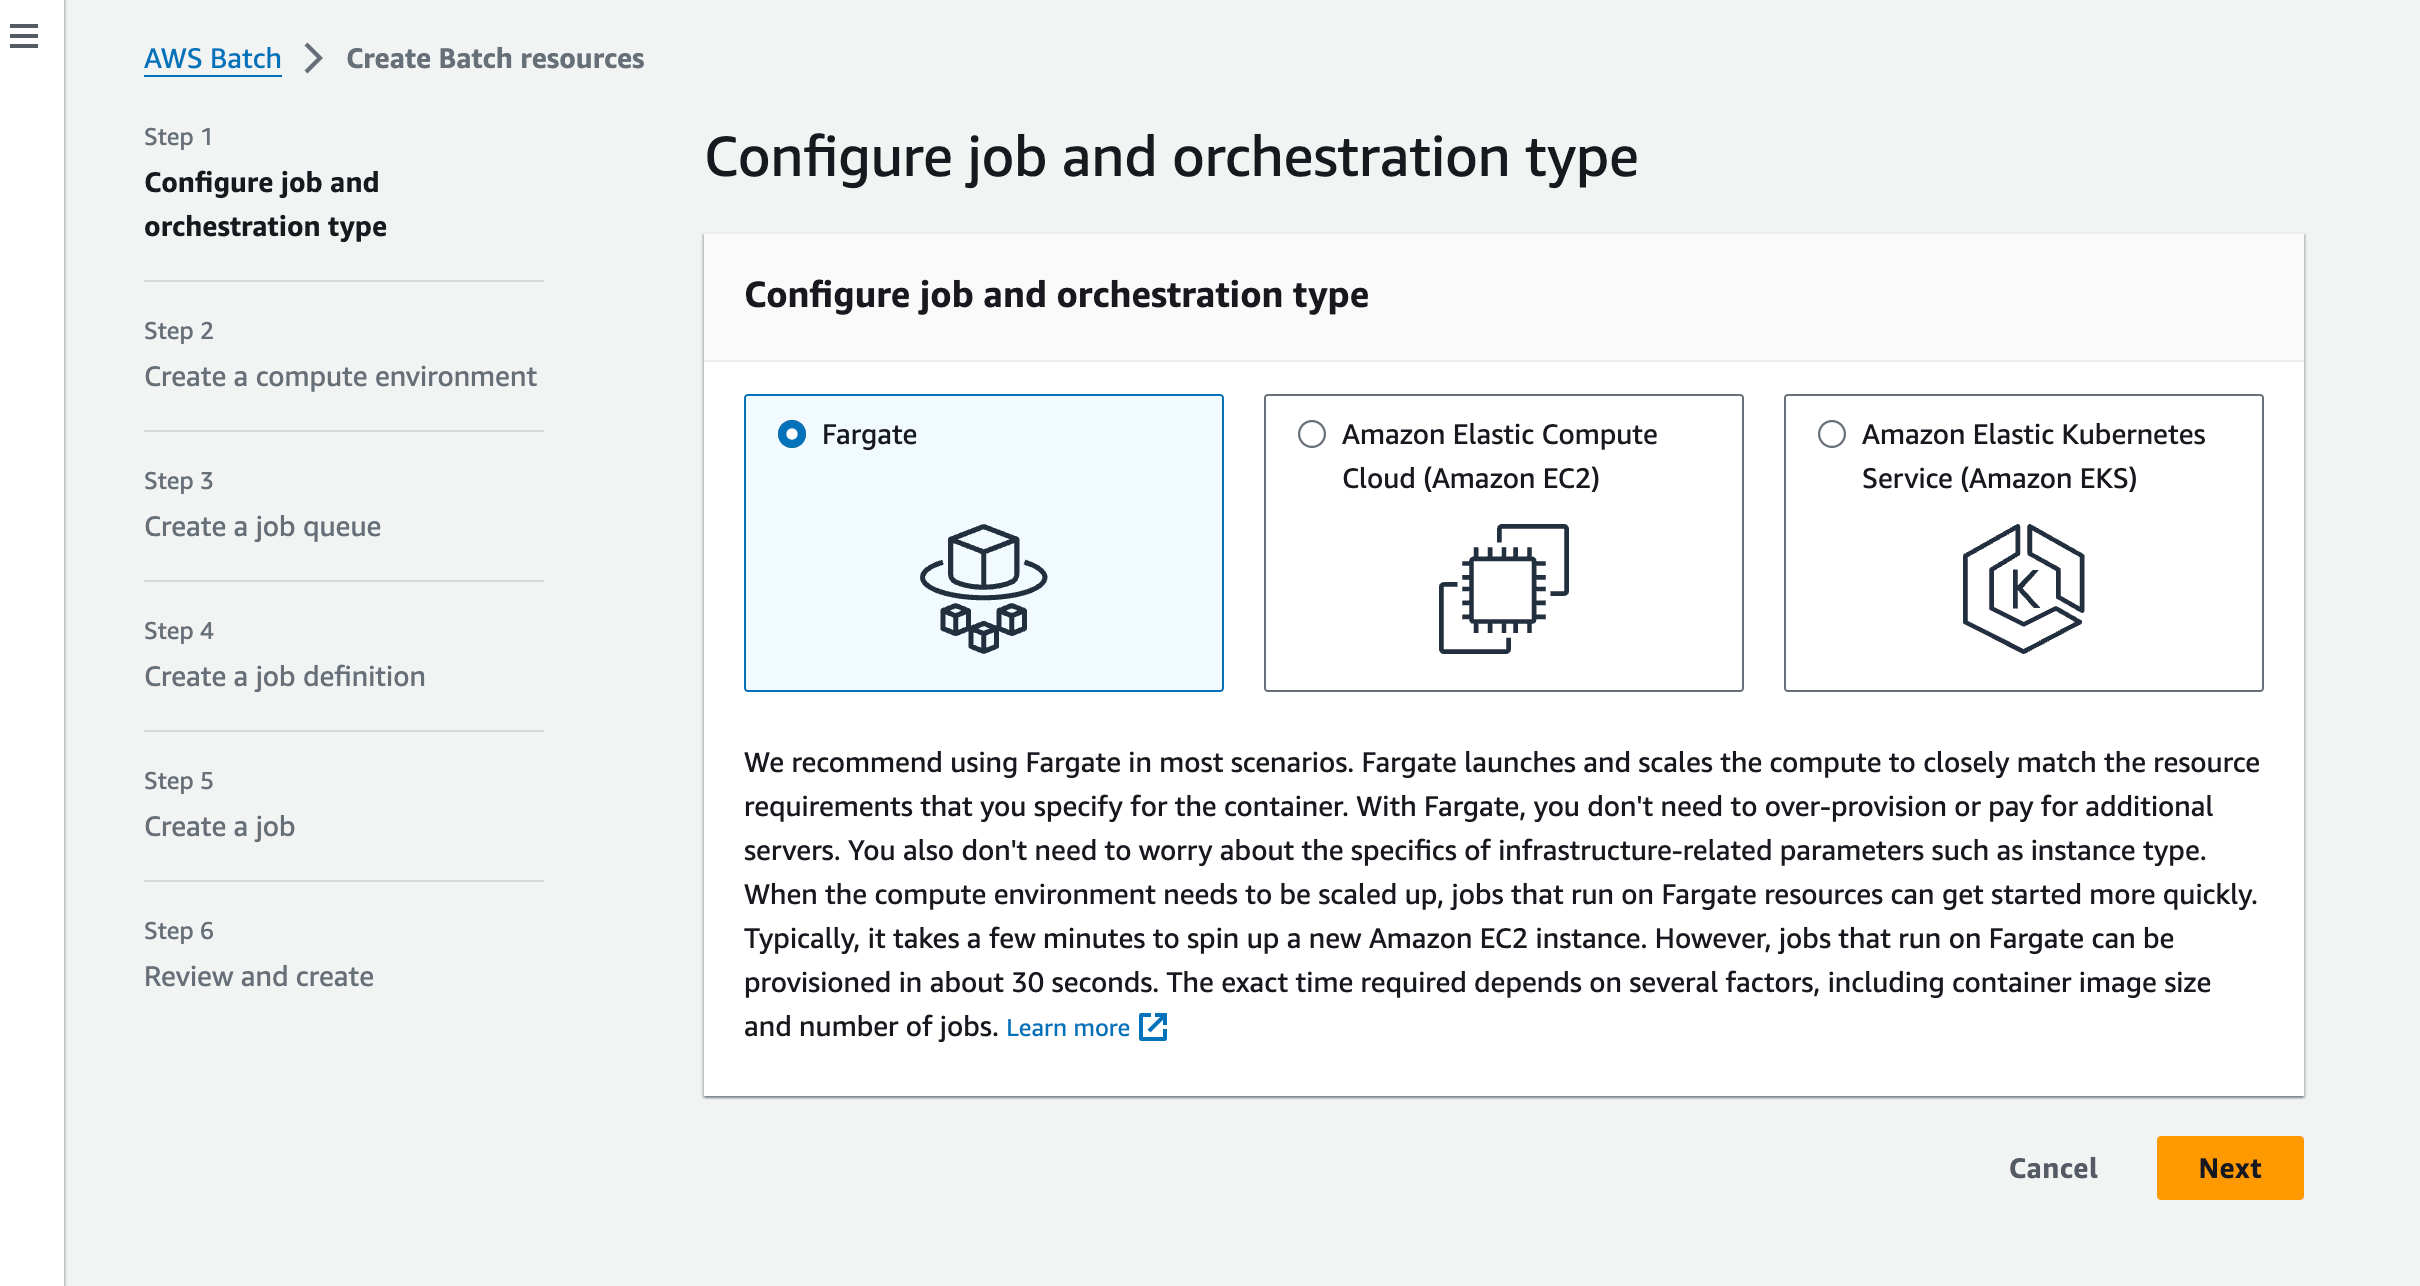
You should see the following text recommending the use of Fargate:
“We recommend using Fargate in most scenarios. Fargate launches and scales the compute to closely match the resource requirements that you specify for the container. With Fargate, you don’t need to over-provision or pay for additional servers. You also don’t need to worry about the specifics of infrastructure-related parameters such as instance type. When the compute environment needs to be scaled up, jobs that run on Fargate resources can get started more quickly. Typically, it takes a few minutes to spin up a new Amazon EC2 instance. However, jobs that run on Fargate can be provisioned in about 30 seconds. The exact time required depends on several factors, including container image size and number of jobs. Learn more.”
Select Fargate for this walkthrough.
Step 1: Select orchestration type
Select Fargate and click on Next.
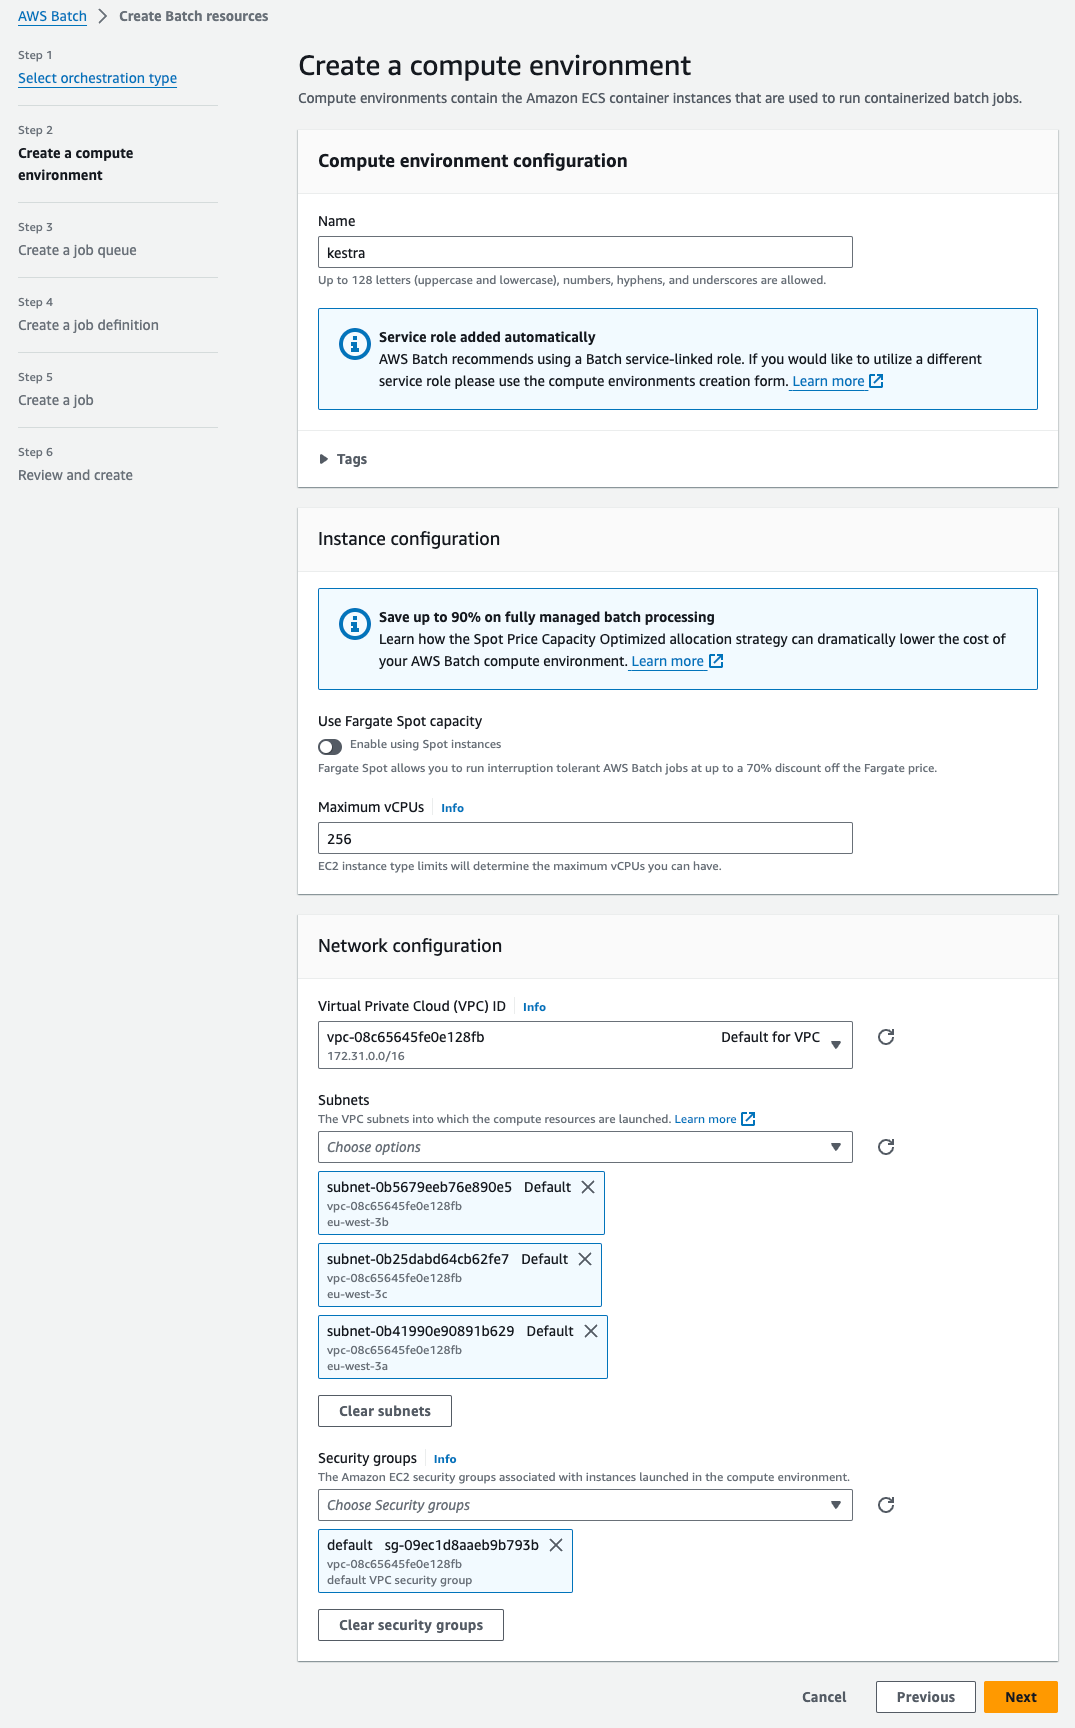
Step 2: Create a compute environment
Add a name for your compute environment — for example, kestra. Keep the default settings. Select the VPC and subnets you want to use — the default VPC, subnets, and security group all work. Then select Next.
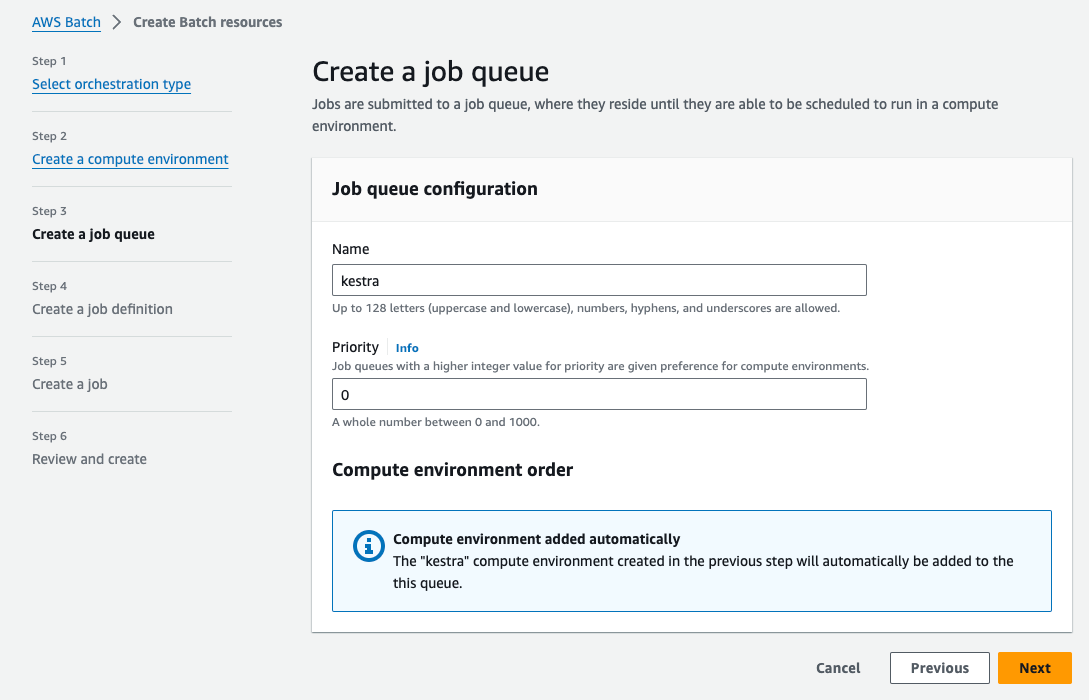
Step 3: Create a job queue
Name the job queue — for example, kestra. Keep the default settings. Then select Next:
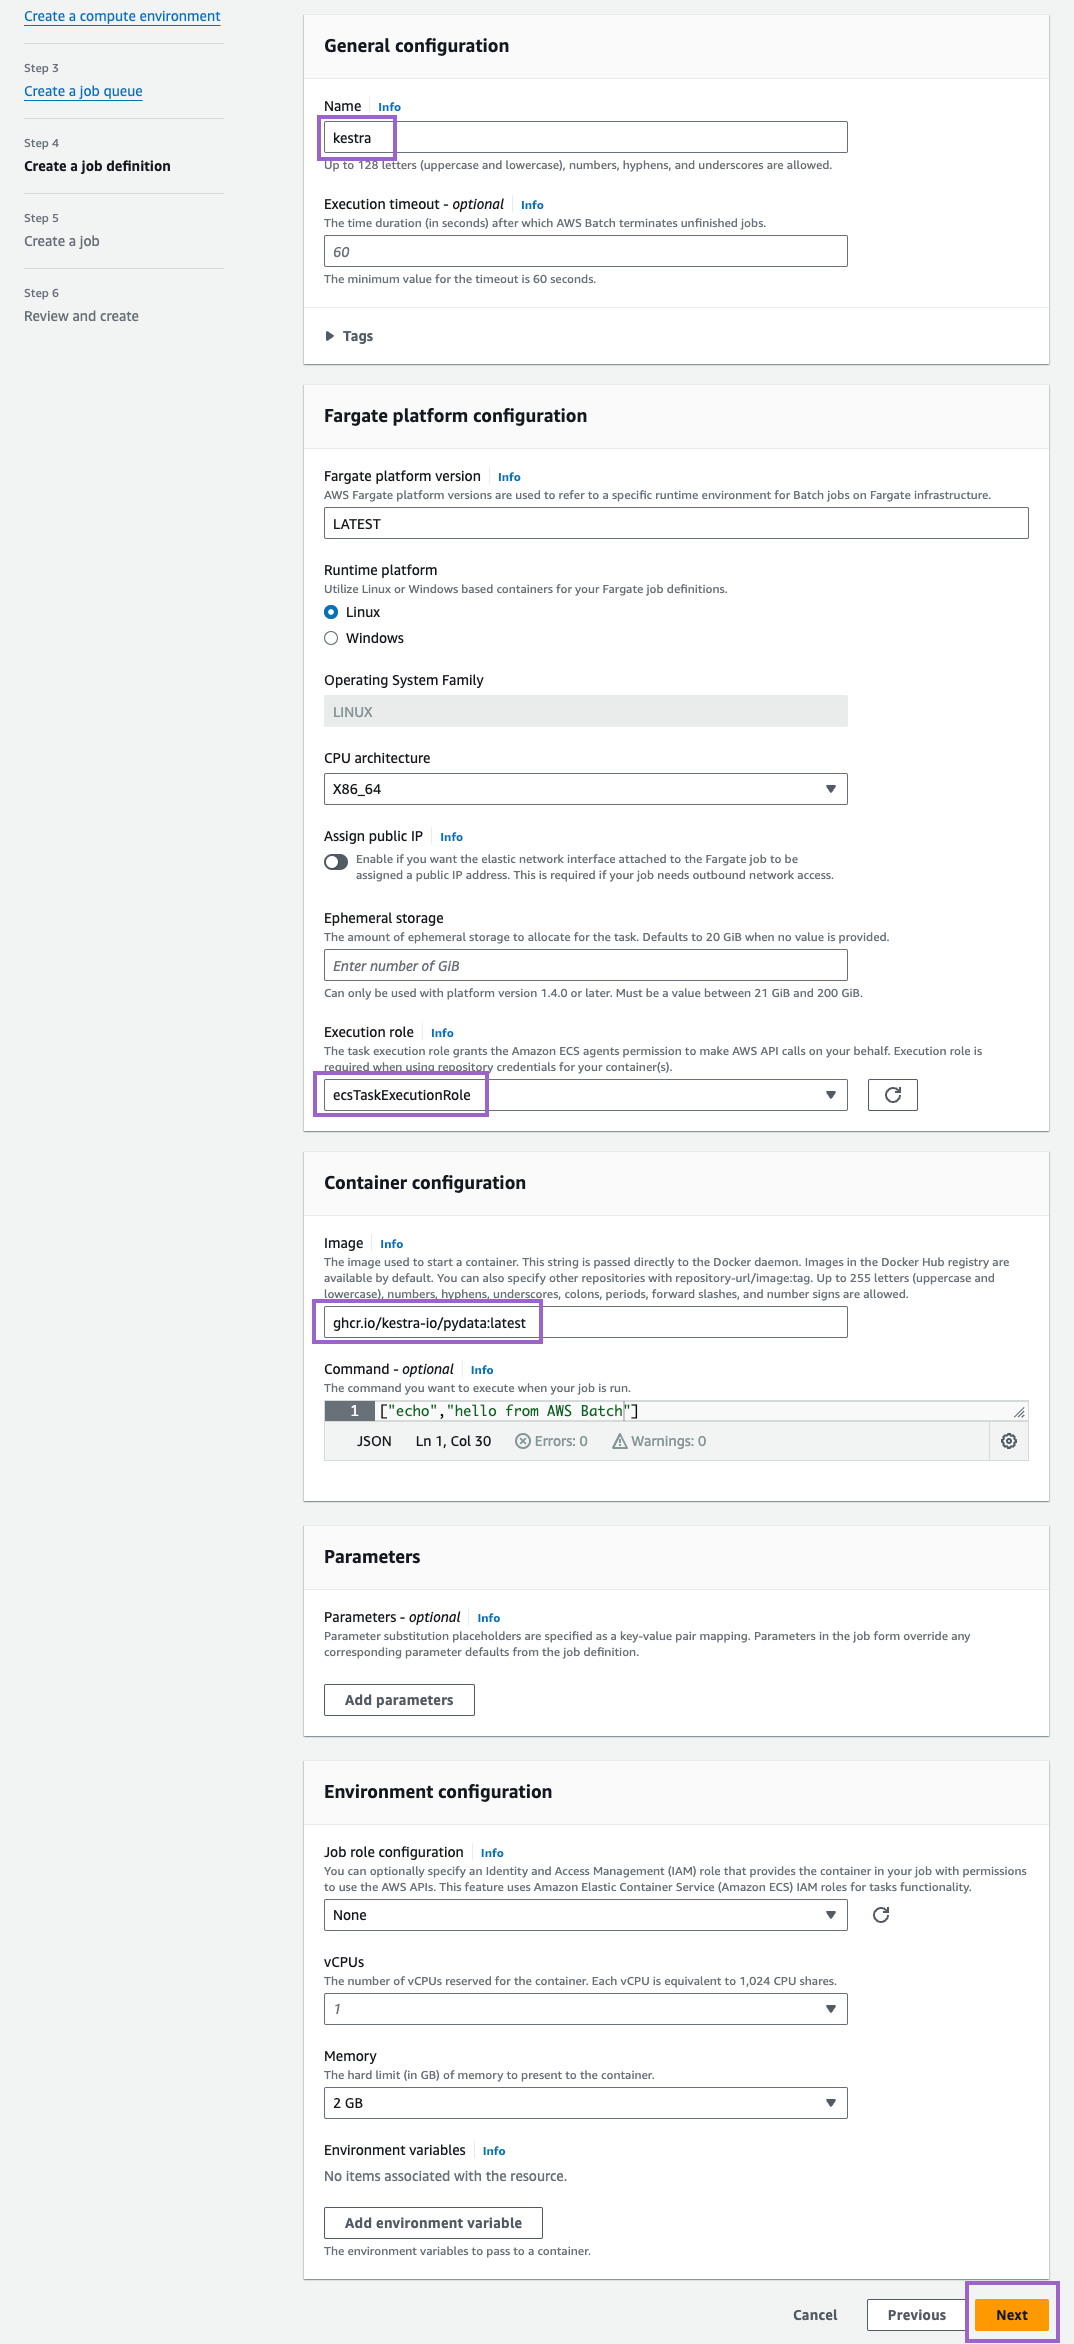
Step 4: Create a job definition
Create a job definition named kestra. Under Execution role, select the role you created earlier (ecsTaskExecutionRole). Keep default settings for everything else (you can optionally set the image to ghcr.io/kestra-io/pydata:latest). Then select Next:
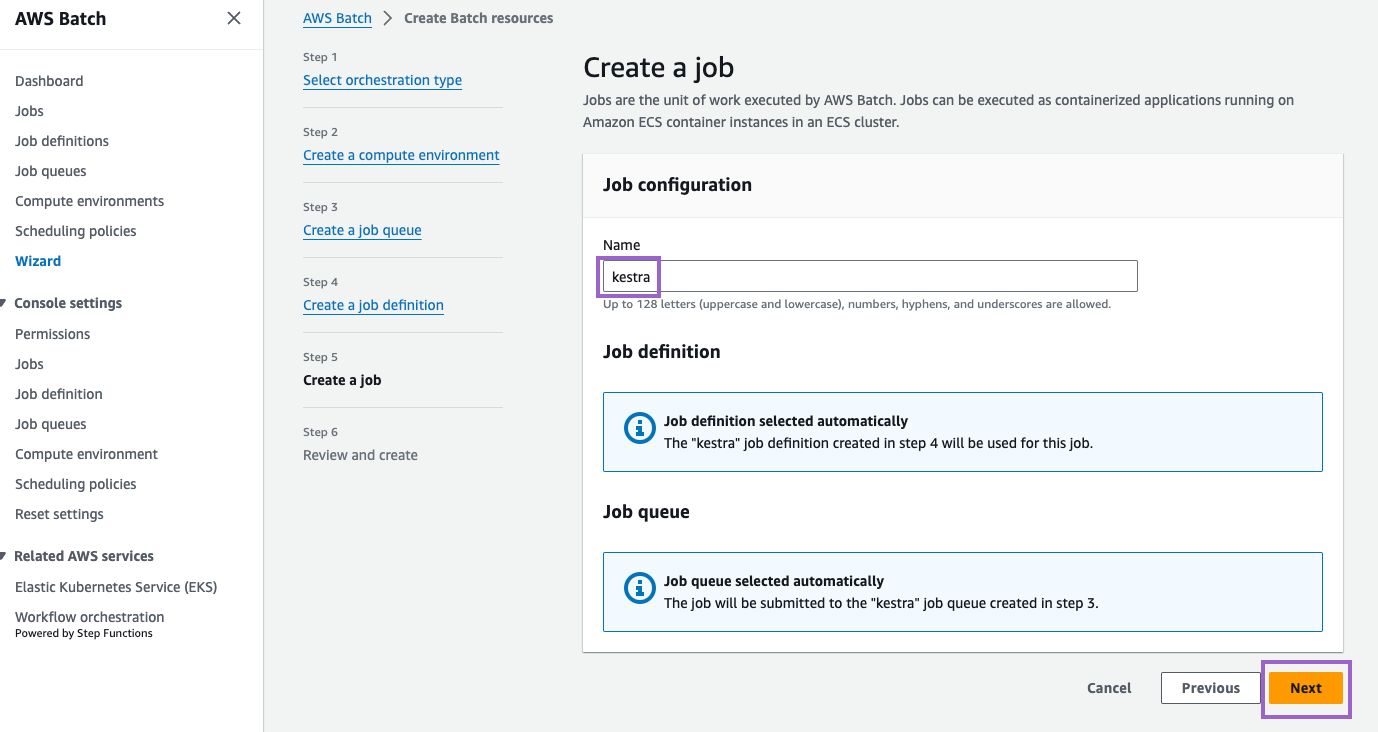
Step 5: Create a job
Create a job named kestra. Select Next to review settings:
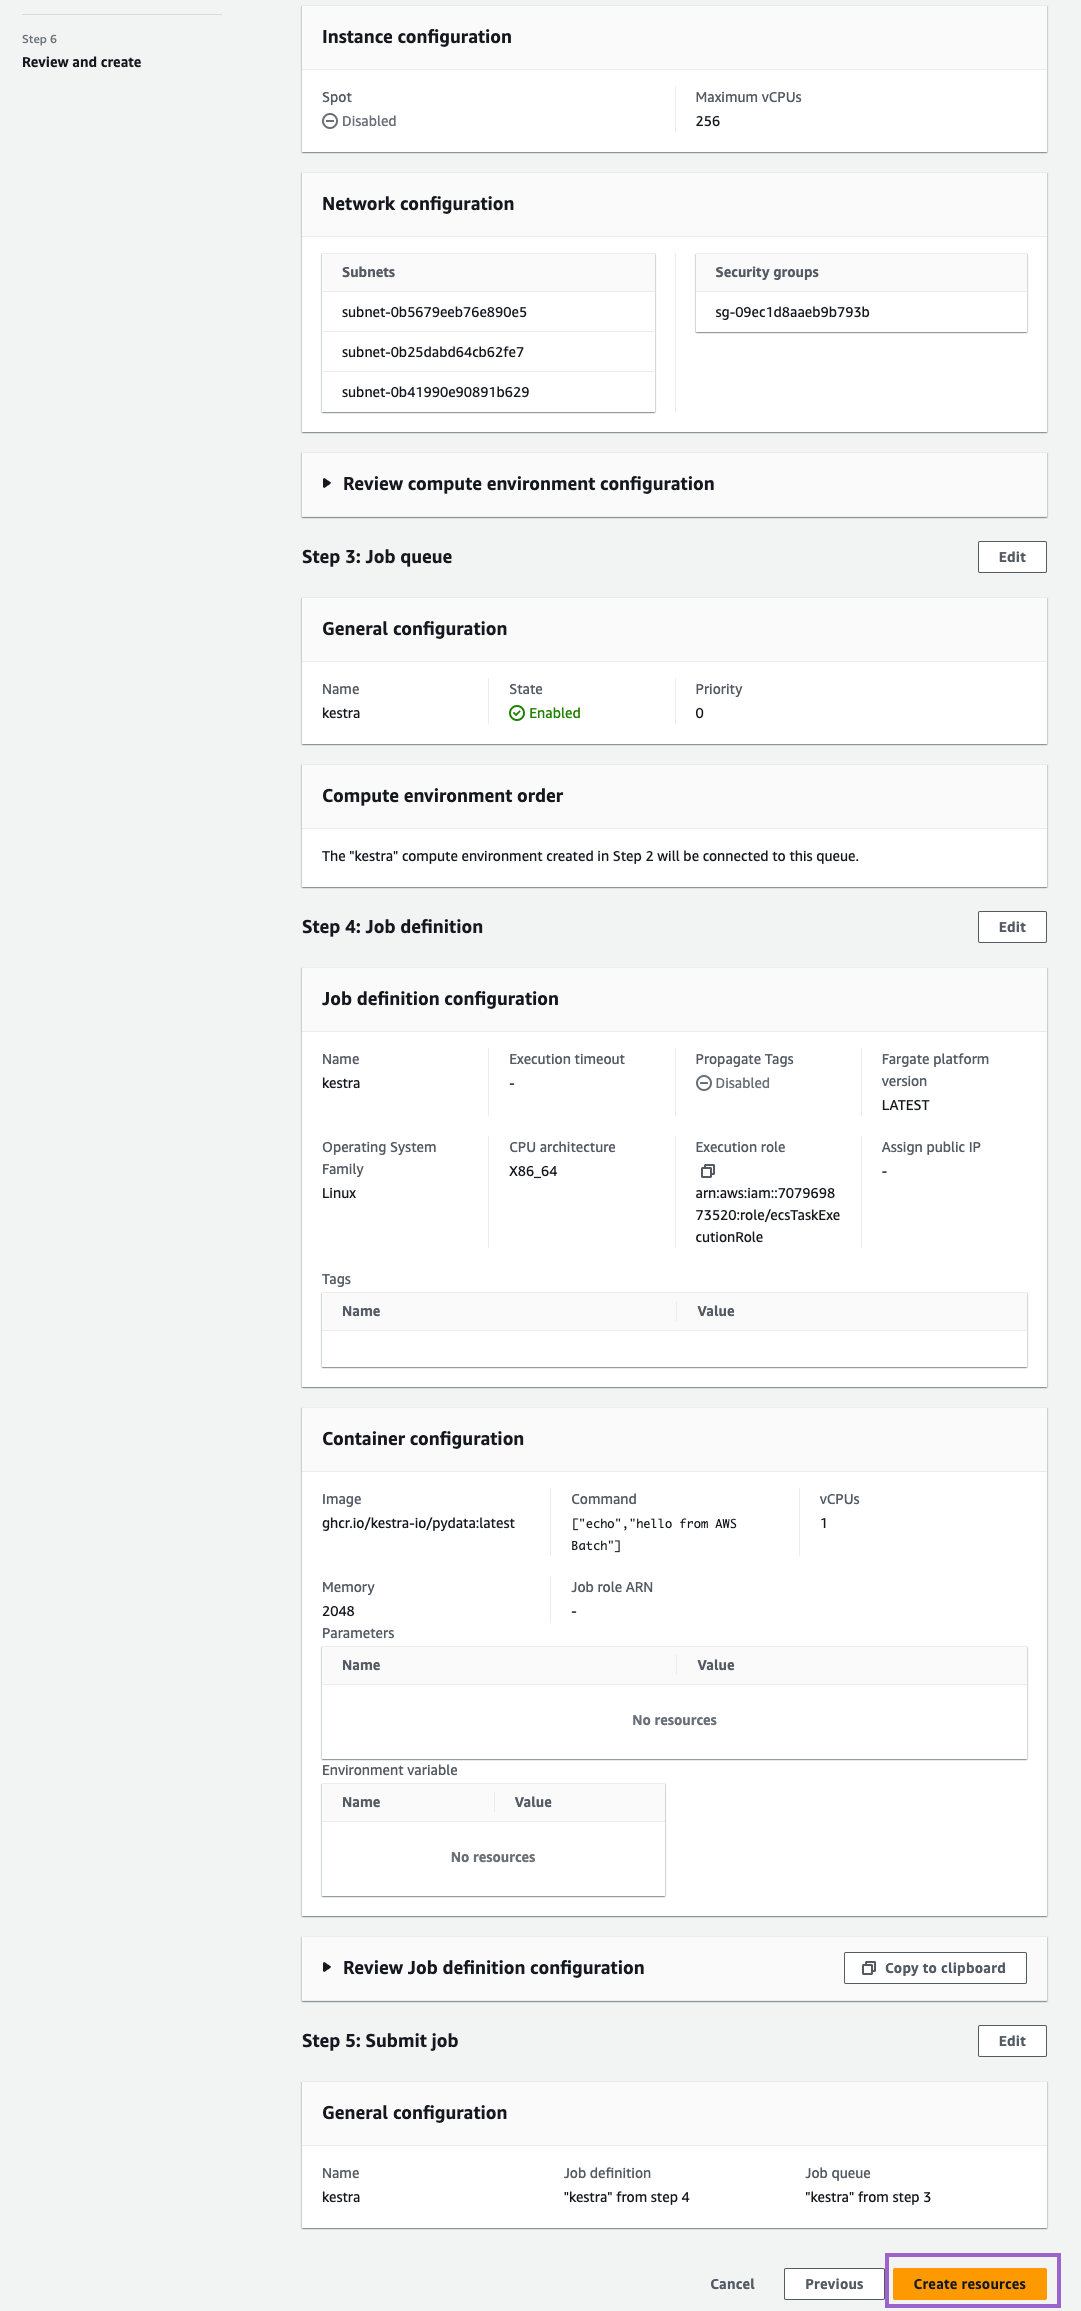
Step 6: Review and create
Review your settings and click on Create resources:
Once you see this message, you are all set:
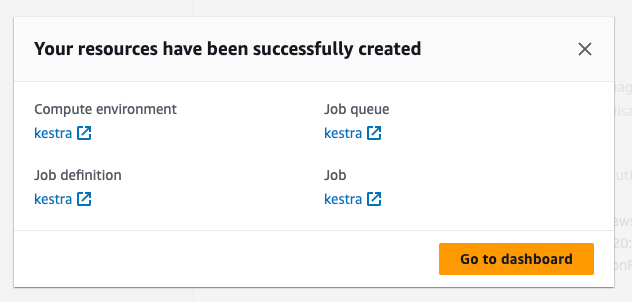
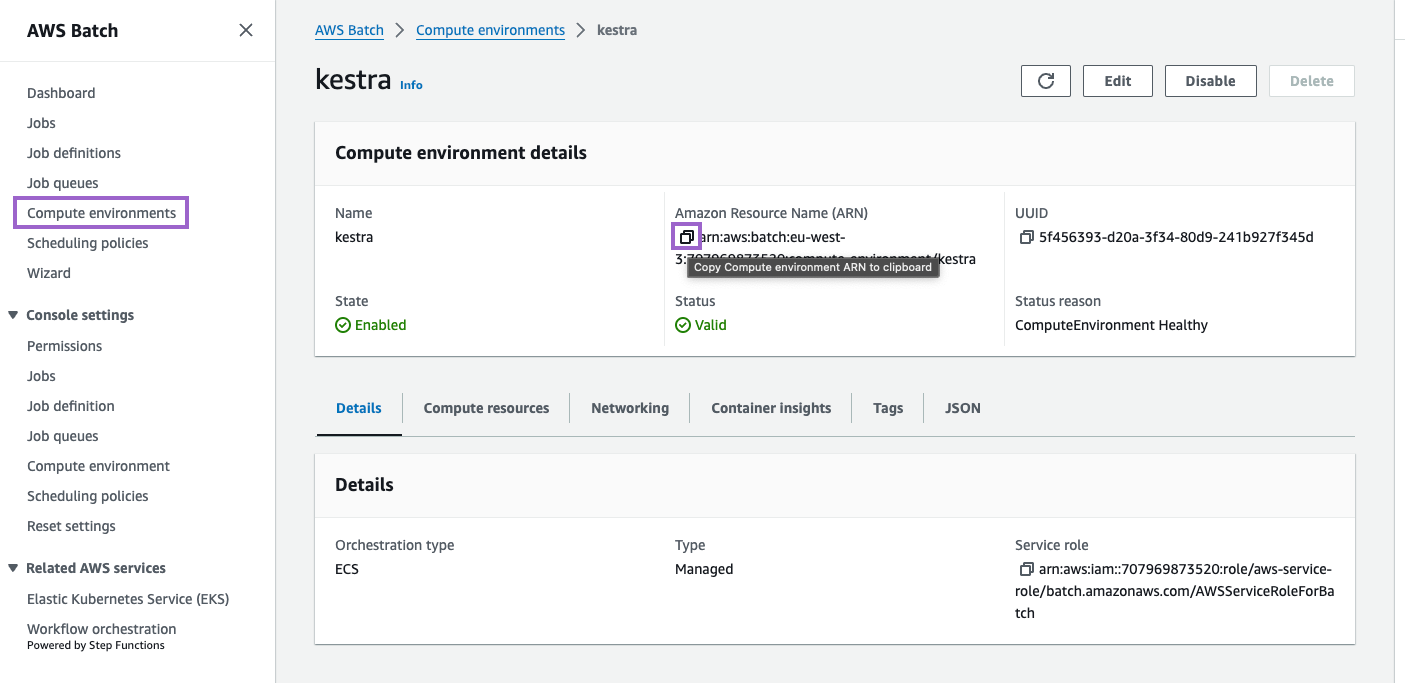
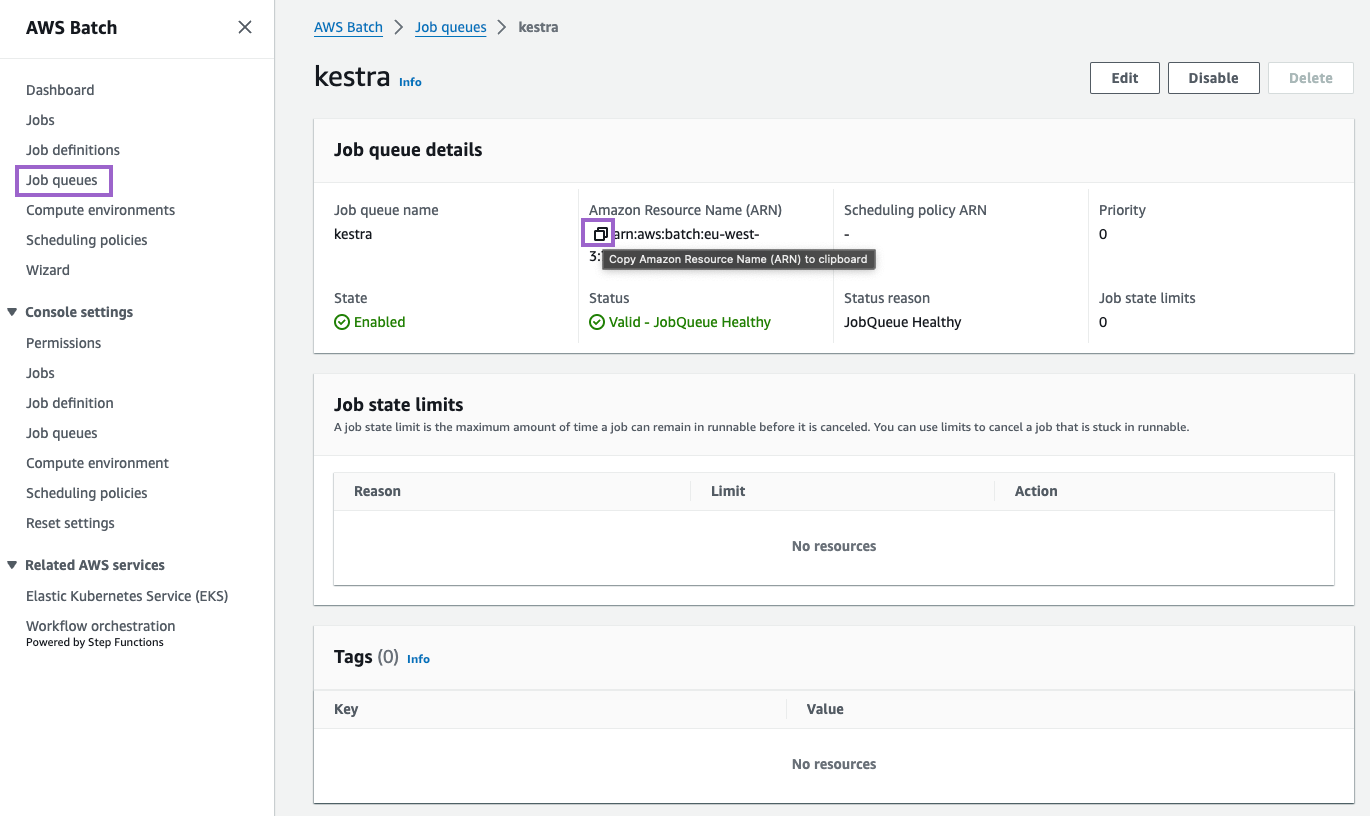
Copy and apply the ARN to your Kestra configuration
Copy the ARN of the compute environment and job queue. You will need to add these to your Kestra configuration.
Create an S3 bucket
Create an S3 bucket to store input and output files. To do this, open S3 → Create bucket.
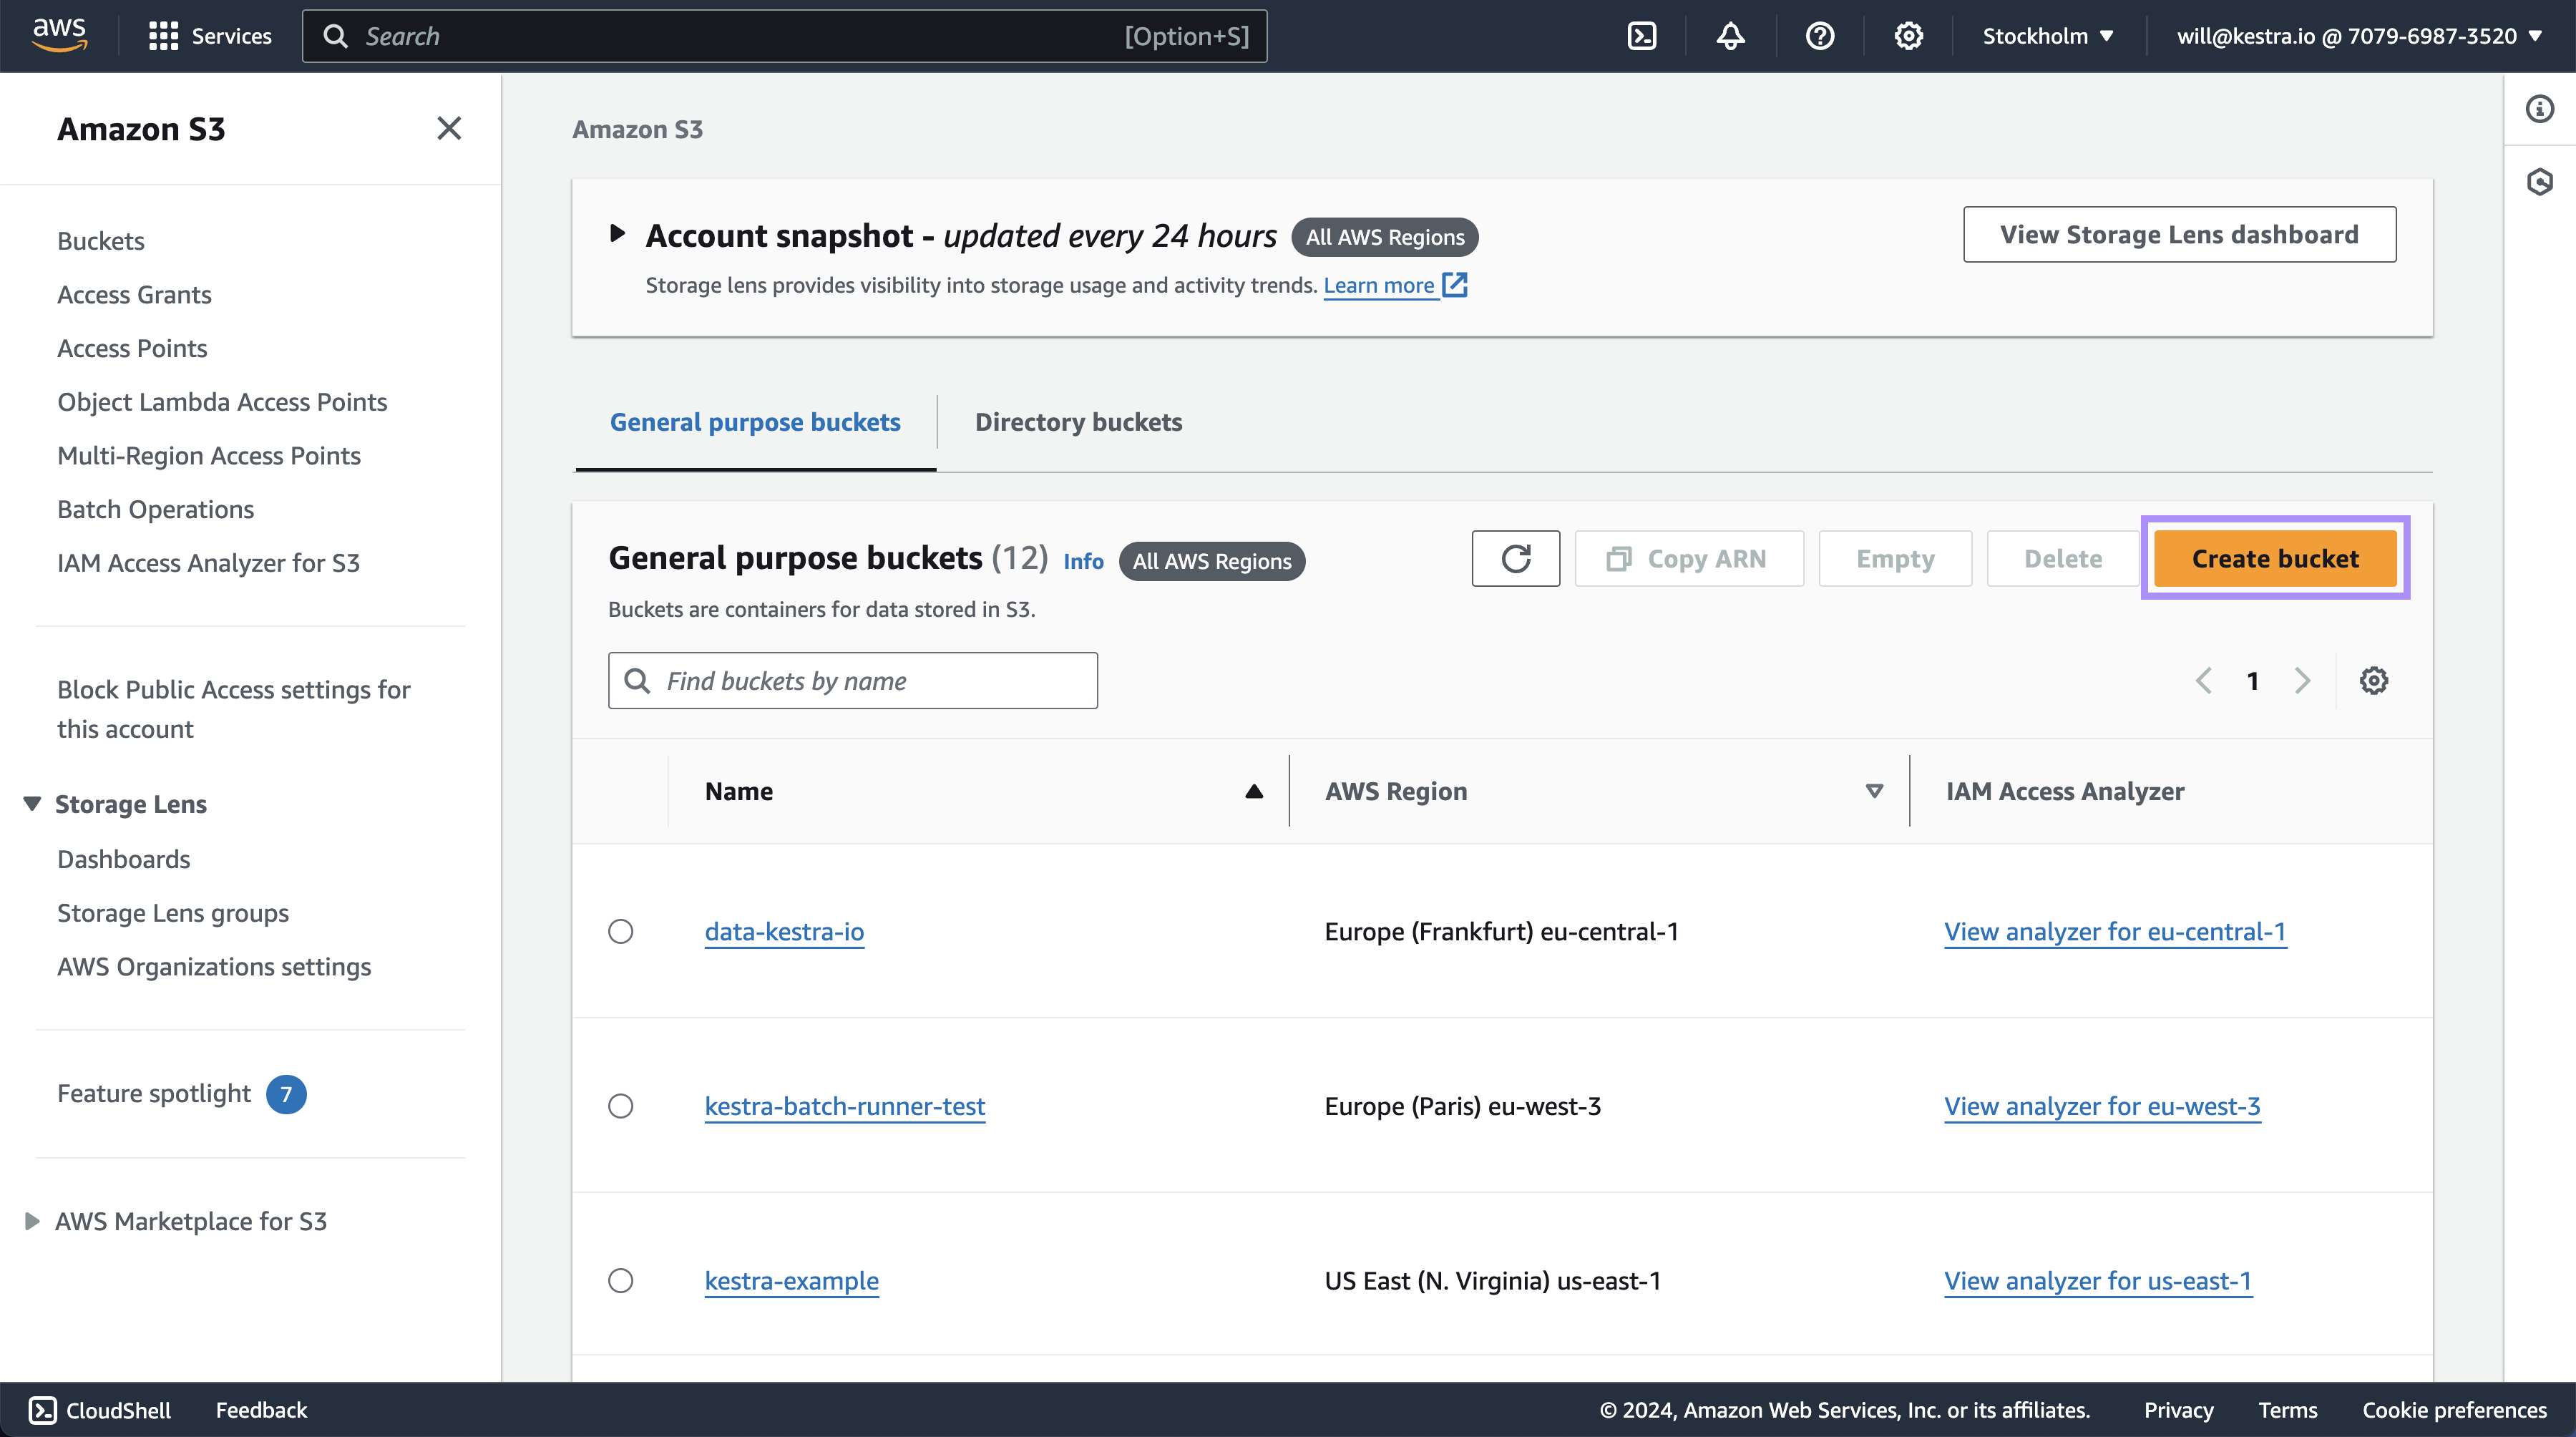
Add a name and leave everything else at its default.
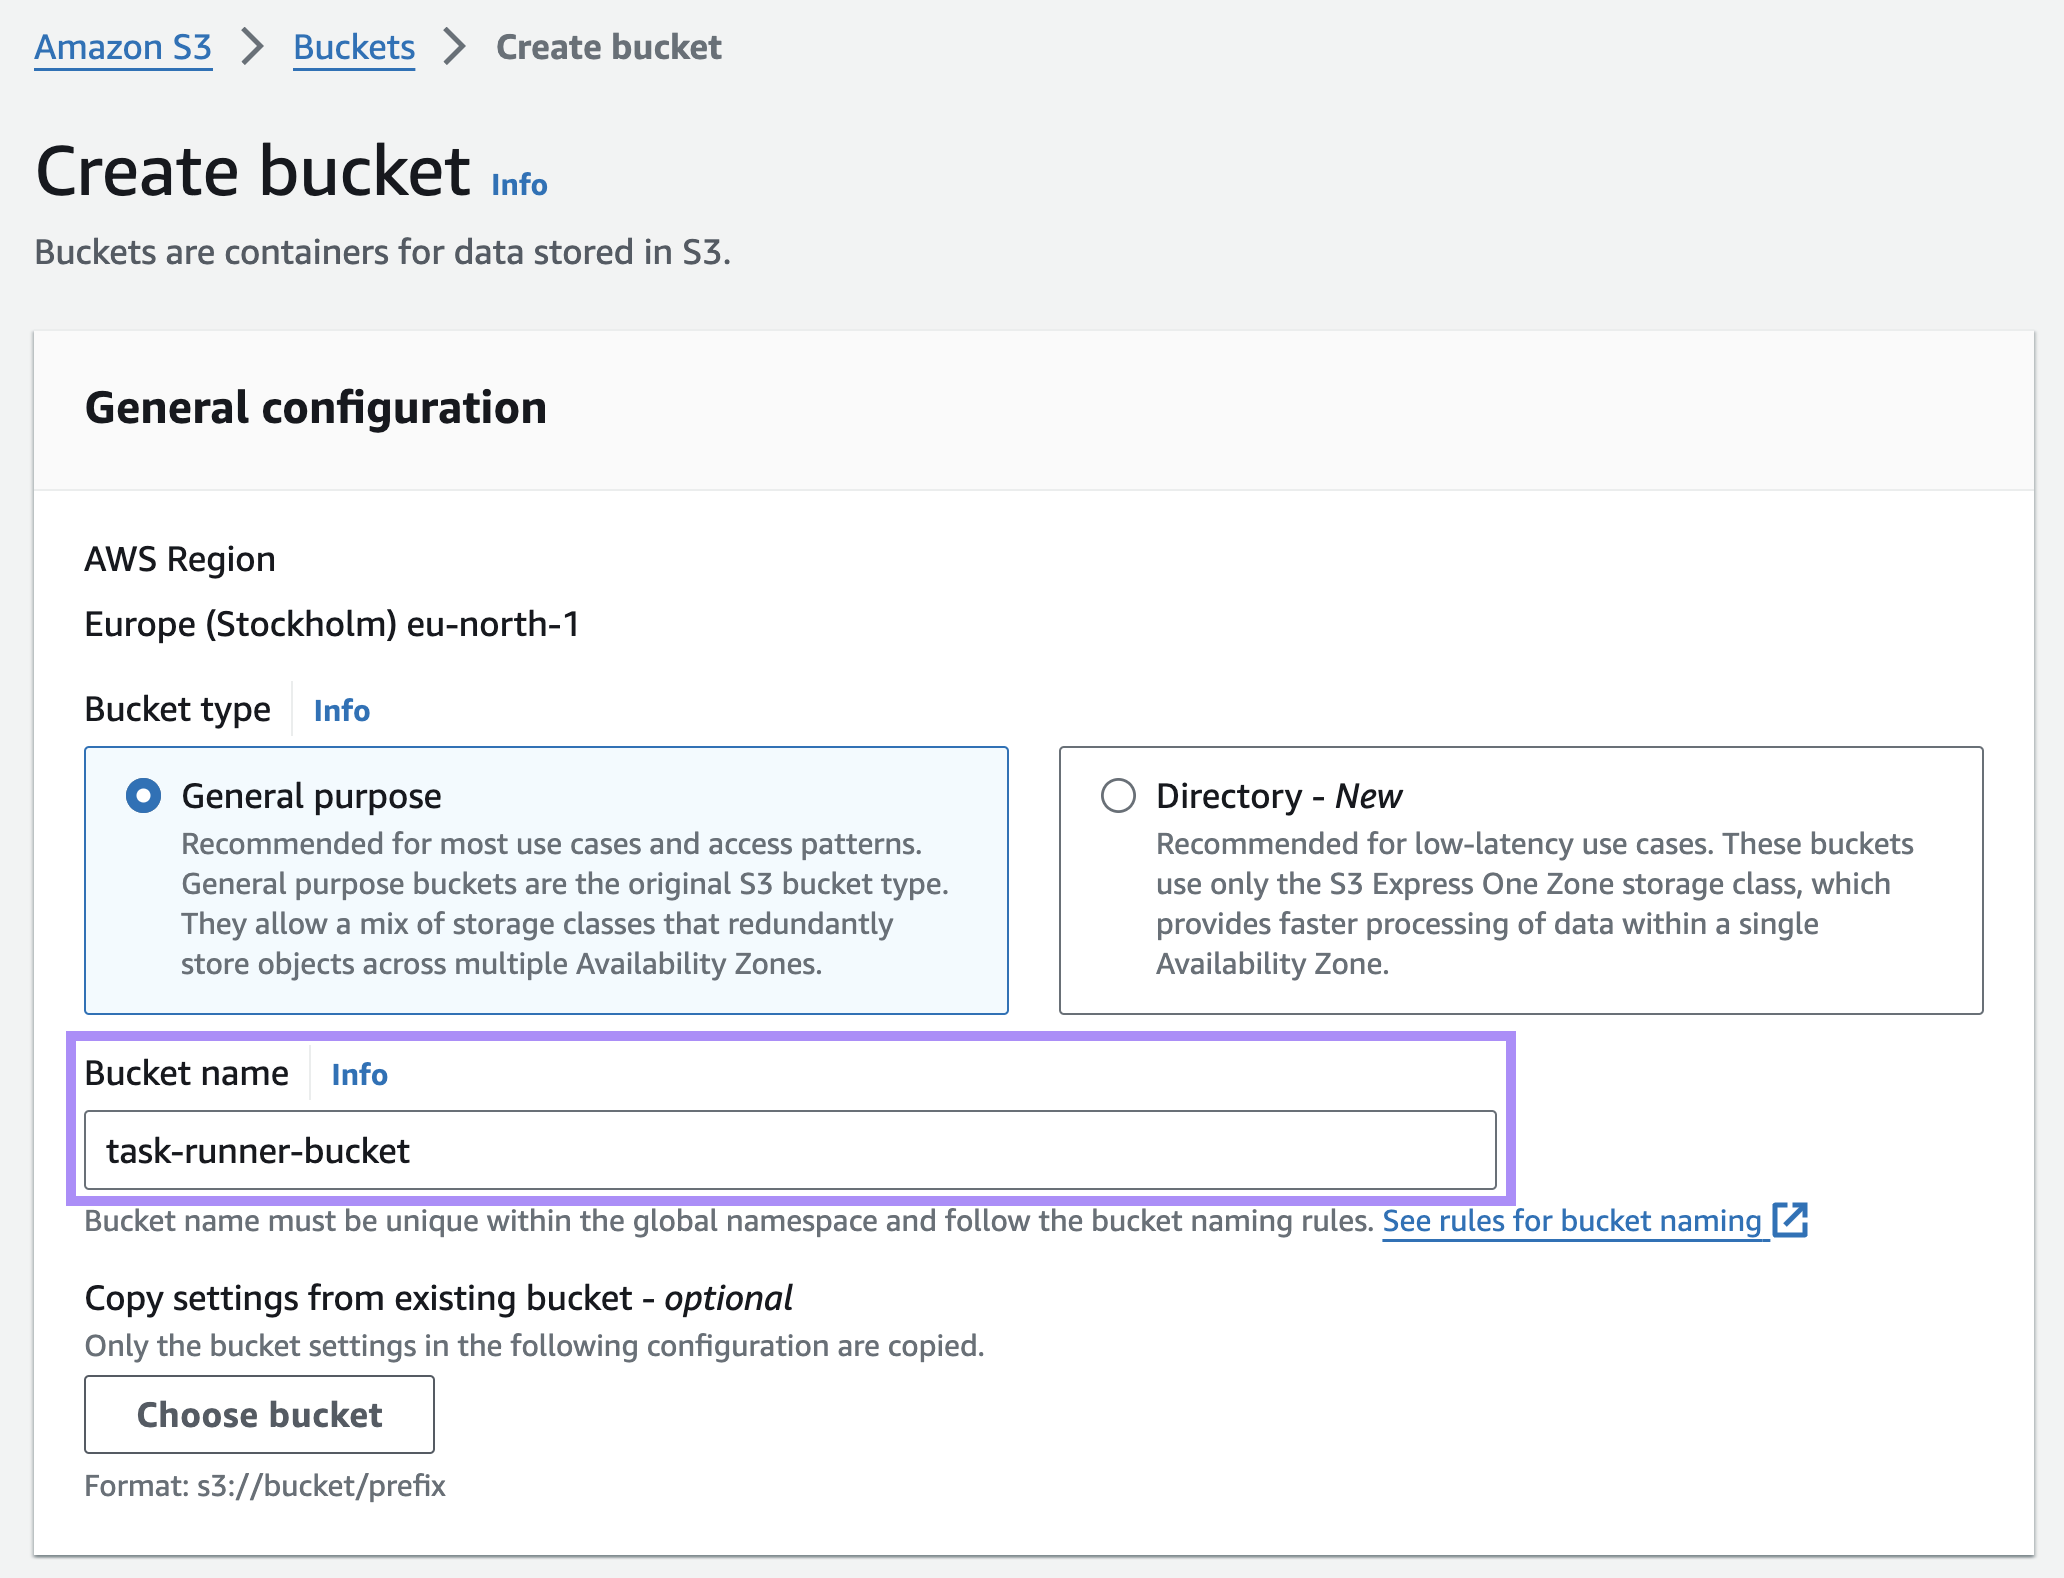
Scroll to the bottom and select Create bucket.
Add the bucket name to your Kestra flow.
Run your Kestra task on AWS ECS Fargate
Fill in the ARNs of the compute environment and job queue in your Kestra configuration. Here is an example of a flow that uses the aws.runner.Batch to run a Python script on AWS ECS Fargate to get environment information and print it to the logs:
id: aws_batch_runnernamespace: company.team
variables: compute_environment_arn: arn:aws:batch:us-east-1:123456789:compute-environment/kestra job_queue_arn: arn:aws:batch:us-east-1:123456789:job-queue/kestra execution_role_arn: arn:aws:iam::123456789:role/ecsTaskExecutionRole task_role_arn: arn:aws:iam::123456789:role/ecsTaskRole
tasks: - id: send_data type: io.kestra.plugin.scripts.python.Script containerImage: ghcr.io/kestra-io/pydata:latest taskRunner: type: io.kestra.plugin.ee.aws.runner.Batch region: us-east-1 accessKeyId: "{{ secret('AWS_ACCESS_KEY_ID') }}" secretKeyId: "{{ secret('AWS_SECRET_KEY_ID') }}" computeEnvironmentArn: "{{ vars.compute_environment_arn }}" jobQueueArn: "{{ vars.job_queue_arn }}" executionRoleArn: "{{ vars.execution_role_arn }}" taskRoleArn: "{{ vars.task_role_arn }}" bucket: kestra-us script: | import platform import socket import sys
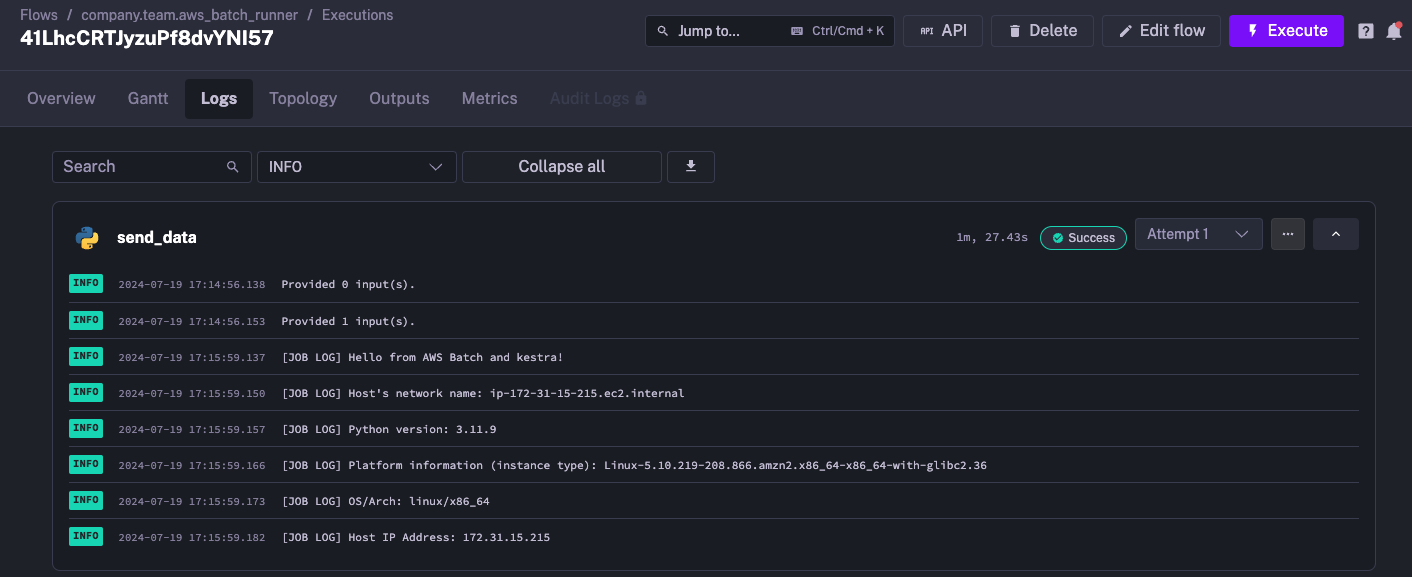
print("Hello from AWS Batch and kestra!")
def print_environment_info(): print(f"Host's network name: {platform.node()}") print(f"Python version: {platform.python_version()}") print(f"Platform information (instance type): {platform.platform()}") print(f"OS/Arch: {sys.platform}/{platform.machine()}")
try: hostname = socket.gethostname() ip_address = socket.gethostbyname(hostname) print(f"Host IP Address: {ip_address}") except socket.error as e: print("Unable to obtain IP address.")
if __name__ == '__main__': print_environment_info()When you execute this task, the environment information appears in the logs generated by the Python script:
Advanced configuration
The task runner exposes several optional properties for tuning behavior and authentication.
Polling and timeouts
| Property | Default | Description |
|---|---|---|
waitUntilCompletion | PT1H | Maximum duration to wait for the job to complete. If the task defines a timeout, that value takes precedence. AWS Batch will automatically terminate the job when this duration is reached. |
completionCheckInterval | PT5S | How often Kestra polls AWS Batch for job status. Lower values reduce latency for short jobs; higher values reduce API call volume for long-running jobs. |
Job lifecycle
| Property | Default | Description |
|---|---|---|
resume | true | When true, if the Kestra worker is restarted while a job is running, it will reconnect to the existing job rather than submitting a new one. Requires a jobQueueArn to be configured. |
delete | true | When true, the job definition, any auto-created job queue, and the S3 working-directory prefix are deleted after the job completes. Set to false to retain resources for debugging — note that a task retry may then reconnect to the previous (failed) job. |
Log streaming
| Property | Default | Description |
|---|---|---|
streamLogs | true | When true, the task runner streams container logs in real time using CloudWatch Logs Live Tail. Set to false to disable streaming and instead fetch logs only once the job completes. |
Set streamLogs: false for cost-sensitive workloads, since Live Tail is billed separately from standard CloudWatch Logs ingestion. It’s also recommended when authenticating with role-chained or short-lived STS credentials (see STS role assumption) — Live Tail keeps a stream open for the entire job duration, and credentials that expire before the job finishes will cause the stream to fail.
EKS: service account and IRSA
For EKS compute environments, use serviceAccountName to attach a Kubernetes service account to the pod. Annotate the service account with an IAM role ARN to enable IRSA — this is the recommended way to grant pods access to AWS services such as S3.
| Property | Description |
|---|---|
serviceAccountName | Name of the Kubernetes service account to attach to the EKS pod. Use with IRSA for IAM authorization. Ignored for ECS compute environments. |
taskRoleArn and executionRoleArn are ignored when the compute environment is EKS.
STS role assumption
Instead of static accessKeyId / secretKeyId credentials, you can authenticate via AWS STS AssumeRole for cross-account access or short-lived credentials:
taskRunner: type: io.kestra.plugin.ee.aws.runner.Batch region: eu-central-1 stsRoleArn: "arn:aws:iam::123456789012:role/kestra-batch-role" stsRoleExternalId: "{{ secret('STS_EXTERNAL_ID') }}" stsRoleSessionName: kestra-session computeEnvironmentArn: "arn:aws:batch:eu-central-1:123456789012:compute-environment/kestraFargateEnvironment"This example is keyless only when Kestra runs inside AWS. On a self-hosted instance on EC2 or EKS, the AWS SDK uses the instance profile or IRSA to make the sts:AssumeRole call without static keys. On Kestra Cloud, no such ambient identity exists — you must supply accessKeyId and secretKeyId alongside stsRoleArn. See Running from Kestra Cloud.
| Property | Description |
|---|---|
stsRoleArn | ARN of the IAM role to assume. |
stsRoleExternalId | External ID for the trust policy (optional). |
stsRoleSessionName | Session name tag attached to the assumed-role session (optional). |
stsEndpointOverride | Override the STS endpoint URL (optional, useful in GovCloud or custom environments). |
stsRoleSessionDuration | Duration of the assumed-role session (optional; defaults to the AWS minimum). |
Running from Kestra Cloud
Kestra Cloud’s control plane runs outside your AWS account. It has no EC2 instance profile, EKS IRSA, or other ambient AWS identity. The following differences apply compared to a self-hosted Kestra instance running inside your own AWS environment.
Authentication on Cloud
Static credentials are required. Supply accessKeyId and secretKeyId in the task runner configuration, stored as secrets:
taskRunner: type: io.kestra.plugin.ee.aws.runner.Batch region: eu-central-1 accessKeyId: "{{ secret('AWS_ACCESS_KEY_ID') }}" secretKeyId: "{{ secret('AWS_SECRET_KEY_ID') }}" computeEnvironmentArn: "arn:aws:batch:eu-central-1:123456789012:compute-environment/kestraFargateEnvironment" jobQueueArn: "arn:aws:batch:eu-central-1:123456789012:job-queue/kestraJobQueue" executionRoleArn: "arn:aws:iam::123456789012:role/kestraEcsTaskExecutionRole" taskRoleArn: "arn:aws:iam::123456789012:role/ecsTaskRole"STS role assumption requires base credentials. On a self-hosted instance running on EC2 or EKS, the AWS SDK uses the instance profile or IRSA to call sts:AssumeRole without static keys. On Kestra Cloud, you must supply base accessKeyId and secretKeyId alongside stsRoleArn — the STS call cannot proceed without them:
taskRunner: type: io.kestra.plugin.ee.aws.runner.Batch region: eu-central-1 accessKeyId: "{{ secret('AWS_ACCESS_KEY_ID') }}" secretKeyId: "{{ secret('AWS_SECRET_KEY_ID') }}" stsRoleArn: "arn:aws:iam::123456789012:role/kestra-batch-role" stsRoleExternalId: "{{ secret('STS_EXTERNAL_ID') }}" stsRoleSessionName: kestra-session computeEnvironmentArn: "arn:aws:batch:eu-central-1:123456789012:compute-environment/kestraFargateEnvironment"OIDC / Web Identity Federation is not currently supported. Kestra Cloud does not act as an OIDC identity provider, so AssumeRoleWithWebIdentity (the approach used by GitHub Actions and similar systems) is not available. There is no fully keyless path from Kestra Cloud to your AWS account today. If your security policy requires no long-lived static credentials, contact Kestra support to discuss alternatives or to ask about roadmap plans for a keyless Cloud-to-AWS path.
Network access
Kestra Cloud makes HTTPS calls to the AWS Batch and S3 APIs from a fixed set of egress IPs. If your AWS environment uses VPC endpoint policies, S3 bucket policies, or SCPs that restrict API access by source IP, you need to allowlist the Kestra Cloud egress ranges. Contact Kestra support to obtain the current egress IP list for your region.
Was this page helpful?