Configure Isolated Namespaces with Secrets and Plugin Defaults
For the complete documentation index, see llms.txt. For a full content snapshot, see llms-full.txt. Append.mdto anykestra.io/docs/*URL for plain Markdown.
How to manage secrets, variables, and plugin defaults at the Namespace level.
Namespace management – secure configuration
Kestra is a multi-tenant platform. Each tenant can have multiple Namespaces, and each Namespace provides additional isolation and security.
Namespaces provide:
- Logical isolation of resources on top of instance- or tenant-level isolation
- Fine-grained access control for secrets, variables, and task configurations
Namespaces are particularly useful in environments with many users, teams, projects, and applications.
Namespace-level features
The Namespace page allows you to configure secrets, plugin defaults, and variables that can be used within any flow in that Namespace.
It allows your organization to centrally manage your secrets, variables, and task configuration while providing fine-grained access-control to those resources.
Since Kestra supports everything as code and from the UI, you can manage Namespaces from the UI or programmatically (e.g., via our Terraform provider).
Secrets
On the Namespaces page, select the Namespace where you want to define the secrets and go to the Secrets tab. Here, you will see all existing secrets associated with this Namespace. Click on Add a secret button on the top right corner of the page.
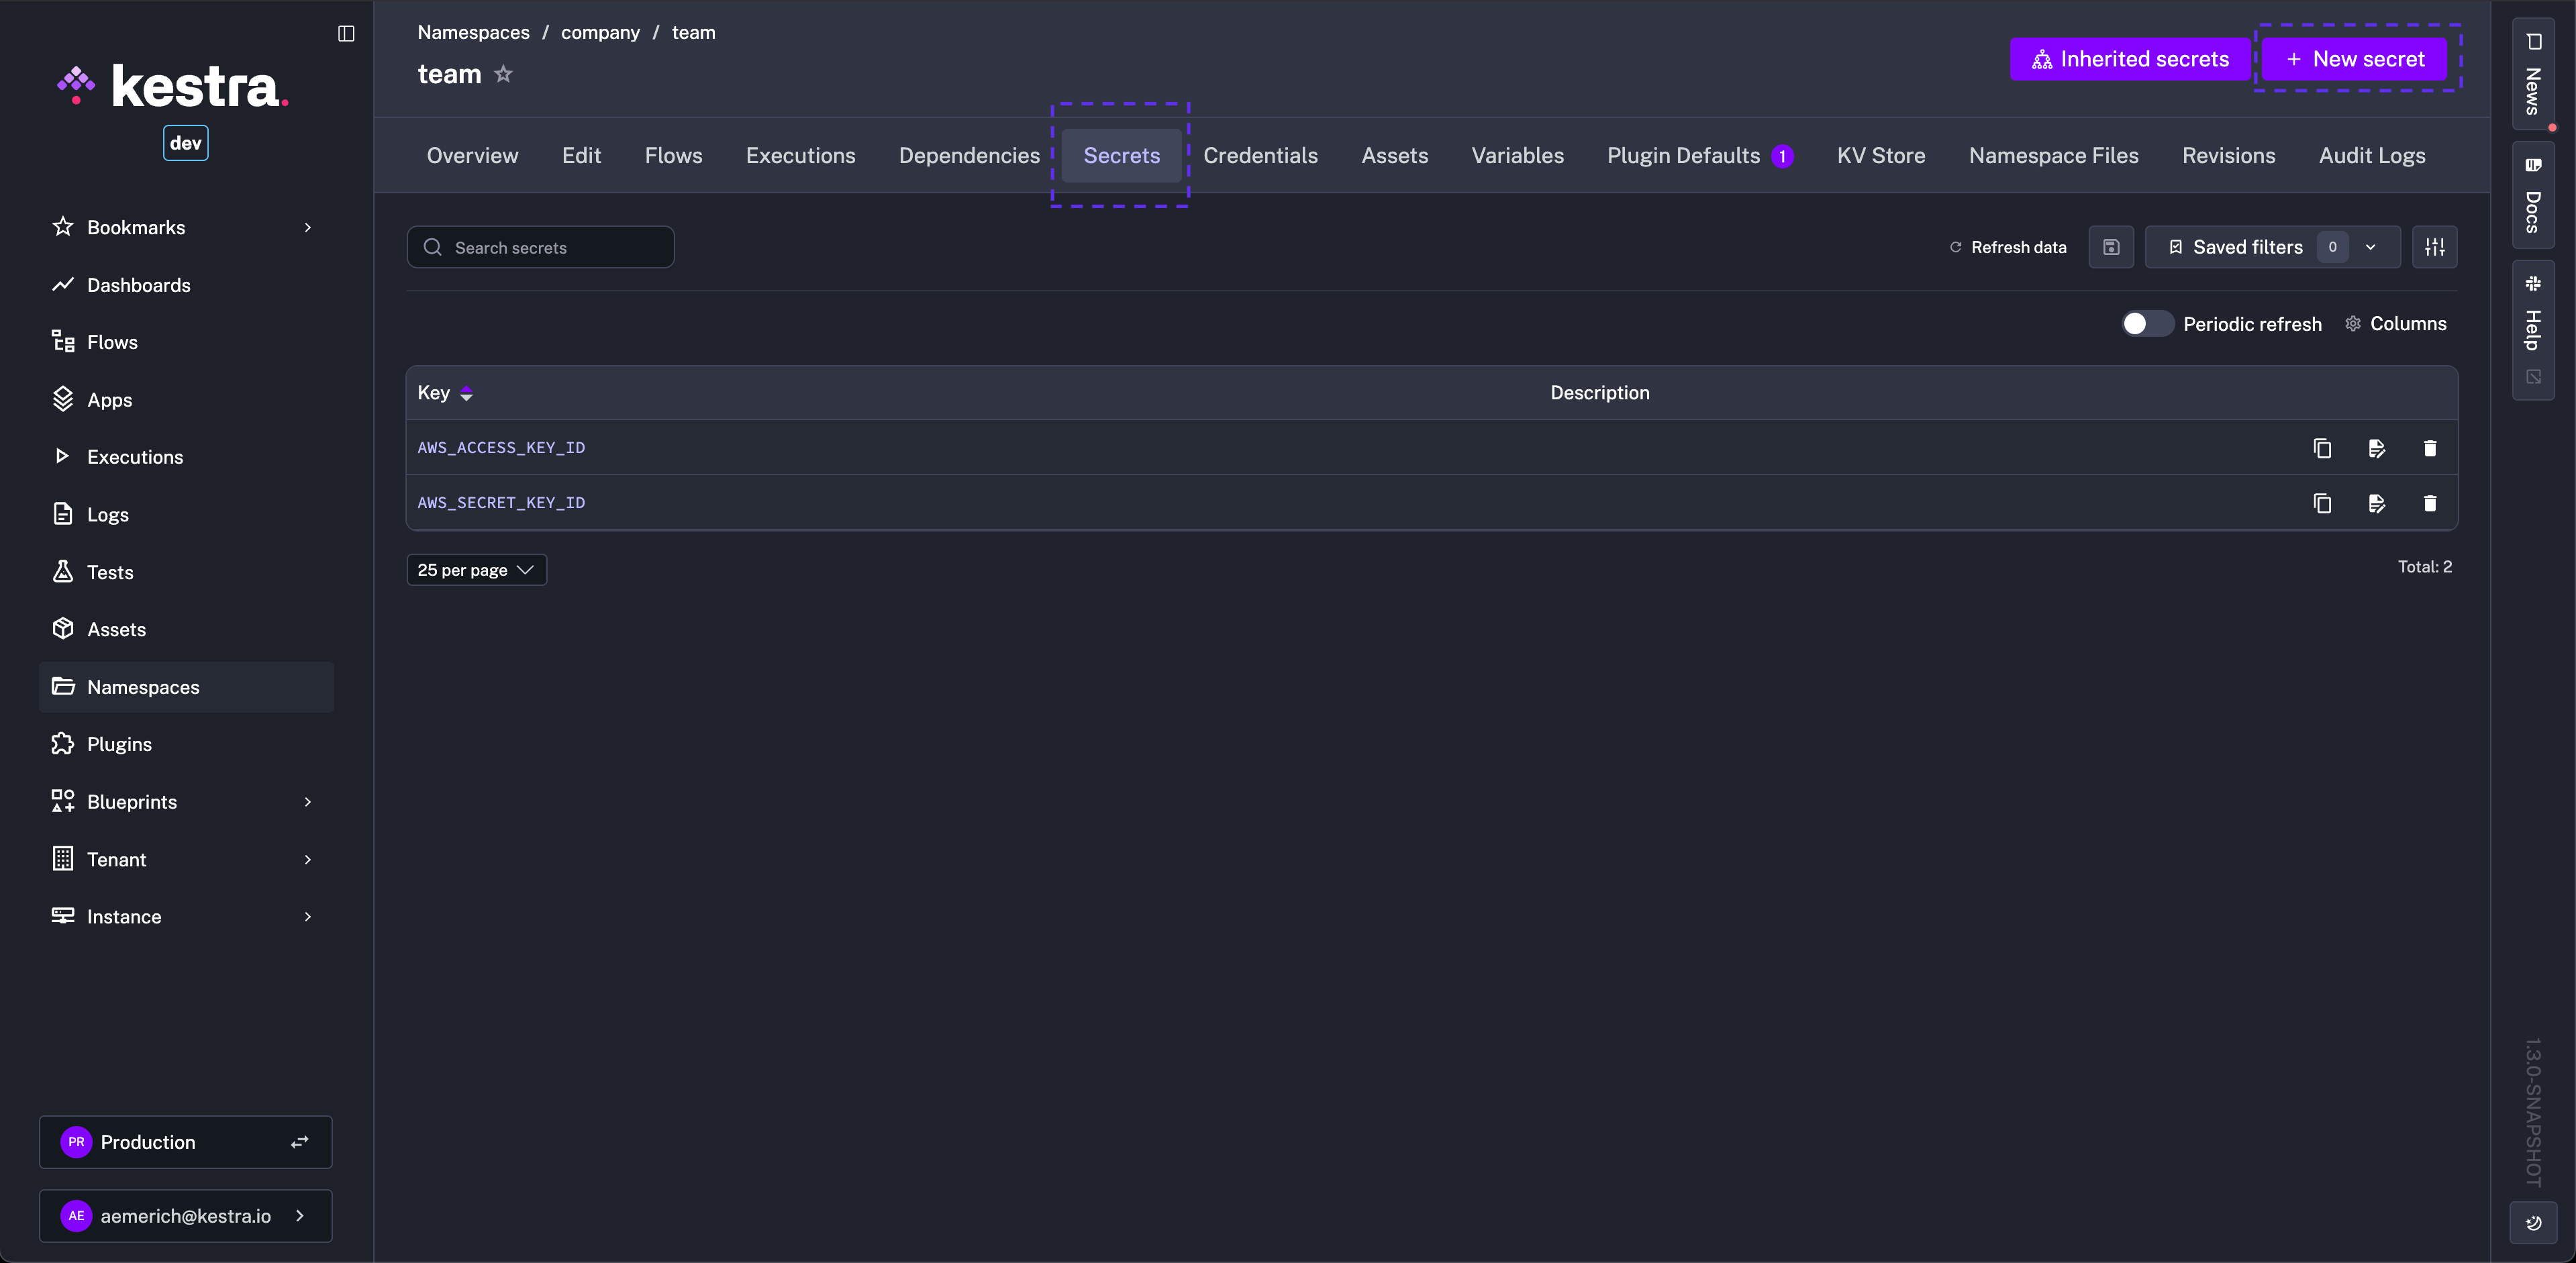
Define the secret by entering its key and value. Save the secret by clicking on the Save button at the bottom.
The secret key should now start appearing on the Secrets tab. You can edit the secret’s value or delete the secret by clicking on the appropriate button towards the right of the secret row. You can reference the secret in the flow by using the key, for example, "{{ secret('MYSQL_PASSWORD') }}".
For APIs that issue short-lived access tokens (e.g., OAuth2), create a Credential that relies on these secrets and fetch the token in flows with {{ credential('your_credential_key') }}.
Here is how you can use it in a flow:
id: query-mysqlnamespace: company.team
tasks:  - id: query    type: io.kestra.plugin.jdbc.mysql.Query    url: jdbc:mysql://localhost:3306/test    username: root    password: "{{ secret('MYSQL_PASSWORD') }}"    sql: select * from employees    fetchOne: true
Make sure to only use the secret in flows defined in the same Namespace (or child Namespace) as your secret.
When building new flows in a Namespace, Namespace secrets are accessible from the Secrets tab. Open the tab to view all available Namespace secret key names.
Plugin defaults
Plugin Defaults can also be defined at the Namespace level. These plugin defaults are then applied for all tasks of the corresponding type defined in the flows under the same Namespace.
On the Namespaces page, select the Namespace where you want to define the plugin defaults and navigate to the Plugin defaults tab. You can add the plugin defaults here and save the changes by clicking on the Save button at the bottom of the page.
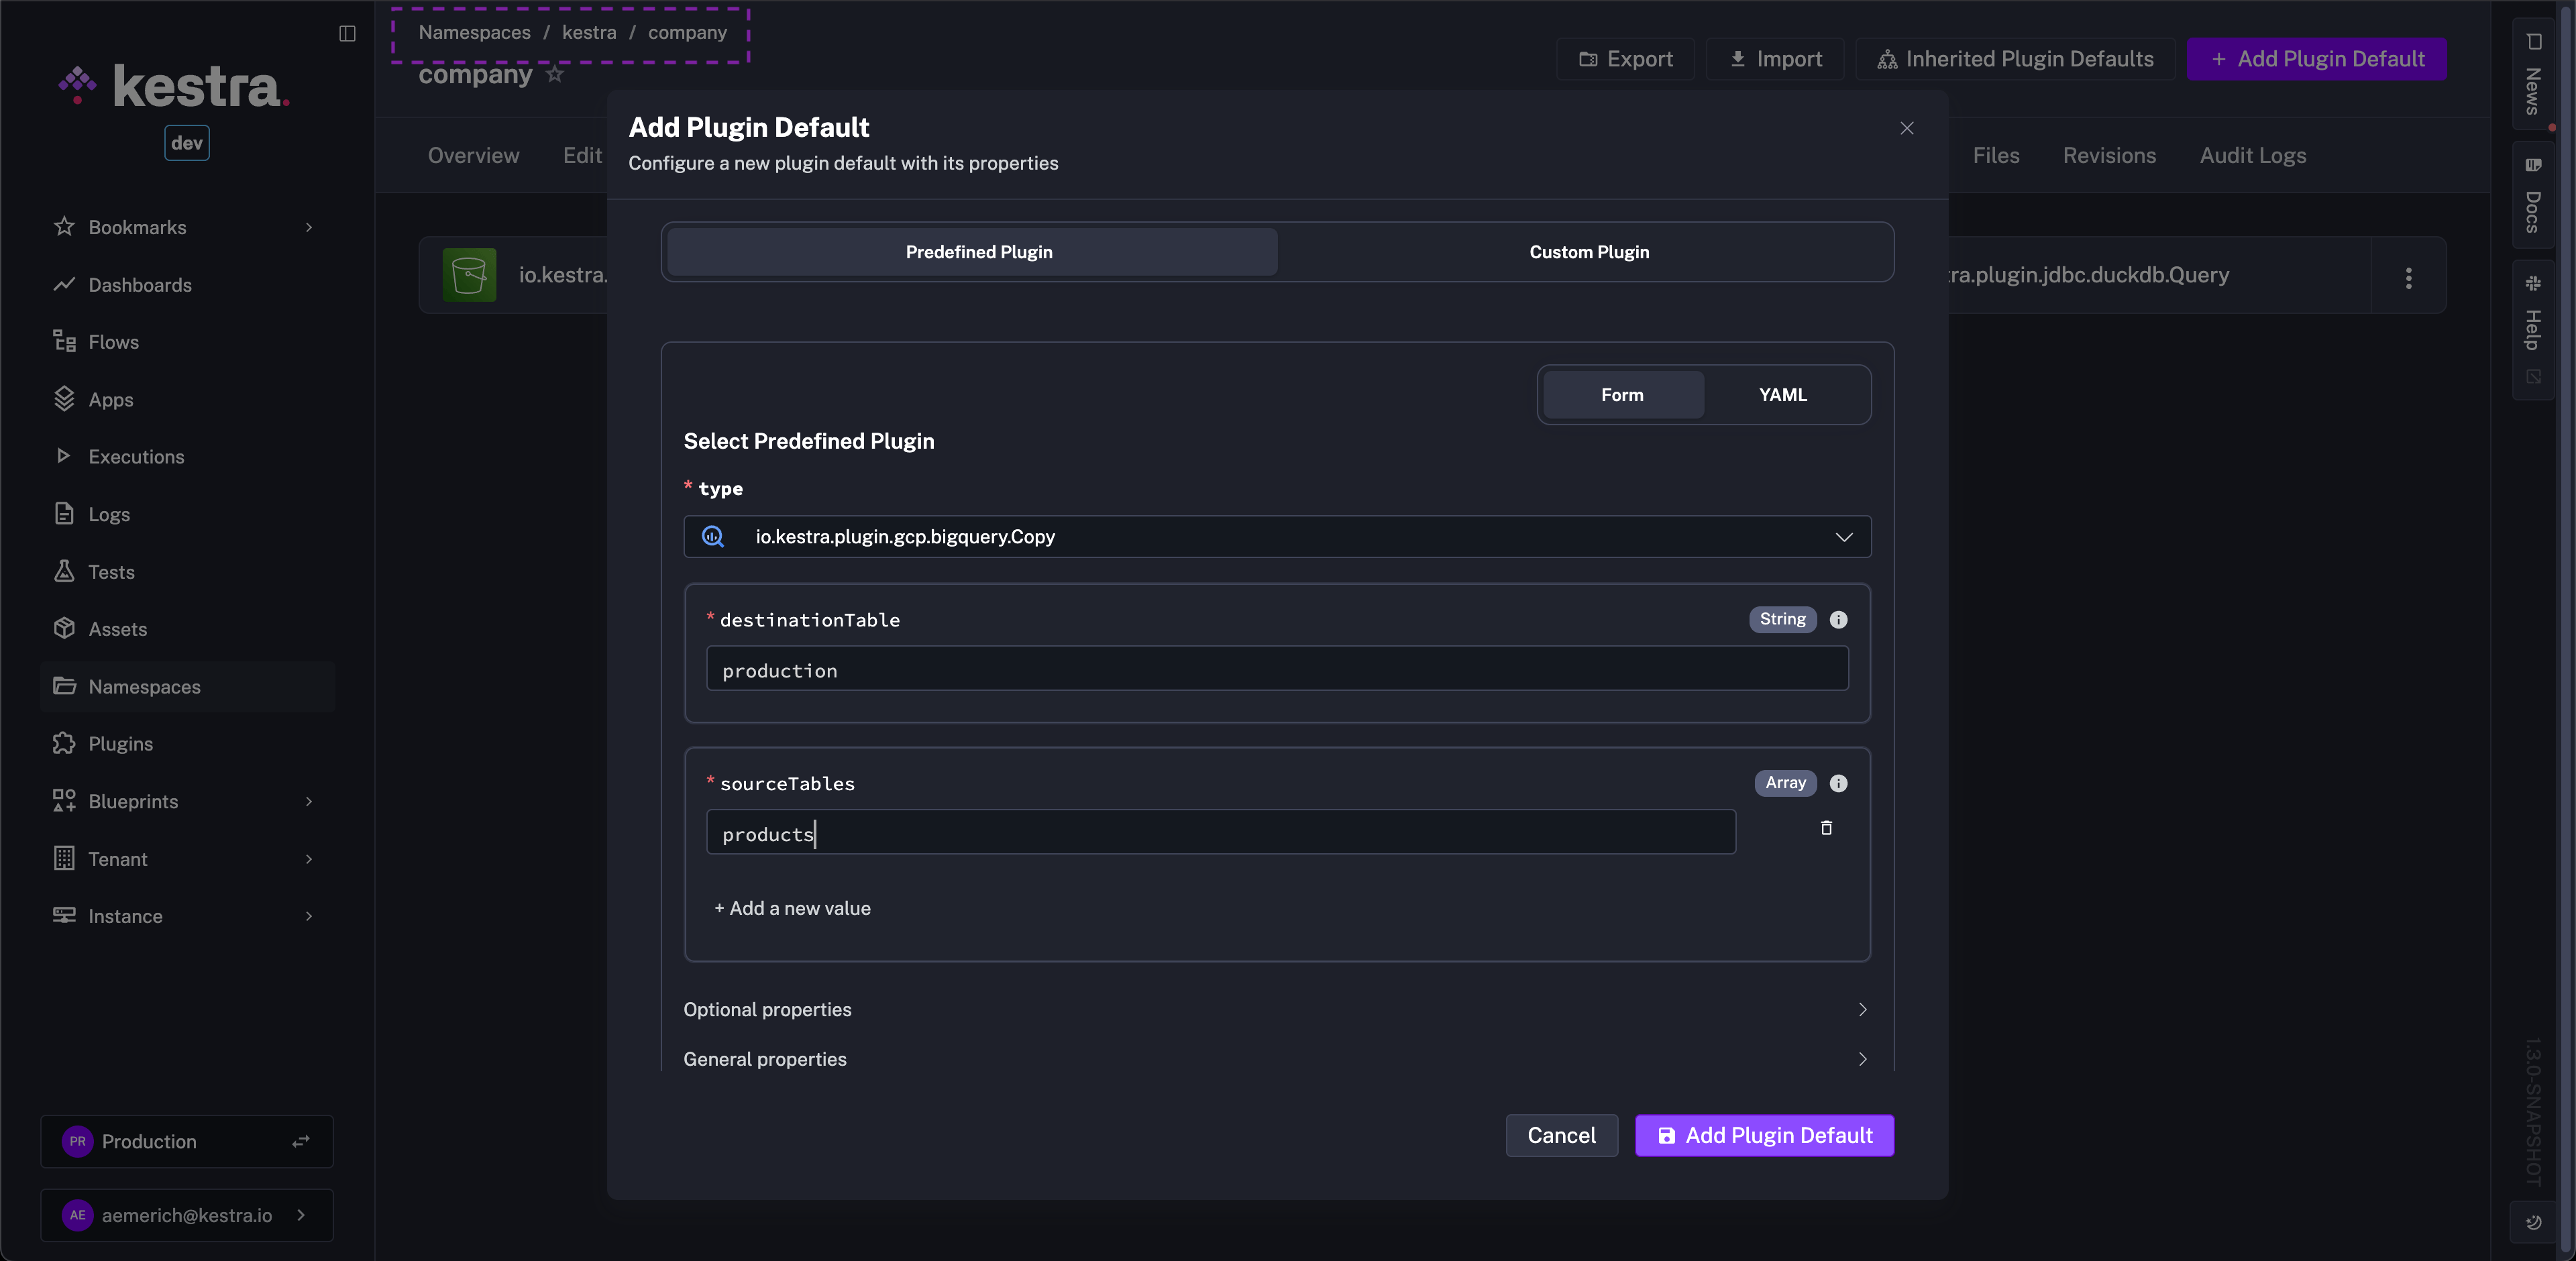
You can reference secrets and variables defined with the same Namespace in the plugin defaults.
In the example below, you no longer need to add the password property for the MySQL query task as it’s defined in your Namespace-level pluginDefaults:
id: query-mysqlnamespace: company.team
tasks:  - id: query    type: io.kestra.plugin.jdbc.mysql.Query    url: jdbc:mysql://localhost:3306/test    username: root    sql: select * from employees    fetchOne: true
Default service account for SDK plugins
Namespaces can now provide default authentication credentials that SDK-based plugins use to run tasks such as List all Namespaces. This allows tasks relying on the Kestra SDK to call the API without hard-coding credentials inside the flow.
On the Namespace Edit page, open the Default authentication section and choose either:
- API token (recommended), or
- Basic auth (username/password)
Variables
Variables defined at the Namespace level can be used in any flow defined under the same Namespace using the syntax: {{ namespace.variable_name }}.
On the Namespaces page, select the Namespace where you want to define the variables. Go to the Variables tab. You can now define the variables on this page. Save the changes by clicking the Save button at the bottom of the page.

Here is an example flow where the Namespace variable is used:
id: query-mysqlnamespace: company.team
tasks:  - id: query    type: io.kestra.plugin.jdbc.mysql.Query    url: jdbc:mysql://localhost:3306/test    username: "{{ namespace.mysql_user }}"    sql: select * from employees    fetchOne: true
When building new flows in a Namespace, Namespace variables are accessible from the Variables tab. Open the tab to view all available Namespace variables and their associated values.

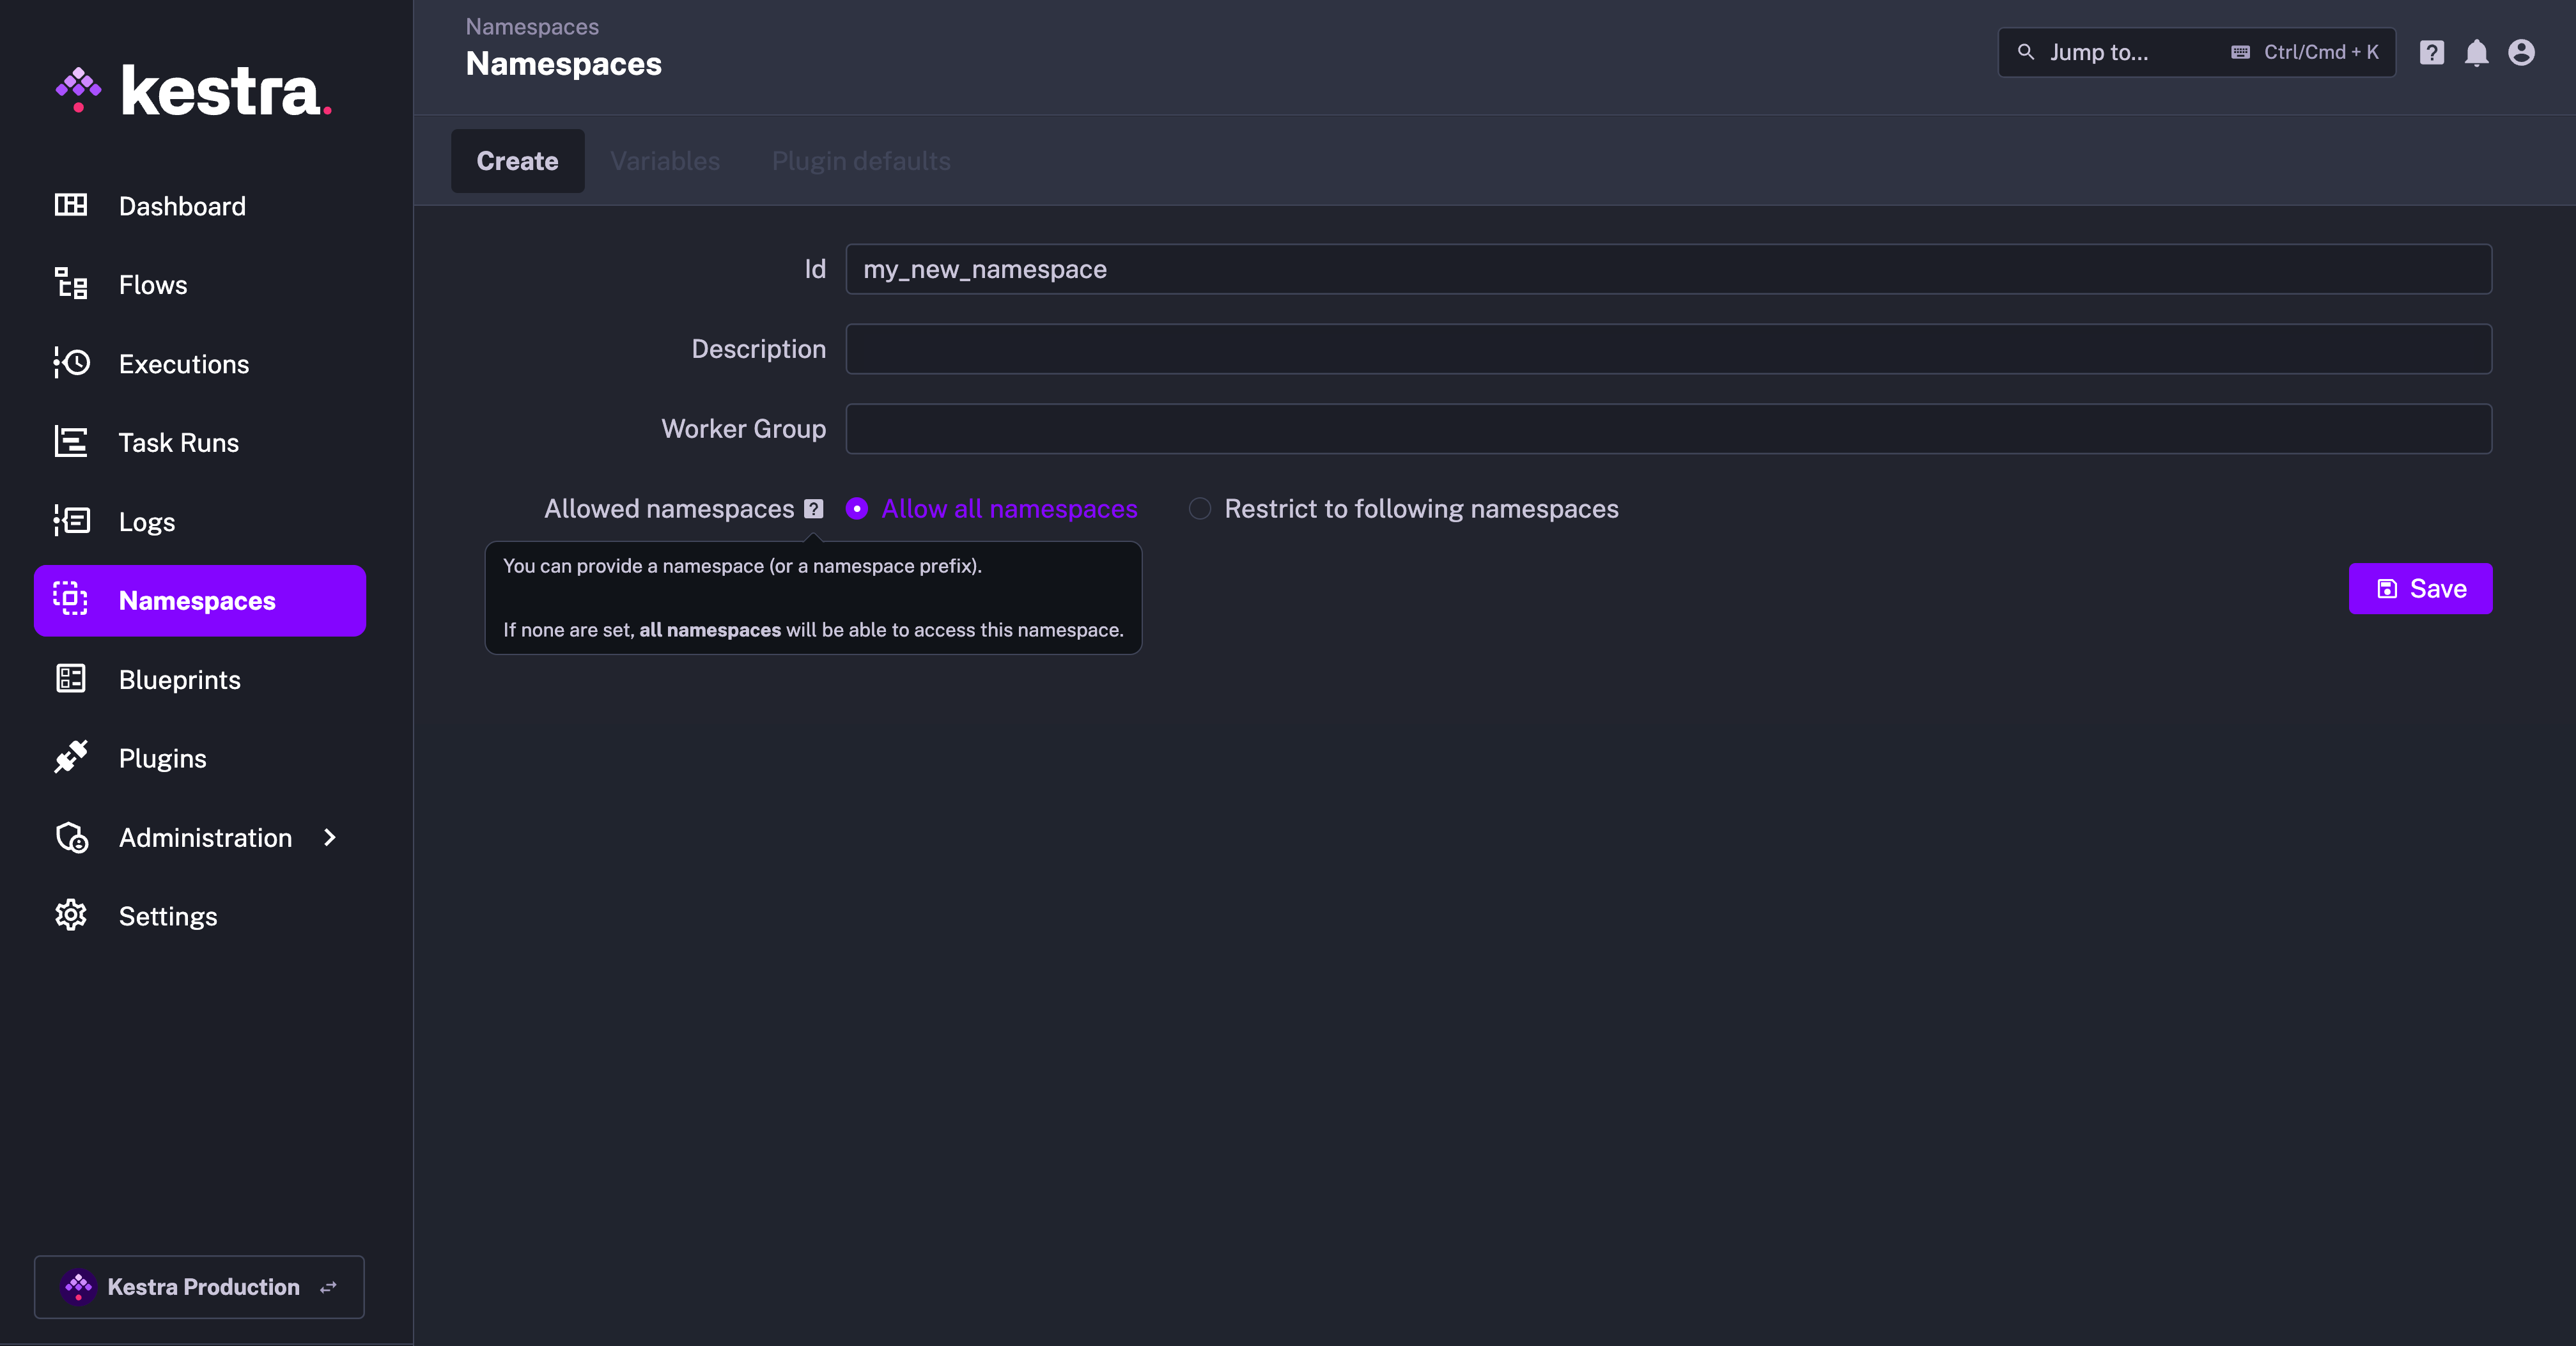
Creating Namespaces
From the UI
The video below shows how you can create a Namespace from the Kestra UI. After creating a Namespace, we’re adding:
- several new secrets
- a nested Namespace variable that references one of these secrets
- a list of plugin defaults helping to use those pre-configured secrets and variables in all the tasks from the AWS and Git plugins.
From Terraform
The following example reproduces the UI steps using Terraform, so that you know how to perform the same steps both from the UI and programmatically.
To create a Namespace from Terraform, use the kestra_namespace resource.
First, configure your Terraform backend and add Kestra as a required provider:
terraform {  backend "s3" {    bucket = "kestraio"    key    = "terraform.tfstate"    region = "us-east-1"  }  required_providers {    kestra = {      source  = "kestra-io/kestra"      version = "~>0.14"    }  }}
provider "kestra" {  url       = var.kestra_host  username  = var.kestra_user  password  = var.kestra_password  tenant_id = var.kestra_tenant_id # only if you are using multi-tenancy}
You can add a file main.tf to your Terraform project with the following content:
resource "kestra_namespace" "marketing" { namespace_id = "marketing" description = "Namespace for the marketing team"}The only required property is the namespace_id, which is the name of the Namespace. The description and all other properties are optional.
Adding variables and plugin defaults to a Namespace Terraform resource
You can add variables and plugin defaults directly to the Namespace resource by pointing to the YAML configuration files.
First, create the variables_marketing.yml file:
github: token: "{{ secret('GITHUB_TOKEN') }}"Then, create another file for task_defaults_marketing.yml:
- type: io.kestra.plugin.aws values: accessKeyId: "{{ secret('AWS_ACCESS_KEY_ID') }}" region: us-east-1 secretKeyId: "{{ secret('AWS_SECRET_ACCESS_KEY') }}"- type: io.kestra.plugin.git values: password: "{{ render(namespace.github.token) }}" username: your-github-usernameFinally, reference those files in your Namespace resource definition:
resource "kestra_namespace" "marketing" { namespace_id = "marketing" description = "Namespace for the marketing team" variables = file("variables_marketing.yml") task_defaults = file("task_defaults_marketing.yml")}Adding secrets to a Namespace using Terraform
To programmatically add secrets to your Namespace via Terraform, you can use the kestra_namespace_secret resource. Here is an example of adding multiple secrets to the marketing Namespace:
resource "kestra_namespace_secret" "github_token" {  namespace    = "marketing"  secret_key   = "GITHUB_TOKEN"  secret_value = var.github_token}
resource "kestra_namespace_secret" "aws_access_key_id" {  namespace    = "marketing"  secret_key   = "AWS_ACCESS_KEY_ID"  secret_value = var.aws_access_key_id}
resource "kestra_namespace_secret" "aws_secret_access_key" {  namespace    = "marketing"  secret_key   = "AWS_SECRET_ACCESS_KEY"  secret_value = var.aws_secret_access_key}
Before referencing variables in your Terraform configuration, make sure to define them in your variables.tf file:
variable "github_token" {  type = string  sensitive = true}
variable "aws_access_key_id" {  type = string  sensitive = true}
variable "aws_secret_access_key" {  type = string  sensitive = true}
variable "kestra_user" {  type      = string  sensitive = true}
variable "kestra_password" {  type      = string  sensitive = true}
variable "kestra_host" {  type      = string  sensitive = false  default   = "http://your_kestra_host:8080" # Change this to your Kestra host URL}
variable "kestra_tenant_id" { type = string sensitive = false default = "kestra-tech"}And add your secrets to the terraform.tfvars file:
github_token = "your-github-token"aws_access_key_id = "your-aws-access-key-id"aws_secret_access_key = "your-aws-secret-access-key"kestra_user = "your-kestra-user"kestra_password = "your-kestra-password"Allowed Namespaces
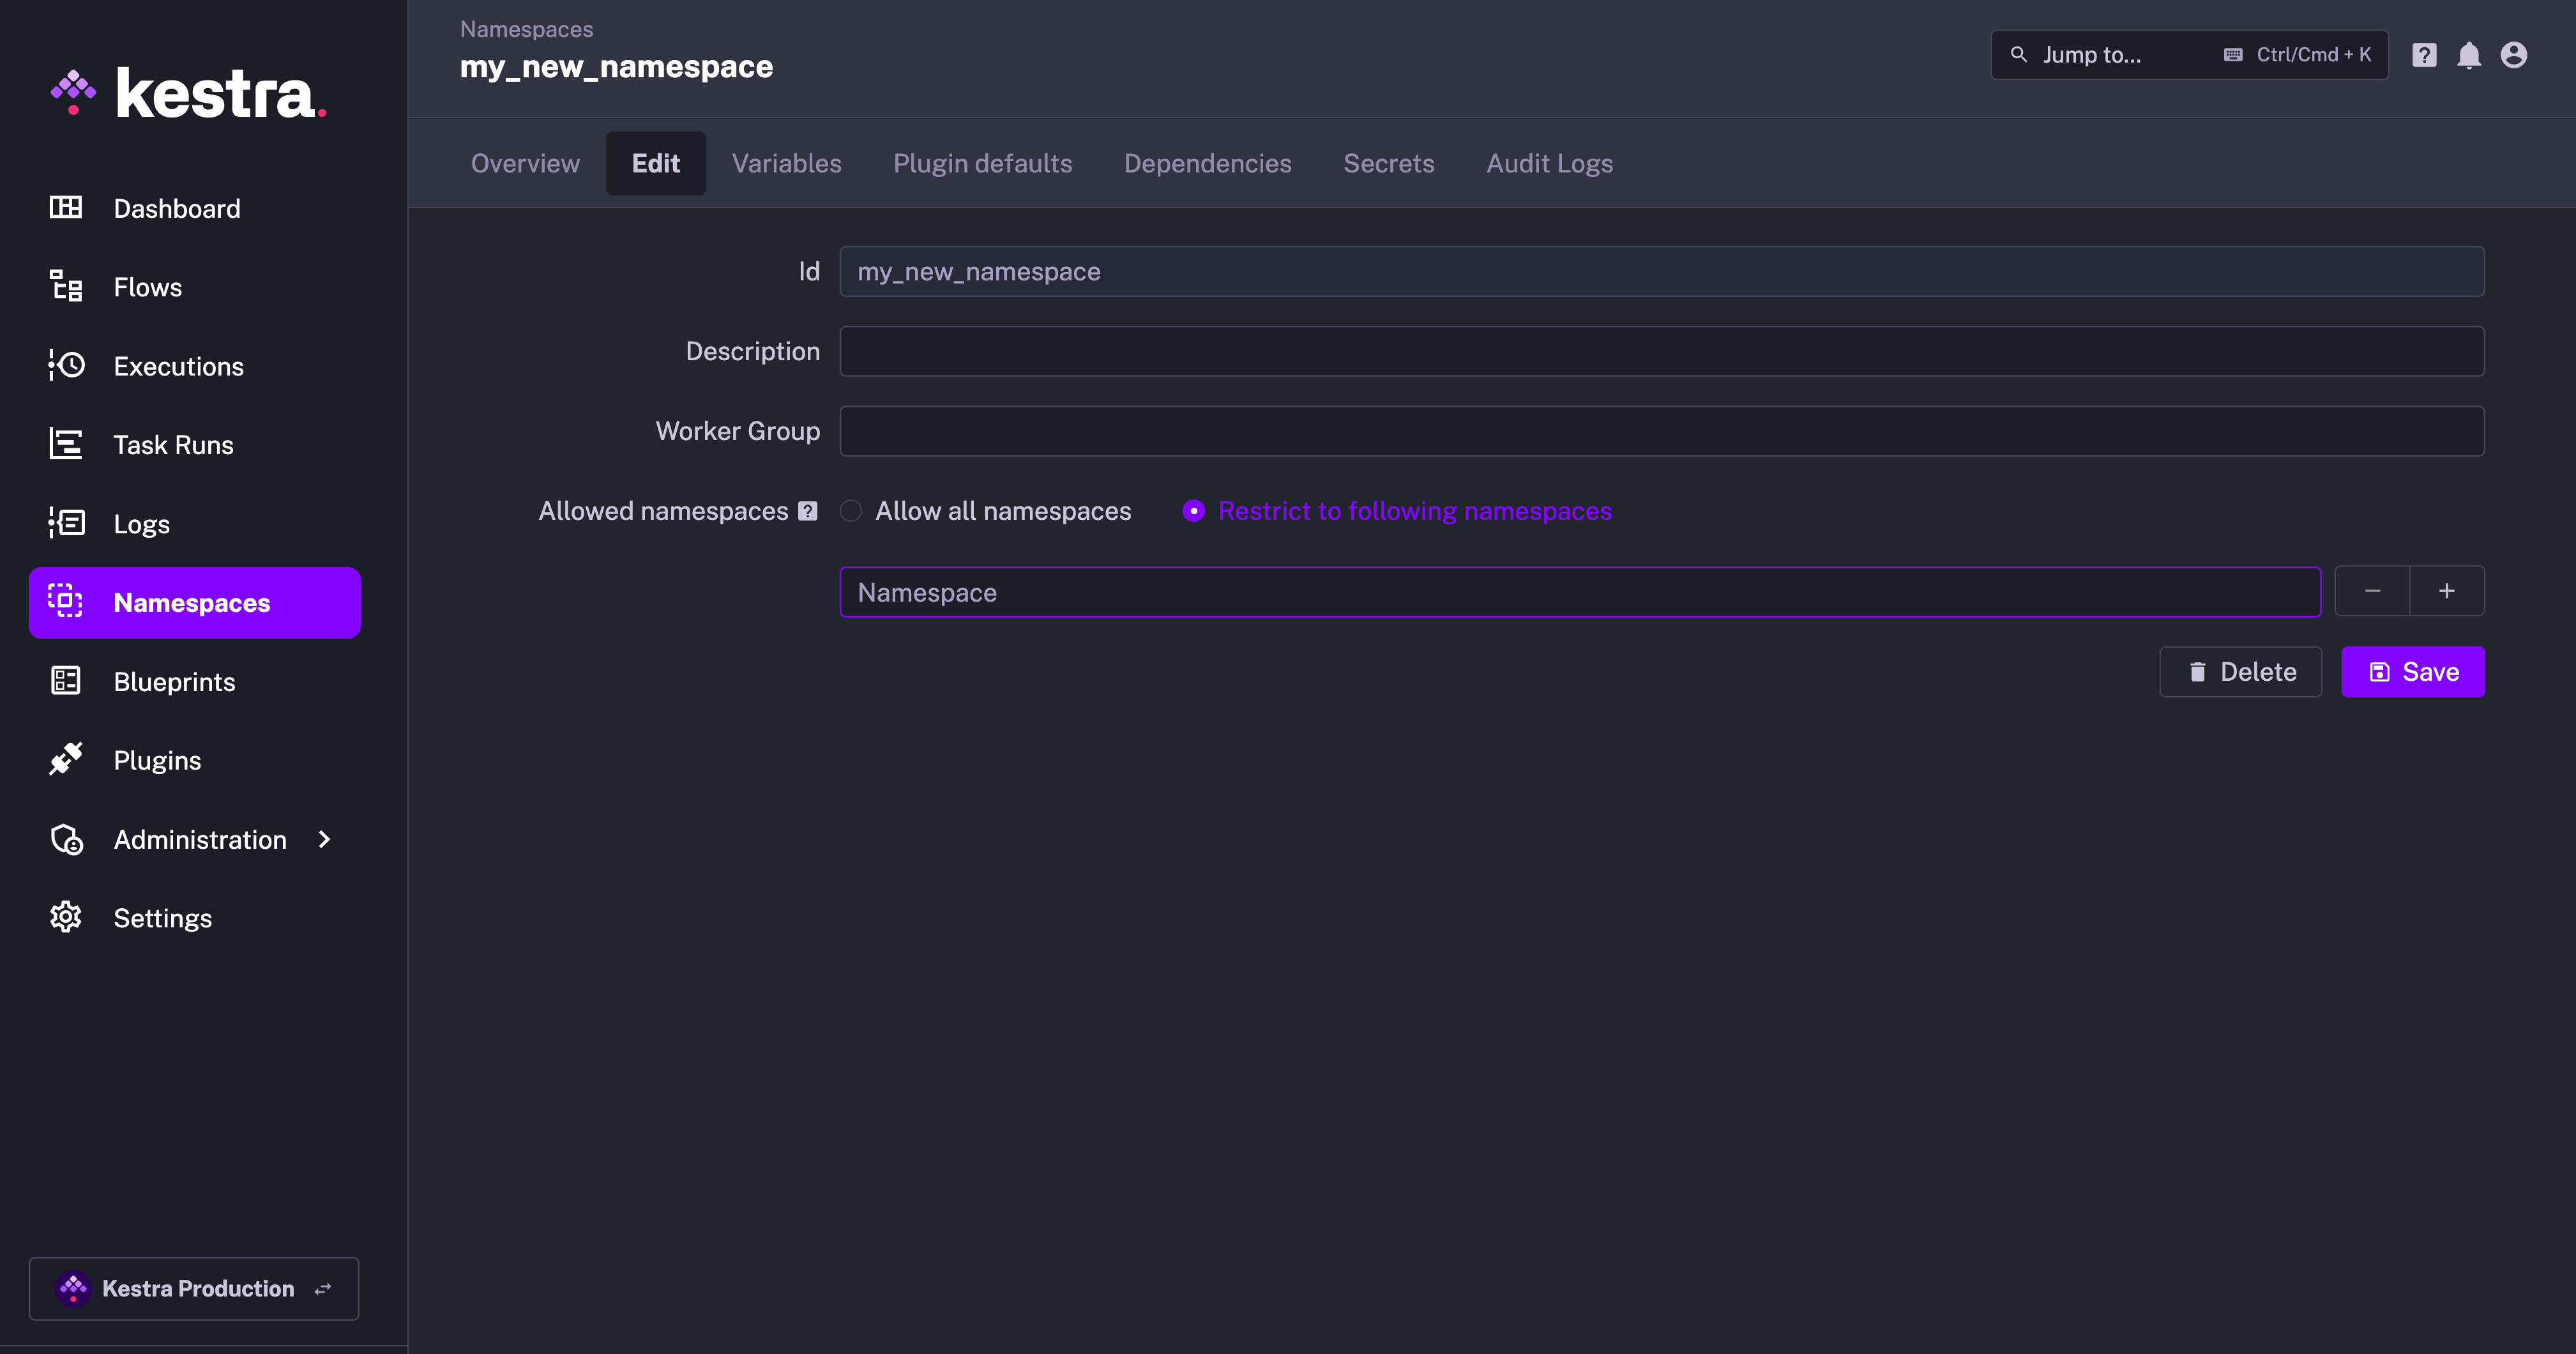
When you navigate to any Namespace and go to the Edit tab, you can explicitly configure which Namespaces are allowed to access flows and other resources related to that Namespace. By default, all Namespaces are allowed:
However, you can restrict that access if you want only specific Namespaces (or no Namespace at all) to trigger its corresponding resources.
Was this page helpful?