 Executions in Kestra – Run and Monitor Flows
Execute flows and view the results.
Executions – run and monitor flows
An execution is a single run of a flow with a specific state.
Task run
A task run is a single run of an individual task within an execution.
Each task run has associated data such as:
- Execution ID
- State
- Start Date
- End Date
Read more about task runs on the dedicated docs page.
Attempts
Each task run can have one or more attempts. Most task runs have only one attempt, but you can configure retries for a task.
If retries have been configured, a task failure will generate new attempts until the retry maxAttempts or maxDuration threshold is hit.
Outputs
Each task can generate output data that other tasks in the current flow execution can use. These outputs can be variables or files that are stored inside Kestra’s internal storage.
Outputs are described on each task’s documentation page and can be viewed in the Outputs tab of the Execution page. Read more on the Outputs page.
Metrics
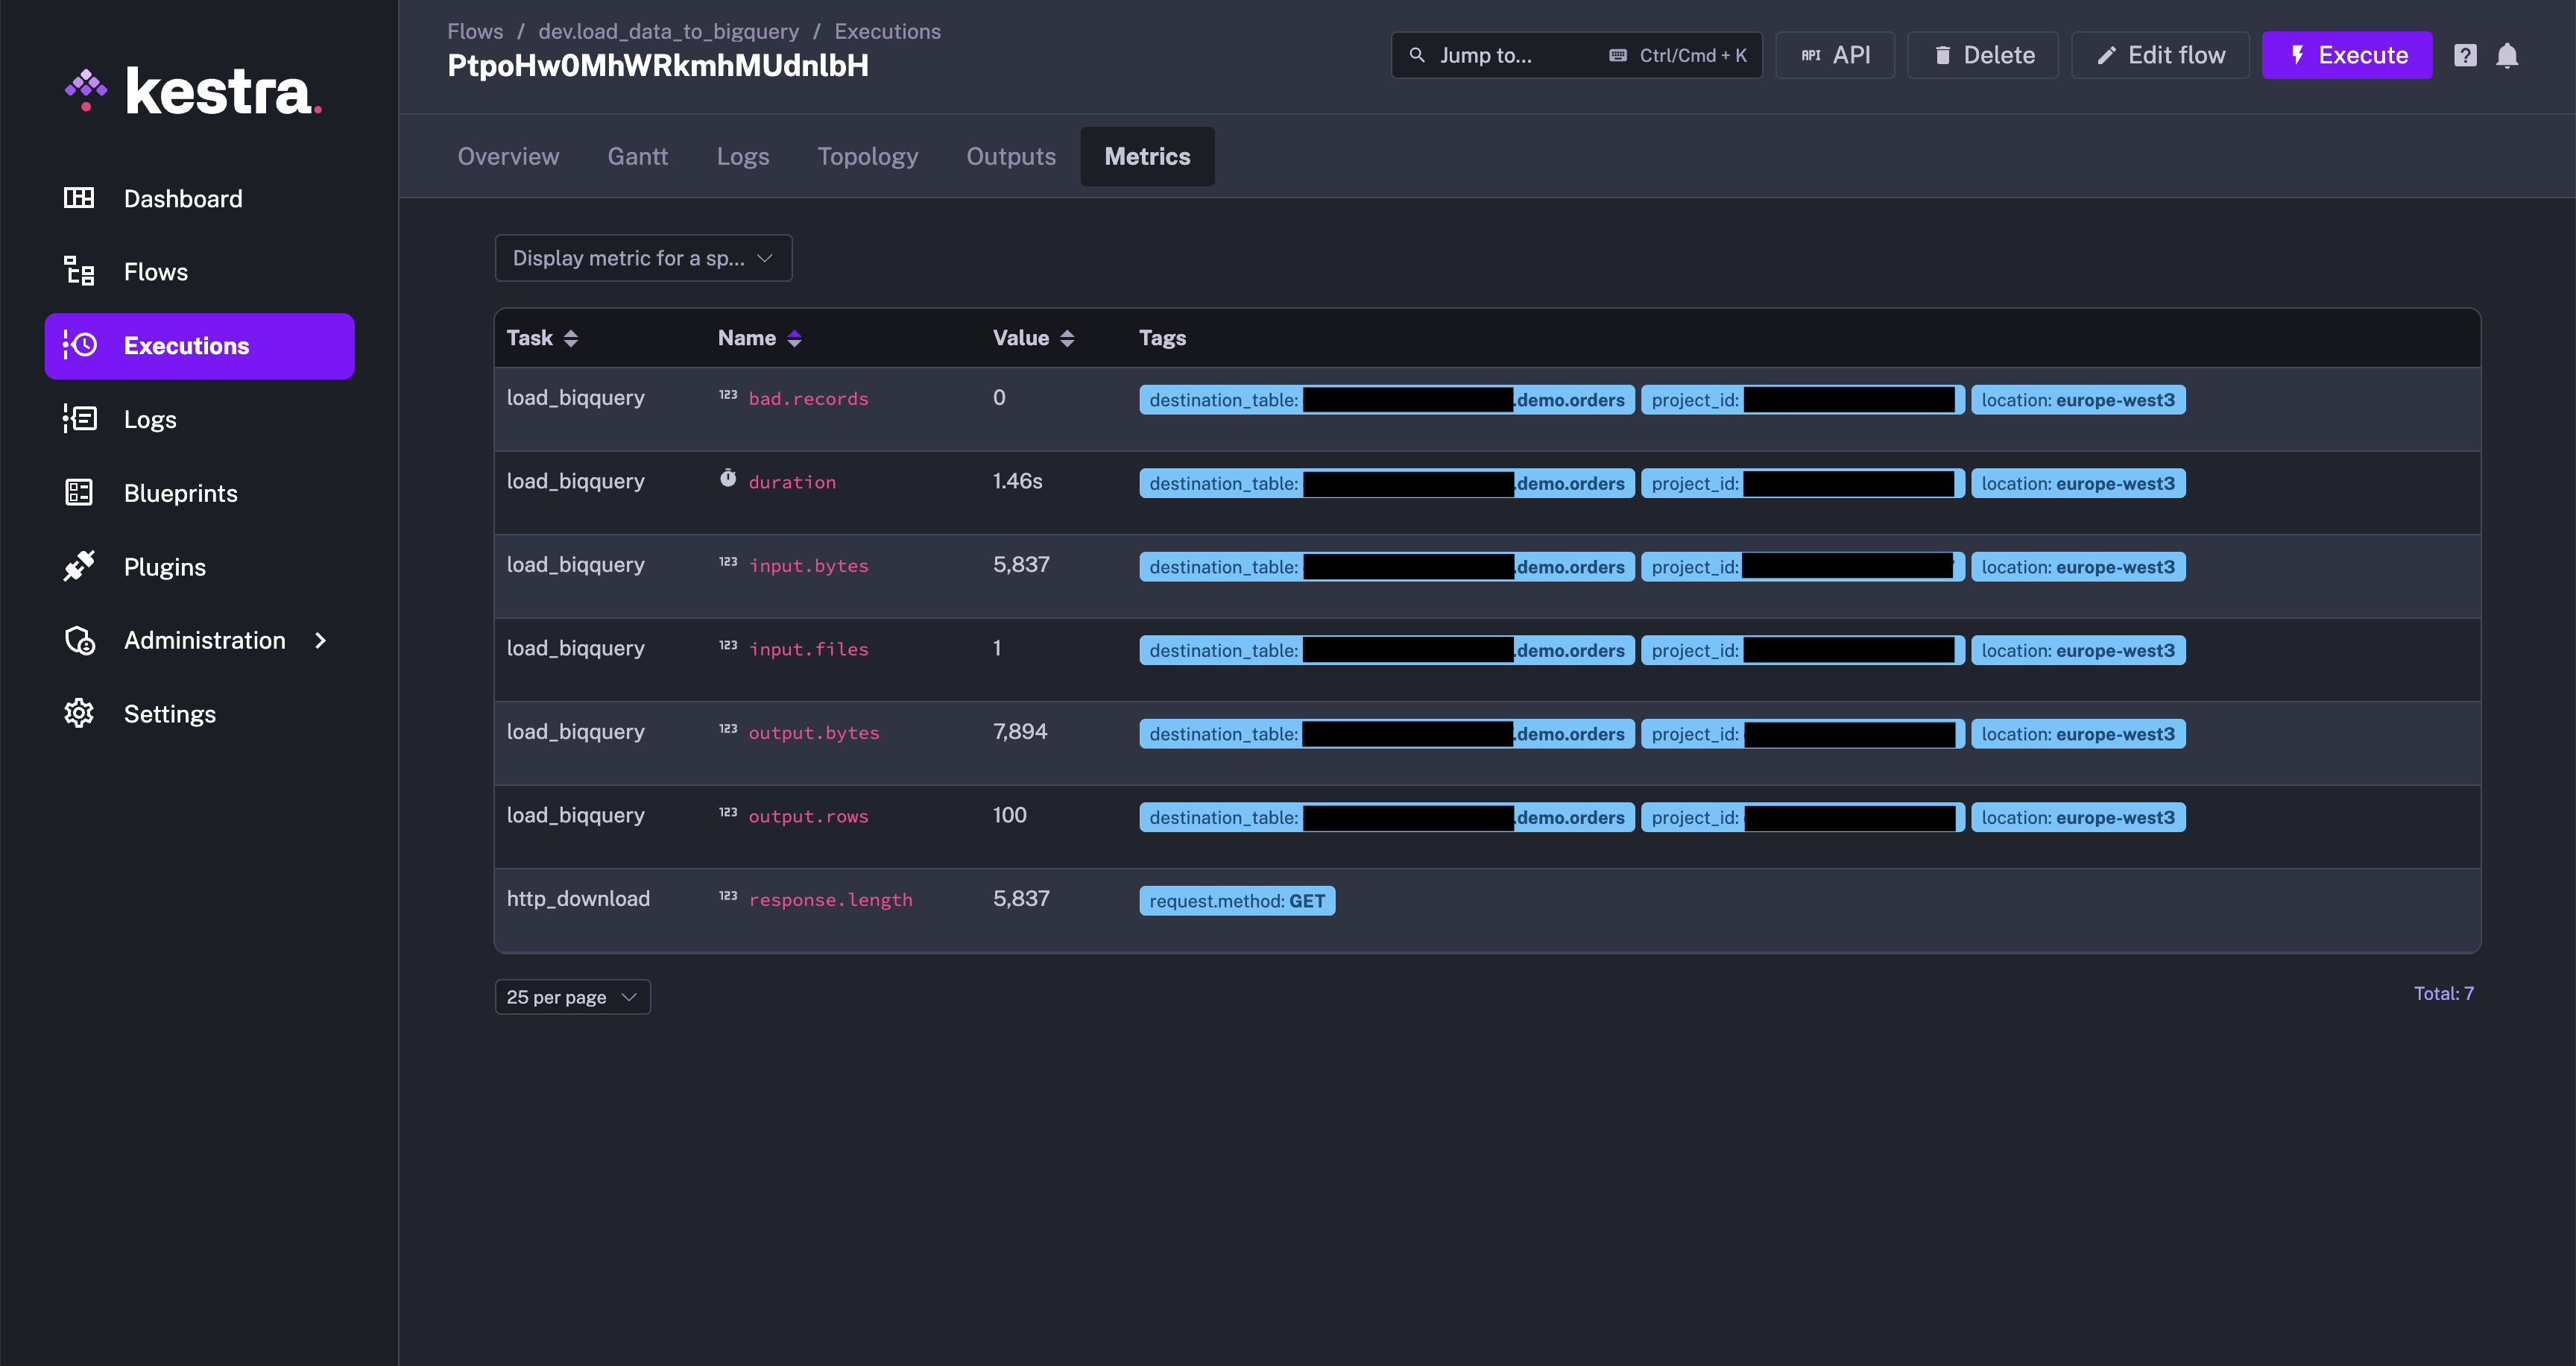
Each task can expose metrics that help you understand task internals. Metrics may include file size, number of returned rows, or query duration. You can view the available metrics for a task type on its documentation page.
Metrics can be seen in the Metrics tab of the Executions page.
Below is an example of a flow generating metrics:
id: load_data_to_bigquerynamespace: company.team
tasks:  - id: http_download    type: io.kestra.plugin.core.http.Download    uri: https://huggingface.co/datasets/kestra/datasets/raw/main/csv/orders.csv
  - id: load_bigquery    type: io.kestra.plugin.gcp.bigquery.Load    description: Load data into BigQuery    autodetect: true    csvOptions:      fieldDelimiter: ","    destinationTable: kestra-dev.demo.orders    format: CSV    from: "{{ outputs.http_download.uri }}"
You can see the list of generated metrics generated in the BigQuery Load task documentation.
After executing the flow, view the BigQuery Load task metrics in the Metrics tab.

State
An execution or a task run can be in a particular state.
There are multiple possible states:
| State | Description |
|---|---|
CREATED | The Execution or task run is waiting to be processed. This state usually means that the Execution is in a queue and is yet to be started. |
RUNNING | The Execution or task run is currently being processed. |
PAUSED | The Execution or task run has been paused. Used for manual validation or waiting for a specified duration before continuing the execution. |
SUCCESS | The Execution or task run has been completed successfully. |
WARNING | The Execution or task run exhibited unintended behavior, but the execution continued and was flagged with a warning. |
FAILED | The Execution or task run exhibited unintended behavior that caused the execution to fail. |
KILLING | A command was issued that asked for the Execution or task run to be killed. The system is in the process of killing the associated tasks. |
KILLED | An Execution or task run was killed (upon request), and no more tasks will run. |
RESTARTED | Transitional status equivalent to CREATEDfor a flow that was executed, failed, and then restarted. |
CANCELLED | An Execution or task run has been aborted because it has reached its defined concurrency limit. The limit was set to the CANCEL behavior. |
QUEUED | An Execution or task run has been put on hold because it has reached its defined concurrency limit. The limit was set to the QUEUE behavior. |
RETRYING | The Execution or task run is currently being retried. |
RETRIED | An Execution or task run exhibited unintended behavior, stopped, and created a new execution as defined by its flow-level retry policy. The policy was set to the CREATE_NEW_EXECUTION behavior. |
For a detailed overview of how each execution and task run transitions through states, see the States page.
Execution expressions
You can use the following execution expressions in your flow.
| Parameter | Description |
|---|---|
{{ execution.id }} | The execution ID, a generated unique ID for each execution |
{{ execution.startDate }} | The start date of the current execution, can be formatted with {{ execution.startDate | date("yyyy-MM-dd HH:mm:ss.SSSSSS") }}. |
{{ execution.originalId }} | The original execution ID, this ID never changes, even in case of a replay and keeps the first execution ID. |
Execute a flow from the UI
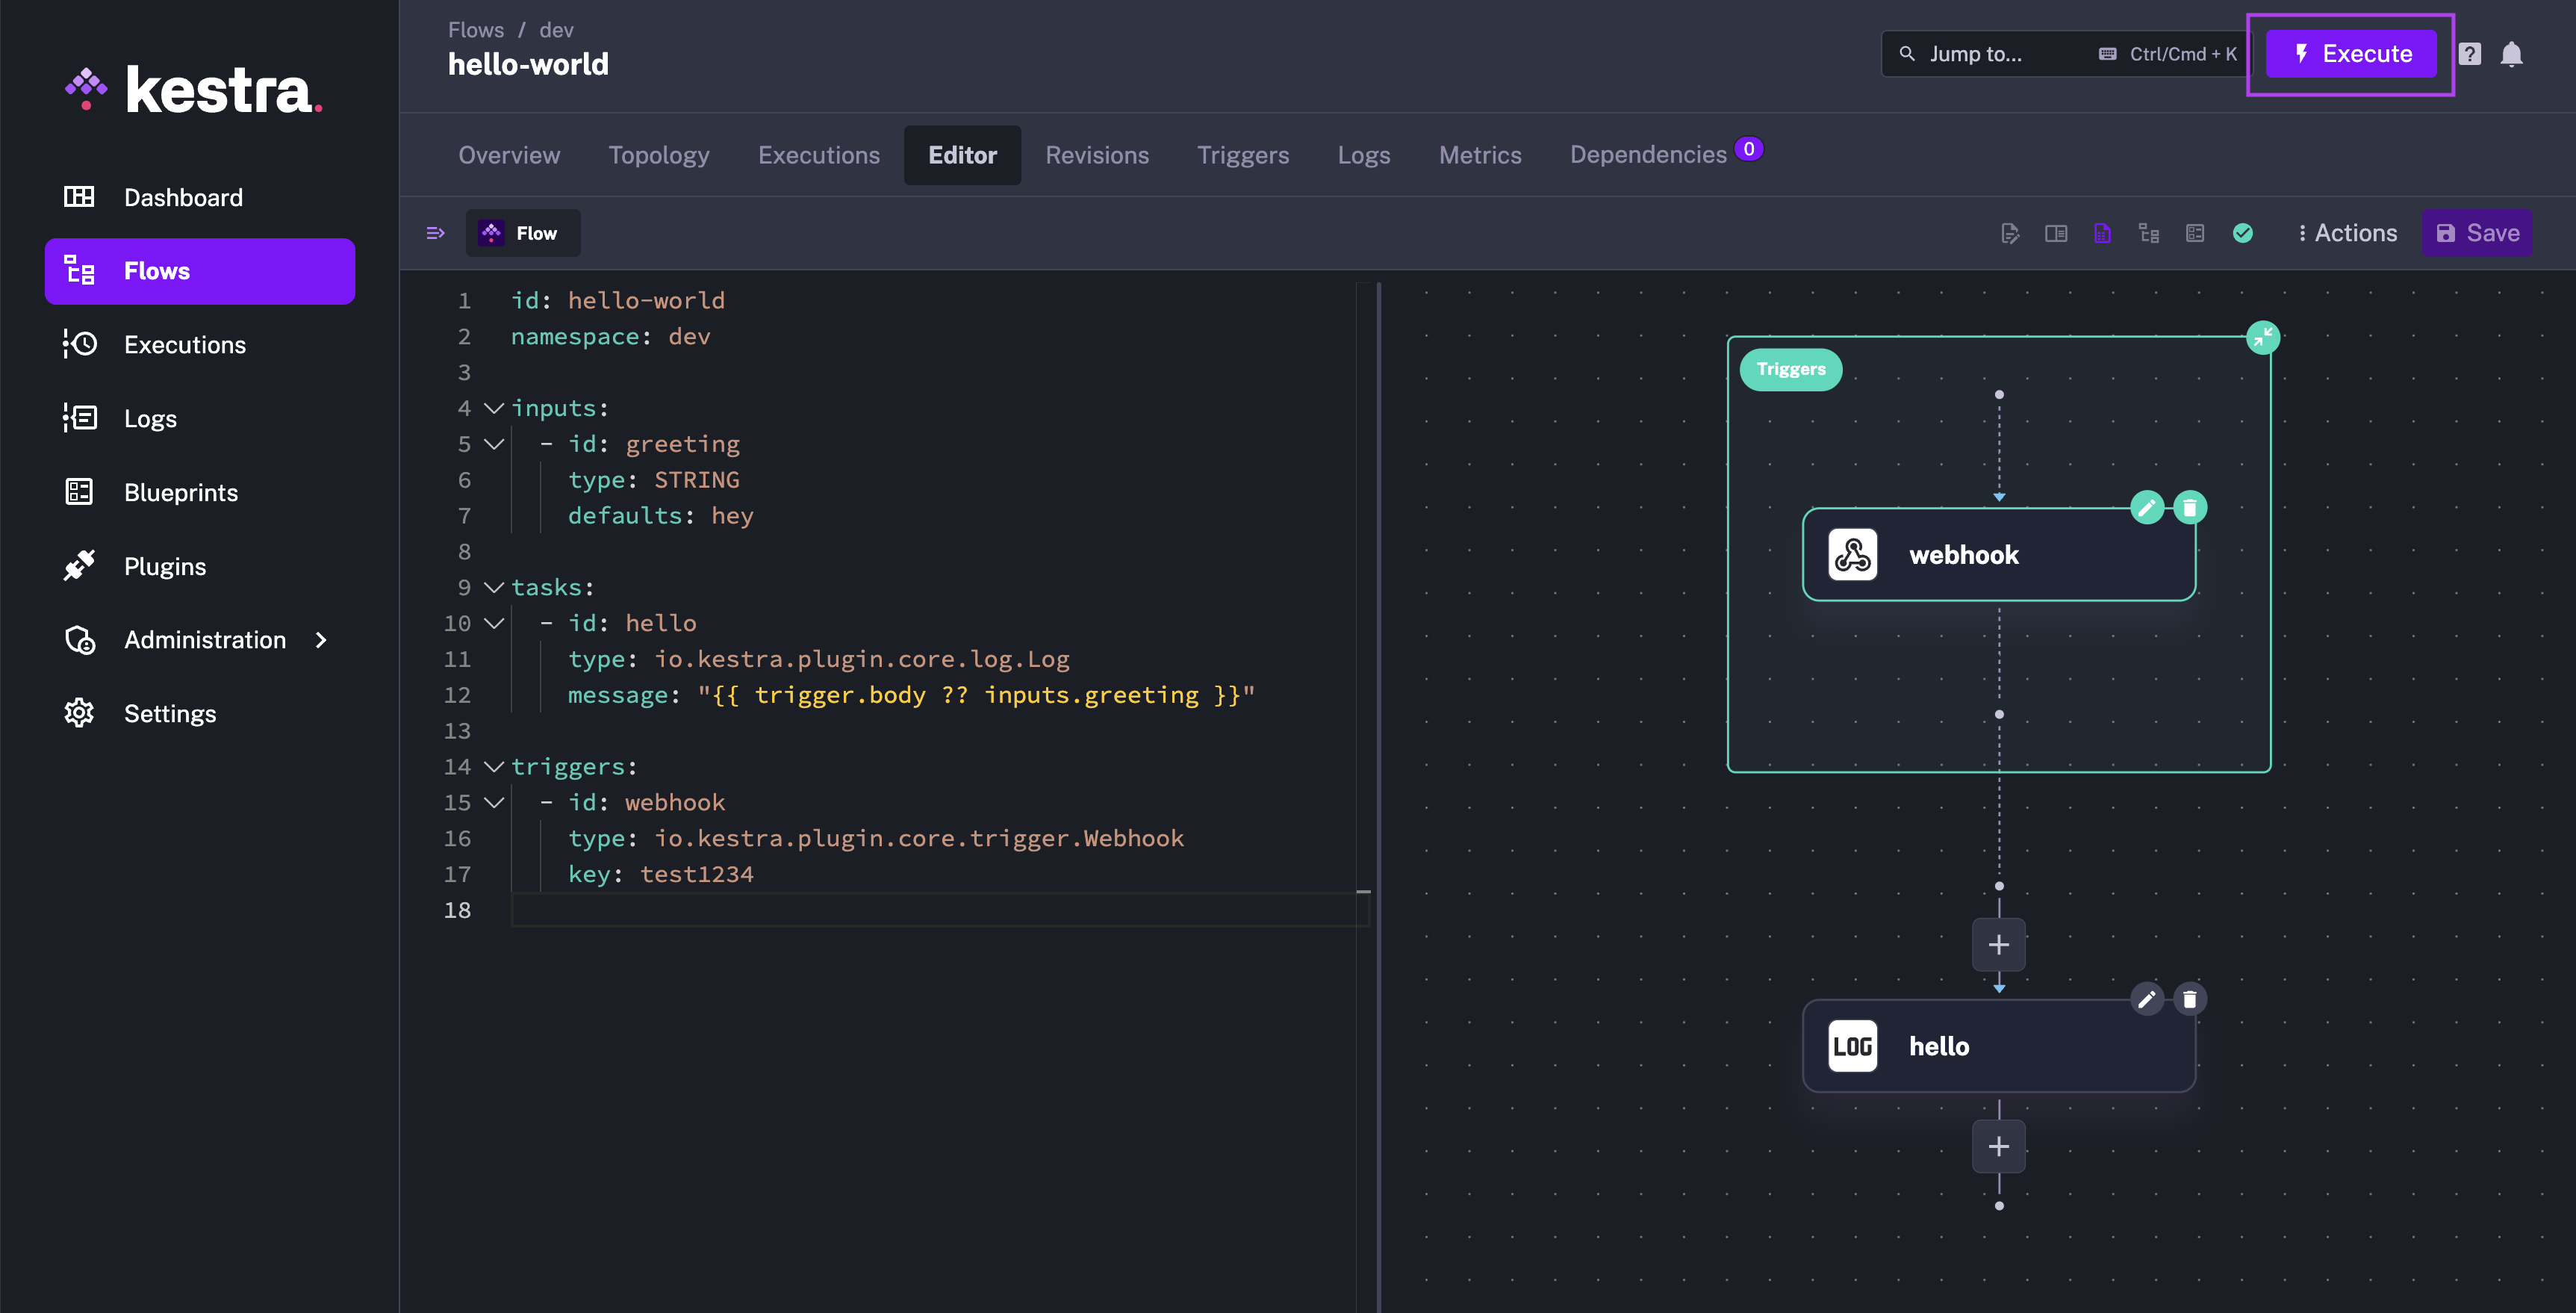
You can trigger a flow manually from the Kestra UI by clicking the Execute button on the flow page. This is useful when you want to test a flow or run it on demand.

Use automatic triggers
You can add a Schedule trigger to automatically launch a flow execution at a regular time interval.
Alternatively, you can add a Flow trigger to automatically launch a flow execution when another flow execution is completed. This is helpful when you want to:
- Implement a centralized namespace-level error handling strategy, e.g., to send a notification when any flow execution fails in a production namespace. Check the Alerting & Monitoring section for more details.
- Decouple your flows by following an event-driven pattern where a flow is triggered by the completion of another flow (as opposed to the [subflow pattern]… where a parent flow explicitly calls child flows).
You can also use the Webhook trigger to automatically launch a flow execution when a given HTTP request is received. You can leverage the {{ trigger.body }} variable to access the request body and the {{ trigger.headers }} variable to access the request headers in your flow.
To launch a flow and send data to the flow’s execution context from an external system using a webhook, you can send a POST request to the Kestra API using the following URL:
http://<kestra-host>:<kestra-port>/api/v1/main/executions/webhook/<namespace>/<flow-id>/<webhook-key>Below is an example:
http://localhost:8080/api/v1/main/executions/webhook/dev/hello-world/secretWebhookKey42You can also pass inputs to the flow using the inputs query parameter.
Execute a flow via an API call
You can trigger a flow execution by calling the API directly. This is useful when you want to start a flow execution from another application or service.
Use the following flow as an example:
id: hello_worldnamespace: company.team
inputs:  - id: greeting    type: STRING    defaults: hey
tasks:  - id: hello    type: io.kestra.plugin.core.log.Log    message: "{{ inputs.greeting }}"
triggers:  - id: webhook    type: io.kestra.plugin.core.trigger.Webhook    key: test1234
If Kestra runs locally, trigger a flow by calling /api/v1/main/executions/{namespace}/{flowId} endpoint. This example uses curl but you could use something else like Postman to test this too:
curl -X POST \http://localhost:8080/api/v1/main/executions/company.team/hello_worldThe above command triggers an execution of the latest revision of the hello_world flow from the company.team namespace.
Execute a specific revision of a flow
If you want to trigger an execution for a specific revision, you can use the revision query parameter:
curl -X POST \http://localhost:8080/api/v1/main/executions/company.team/hello_world?revision=2Execute a flow with inputs
You can also trigger a flow execution with inputs by adding the inputs as form data (the -F flag in the curl command):
curl -X POST \http://localhost:8080/api/v1/main/executions/company.team/hello_world \-F greeting="hey there"You can pass inputs of different types, such as STRING, INT, FLOAT, DATETIME, FILE, BOOLEAN, and more.
curl -v "http://localhost:8080/api/v1/main/executions/company.team/kestra-inputs" \ -H "Transfer-Encoding:chunked" \ -H "Content-Type:multipart/form-data" \ -F string="a string" \ -F optional="an optional string" \ -F int=1 \ -F float=1.255 \ -F boolean=true \ -F instant="2023-12-24T23:00:00.000Z" \ -F "files=@/tmp/128M.txt;filename=file"Execute a flow with FILE-type inputs
You can also pass files as an input. All files must be sent as multipart form data named files with a header filename=your_kestra_input_name indicating the name of the input.
Let’s look at an example to make this clearer. Suppose you have a flow that takes a JSON file as input and reads the file’s content:
id: large_json_payloadnamespace: company.team
inputs:  - id: myCustomFileInput    type: FILE
tasks:  - id: hello    type: io.kestra.plugin.scripts.shell.Commands    inputFiles:      myfile.json: "{{ inputs.myCustomFileInput }}"    taskRunner:      type: io.kestra.plugin.core.runner.Process    commands:      - cat myfile.json
Assuming you have a file myfile.json in the current working directory, you can invoke the flow using the following curl command:
curl -X POST -F "files=@./myfile.json;filename=myCustomFileInput" 'http://localhost:8080/api/v1/main/executions/company.team/large_json_payload'We recommend this pattern if you need to pass large payloads to a flow. Passing a large payload directly in the request body (e.g., as JSON-type input or as a raw JSON webhook body) is not recommended for privacy, performance, and maintainability reasons. Such large payloads would be stored directly in your Kestra’s database backend, cluttering valuable storage space and leading to potential performance or privacy issues. However, if you pass it as a JSON file using a FILE-type input, it will be stored in internal storage (such as S3, GCS, Azure Blob), making it more performant and cost-effective to store and retrieve.
Execute a flow via an API call in Python
You can also use the requests library in Python to make requests to the Kestra API. Here’s an example:
import requestsfrom requests_toolbelt.multipart.encoder import MultipartEncoder
with open("/tmp/128M.txt", 'rb') as fh:  url = "http://kestra:8080/api/v1/main/executions/company.team/hello_world"  mp_encoder = MultipartEncoder(fields={    "string": "a string",    "int": 1,    "float": 1.255,    "datetime": "2025-04-20T13:00:00.000Z",    "files": ("file", fh, "text/plain")  })  result = requests.post(      url,      data=mp_encoder,      headers={"Content-Type": mp_encoder.content_type},  )
Get URL to follow the Execution progress
The executions endpoint also returns a URL, allowing you to follow the execution progress from the UI. This is helpful for externally triggered, long-running executions that require users to follow the workflow progress. Below shows the steps to how you can use it:
- First, create a flow:
id: myflownamespace: company.team
tasks: - id: long_running_task type: io.kestra.plugin.scripts.shell.Commands commands: - sleep 90 taskRunner: type: io.kestra.plugin.core.runner.Process- Execute the flow via an API call:
curl -X POST http://localhost:8080/api/v1/main/executions/company.team/myflowYou will see output similar to the following:
{ "id": "1ZiZQWCHj7bf9XLtgvAxyi", "namespace": "company.team", "flowId": "myflow", "flowRevision": 1, "state": { "current": "CREATED", "histories": [ { "state": "CREATED", "date": "2024-09-24T13:35:32.983335847Z" } ], "duration": "PT0.017447417S", "startDate": "2024-09-24T13:35:32.983335847Z" }, "originalId": "1ZiZQWCHj7bf9XLtgvAxyi", "deleted": false, "metadata": { "attemptNumber": 1, "originalCreatedDate": "2024-09-24T13:35:32.983420055Z" }, "url": "http://localhost:8080/ui/executions/company.team/myflow/1ZiZQWCHj7bf9XLtgvAxyi"}You can click directly on that last URL to follow the execution progress from the UI, or you can return that URL from your application to the user who initiated the flow.
Keep in mind that you need to configure the URL of your Kestra instance within your configuration file to have a full URL rather than just the suffix /ui/executions/company.team/myflow/uuid. Here is how you can do it:
kestra: url: http://localhost:8080Webhook vs. API call
When sending a POST request to the /api/v1/main/executions/{namespace}/{flowId} endpoint, you can send data to the flow’s execution context using inputs. If you want to send arbitrary metadata to the flow’s execution context based on some event happening in your application, you can leverage a Webhook trigger.
You can adjust the previous hello_world example to use the webhook trigger instead of an API call:
id: hello_worldnamespace: company.team
inputs:  - id: greeting    type: STRING    defaults: hey
tasks:  - id: hello    type: io.kestra.plugin.core.log.Log    message: "{{ trigger.body ?? inputs.greeting }}"
triggers:  - id: webhook    type: io.kestra.plugin.core.trigger.Webhook    key: test1234
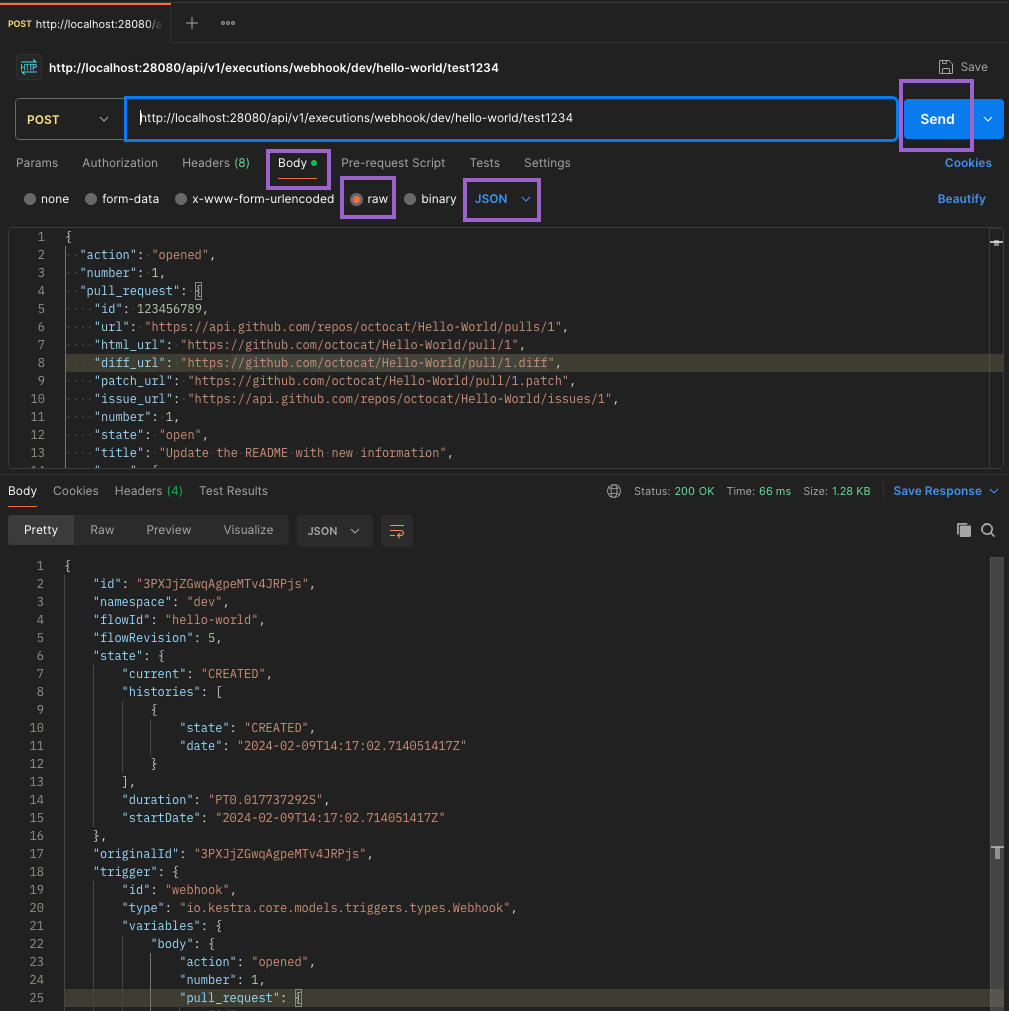
You can now send a POST request to the /api/v1/main/executions/webhook/{namespace}/{flowId}/{webhookKey} endpoint to trigger an execution and pass any metadata to the flow using the request body. In this example, the webhook URL would be http://localhost:8080/api/v1/main/executions/webhook/company.team/hello_world/test1234.
You can test the webhook trigger using a tool like Postman or cURL. Paste the webhook URL in the URL field and a sample JSON payload in the request body. Make sure to set:
- the request method to POST
- the request body type to raw JSON format
Finally, click the Send button to trigger the flow execution. You should get a response with the execution ID and status code 200 OK.

⚡️ When to use a webhook trigger vs. an API call? To decide whether to use a webhook trigger or an API call to create an Execution, consider the following:
- Use the webhook trigger when you want to send arbitrary metadata to the flow’s execution context based on some event happening in your application.
- Use the webhook trigger when you want to create new executions based on some event happening in an external application, such as a GitHub event (e.g. a Pull Request is merged) or a new record in a SaaS application, and you want to send the event metadata (header and body) to the flow to act on it.
- Use an API call when you only need to pass typed inputs and do not need to send an arbitrary payload.
Execute a flow from Python
You can also execute a flow using the kestra pip package. This is useful when you want to trigger a flow execution from a Python application without crafting the HTTP request manually, as shown earlier.
First, install the package:
pip install kestraThen, you can trigger a flow execution by calling the execute() method. Below is an example for the same hello_world flow in the namespace company.team as above:
from kestra import Flowflow = Flow()flow.execute('company.team', 'hello_world', {'greeting': 'hello from Python'})Now imagine that you have a flow that takes a FILE-type input and reads the file’s content:
id: myflownamespace: company.team
inputs:  - id: myfile    type: FILE
tasks:  - id: print_data    type: io.kestra.plugin.core.log.Log    message: "file's content {{ read(inputs.myfile) }}"
Assuming you have a file called example.txt in the same directory as your Python script, you can pass a file as an input to the flow using the following Python code:
import osfrom kestra import Flow
os.environ["KESTRA_HOSTNAME"] = "http://host.docker.internal:8080" # Set this when executing inside Kestra
flow = Flow()with open('example.txt', 'rb') as fh:    flow.execute('company.team', 'myflow', {'files': ('myfile', fh, 'text/plain')})
Keep in mind that files is a tuple with the following structure: ('input_id', file_object, 'content_type').
Execute with ForEachItem
The ForEachItem task allows you to iterate over a list of items and run a subflow for each item, or for each batch containing multiple items. Use this to process large lists in parallel, e.g., millions of records from a database table or an API payload.
The ForEachItem task is a Flowable task, which means that it can be used to define the flow logic and control the execution of the flow.
Syntax:
id: each_examplenamespace: company.teamtasks: - id: each type: io.kestra.plugin.core.flow.ForEachItem items: "{{ inputs.file }}" # could be also an output variable {{ outputs.extract.uri }} inputs: file: "{{ taskrun.items }}" # batch items passed to the subflow batch: rows: 4 bytes: "1024" partitions: 2 namespace: company.team flowId: subflow revision: 1 # optional (default: latest) wait: true # wait for the subflow execution transmitFailed: true # fail the task run if the subflow execution fails labels: # optional labels to pass to the subflow to be executed key: valueFull Example
Subflow:
id: subflownamespace: company.team
inputs:  - id: items    type: FILE
tasks:  - id: for_each_item    type: io.kestra.plugin.scripts.shell.Commands    taskRunner:      type: io.kestra.plugin.core.runner.Process    commands:      - cat "{{ inputs.items }}"
  - id: read    type: io.kestra.plugin.core.log.Log    message: "{{ read(inputs.items) }}"
Below is a flow that uses the ForEachItem task to iterate over a list of items and run the subflow for a batch of 10 items at a time:
id: each_parentnamespace: company.team
tasks:  - id: extract    type: io.kestra.plugin.jdbc.duckdb.Query    sql: |      INSTALL httpfs;      LOAD httpfs;      SELECT *      FROM read_csv_auto('https://huggingface.co/datasets/kestra/datasets/raw/main/csv/orders.csv', header=True);    store: true
  - id: each    type: io.kestra.plugin.core.flow.ForEachItem    items: "{{ outputs.extract.uri }}"    batch:      rows: 10    namespace: company.team    flowId: subflow    wait: true    transmitFailed: true    inputs:      items: "{{ taskrun.items }}"
Was this page helpful?