 Create a CI/CD pipeline
Kestra provides several ways to create a CI/CD pipeline for your flows. This section explains how to automate the validation and deployment of your workflows using CI/CD.
Introduction
Manual deployments are often not desirable. CI/CD pipelines are a great way to automate the validation and deployment of your workflows to production environments. This section explains several ways of creating a CI/CD pipeline for your Kestra resources.
Why a CI/CD pipeline?
A CI/CD process helps ensure fast and reliable deployments. Your changes get deployed automatically, as soon as they get peer-reviewed and merged to a VCS (Version Control System) like Git.
CI/CD for Kestra workflows
There are several ways to create a CI/CD pipeline for your flows in Kestra. Pick one of the options listed below that best suits your needs.
Kestra CLI
Kestra CLI provides several commands for validating and deploying your flows:
# validate a single flow
./kestra flow validate flow_directory/myflow.yml --server http://localhost:8080 --api-token <your-api-token>

# deploy a single flow to a namespace without deleting existing flows
./kestra flow namespace update namespace_name flow_directory/myflow.yml --no-delete --server http://localhost:8080 --api-token <your-api-token>
Note that the --api-token option is available only in the Enterprise Edition. Check the API Tokens page for more details.
If you run Kestra in a Docker container, you can access the CLI as follows:
docker exec -it kestra-container-name /bin/bash
./kestra flow --help
To validate and deploy multiple flows within a directory named flows, you can provide a path to that directory:
./kestra flow validate flows/ --server http://localhost:8080 --api-token <your-api-token>
./kestra flow namespace update namespace_name flows/ --no-delete --server http://localhost:8080 --api-token <your-api-token>
The --no-delete flag is used to preserve existing flows already stored within your Kestra instance. Don't include that flag if you want that a specific Git repository or a local directory is used as the single source of truth for your production workflows. This way, all previously stored flows get deleted, and only those flows maintained in Git (or that directory) are kept and updated.
CLI options
The CLI provides several options to customize your validation and deployment process. CLI options you should be aware of include:
--local: performs the validation locally using the client. By default, Kestra validates flows server-side (a remote API call to your Kestra webserver/standalone server).--server: allows you to specify the remote Kestra webserver/standalone server URL. The default URL is http://localhost:8080.
For all available CLI options on both flow validate and flow namespace update commands, use the -h or --help flag:
./kestra flow validate -h
./kestra flow namespace update -h
Templates (deprecated)
Templates can be validated and deployed in the same way as flows:
./kestra template validate path-to-template-directory
./kestra template namespace update template-namespace-to-update path-to-template-directory
Note that templates are deprecated and will be removed in a future release. Use subflows instead.
Deploy flows... from a flow!
The CLI commands explained above can be used in a Shell script within a flow. This way, your CI/CD pipeline can be managed directly from your Kestra instance directly.
id: ci-cd
namespace: prod

tasks:
  - id: github-ci-cd
    type: io.kestra.core.tasks.flows.WorkingDirectory
    tasks:
      - id: clone-repository
        type: io.kestra.plugin.git.Clone
        url: https://github.com/anna-geller/kestra-ci-cd
        branch: main

      - id: validate-flows
        type: io.kestra.plugin.scripts.shell.Commands
        description: "Validate flows from Git before deploying them."
        runner: PROCESS
        warningOnStdErr: false
        commands:
          - /app/kestra flow validate flows/ --server http://localhost:8080 --api-token "{{ secret('KESTRA_API_TOKEN') }}"

      - id: deploy-flows
        type: io.kestra.plugin.scripts.shell.Commands
        description: "Deply flows to a Kestra namespace."
        runner: PROCESS
        warningOnStdErr: false
        commands:
          - /app/kestra flow namespace update prod flows/prod/ --server http://localhost:8080 --api-token "{{ secret('KESTRA_API_TOKEN') }}"
          - /app/kestra flow namespace update prod.marketing flows/prod.marketing/ --server http://localhost:8080 --api-token "{{ secret('KESTRA_API_TOKEN') }}"

triggers:
  - id: github
    type: io.kestra.core.models.triggers.types.Webhook
    key: "yourSecretKey1234"
While you can trigger that deployment pipeline manually using Kestra UI or API (i.e. just like any other Kestra flow), it's better to combine that with a push event emitted by your Git repository. The above flow leverages the Webhook trigger so that your CI/CD flow runs as soon as you push changes to your Git branch.
To configure the webhook for your GitHub repository, go to Settings, and then select Webhooks. The URL in your browser should look as follows:
https://github.com/your_username/your_repository_name/settings/hooks
Select "Add webhook":

Paste Kestra's webhook URL into the Payload URL field, as shown below. The webhook to trigger a Kestra flow should be in the following format:
https://kestra_host_url/api/v1/executions/webhook/namespace/flow_id/webhook_key
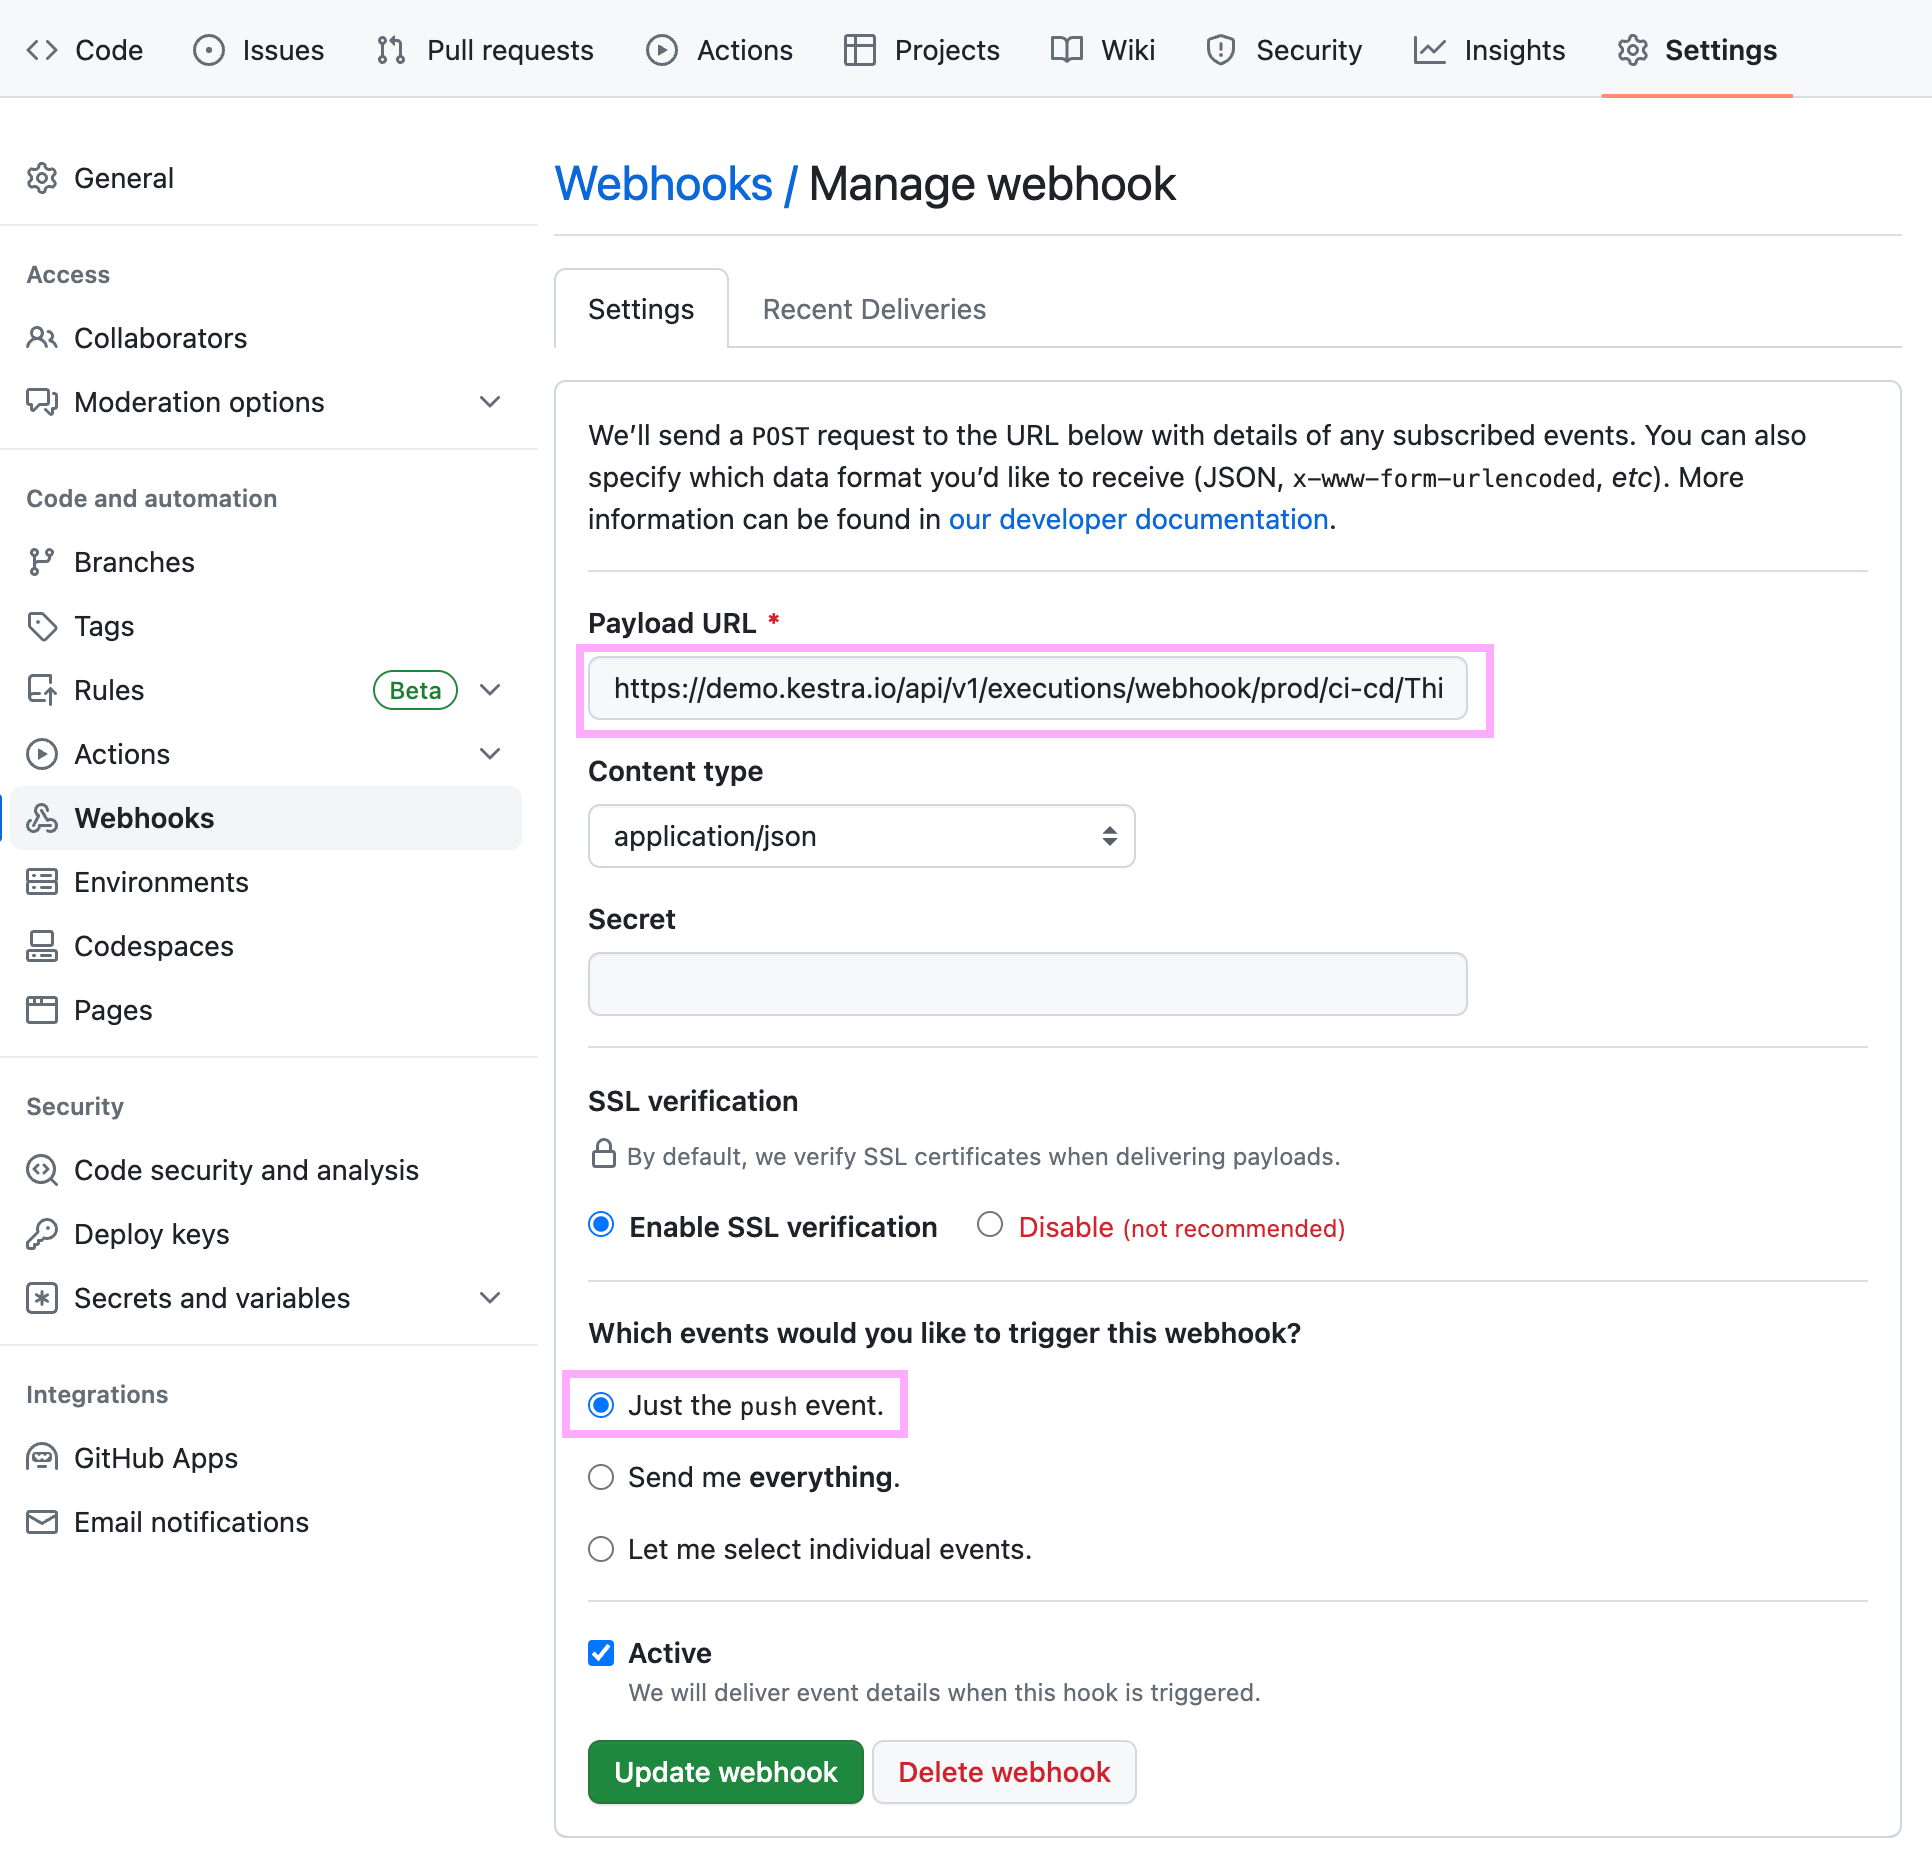
Note that we configured this webhook to be sent upon a push event to the default branch, but you can choose the option "Let me select individual events" for further customization e.g. to trigger the flow any time there is a new pull request.
Deploy flows from a GitHub Action
The official Kestra's GitHub Actions leverage the same CLI commands to:
- Validate flows and templates using the Validate Action
- Deploy flows and templates using the Deploy Action.
Here is a full example validating and deploying flows within a GitHub Actions workflow:
name: Kestra CI/CD
on:
  push:
    branches:
      - main
jobs:
  prod:
    runs-on: ubuntu-latest
    steps:
      - uses: actions/checkout@v3
      - name: validate-all flows
        uses: kestra-io/validate-action@develop
        with:
          directory: ./flows/prod
          resource: flow
          server: ${{secrets.KESTRA_HOSTNAME}}
          user: ${{secrets.KESTRA_USER}}
          password: ${{secrets.KESTRA_PASSWORD}}
      - name: deploy-prod
        uses: kestra-io/deploy-action@develop
        with:
          namespace: prod
          directory: ./flows/prod
          resource: flow
          server: ${{secrets.KESTRA_HOSTNAME}}
          user: ${{secrets.KESTRA_USER}}
          password: ${{secrets.KESTRA_PASSWORD}}
          delete: false
      - name: deploy-prod-marketing
        uses: kestra-io/deploy-action@develop
        with:
          namespace: prod.marketing
          directory: ./flows/prod.marketing
          resource: flow
          server: ${{secrets.KESTRA_HOSTNAME}}
          user: ${{secrets.KESTRA_USER}}
          password: ${{secrets.KESTRA_PASSWORD}}
          delete: false
Note that this example uses GitHub repository secrets to store the host name, user name and password to your Kestra instance. Make sure to add those secrets to your repository before using this workflow.
Here is a modified version of the same workflow but this time using an API token instead of a user name and password:
name: Kestra CI/CD
on:
  push:
    branches:
      - main
jobs:
  prod:
    runs-on: ubuntu-latest
    steps:
      - uses: actions/checkout@v3
      - name: validate-all flows
        uses: kestra-io/validate-action@develop
        with:
          directory: ./flows/prod
          resource: flow
          server: ${{secrets.KESTRA_HOSTNAME}}
          apiToken: ${{secrets.KESTRA_API_TOKEN}}
      - name: deploy-prod
        uses: kestra-io/deploy-action@develop
        with:
          namespace: prod
          directory: ./flows/prod
          resource: flow
          server: ${{secrets.KESTRA_HOSTNAME}}
          apiToken: ${{secrets.KESTRA_API_TOKEN}}
          delete: false
      - name: deploy-prod-marketing
        uses: kestra-io/deploy-action@develop
        with:
          namespace: prod.marketing
          directory: ./flows/prod.marketing
          resource: flow
          server: ${{secrets.KESTRA_HOSTNAME}}
          apiToken: ${{secrets.KESTRA_API_TOKEN}}
          delete: false
Deploy flows from a GitLab CI/CD
GitLab CI/CD follows a similar pattern to the GitHub Actions example. See the GitLab section for more details.
Deploy flows from Terraform
While Terraform might be more challenging to understand at first, we highly recommend this option, as it provides the highest degree of flexibility. Using Kestra and Terraform together, your flows can be deployed along with other infrastructure resources in your stack, making it easier to adopt Infrastructure as Code.
The Terraform CI/CD page provides a more detailed explanation, but here is a simple Terraform configuration that you can use to automate the deployment of flows stored in a flows directory:
terraform {
  required_providers {
    kestra = {
      source  = "kestra-io/kestra"
      version = "~> 0.15.0"
    }
  }
}

provider "kestra" {
  url = "http://localhost:8080" # Kestra webserver/standalone server URL
  api_token = "<your-api-token>" # only available in the Enterprise Edition
}

resource "kestra_flow" "flows" {
  for_each  = fileset(path.module, "flows/*.yml")
  flow_id   = yamldecode(templatefile(each.value, {}))["id"]
  namespace = yamldecode(templatefile(each.value, {}))["namespace"]
  content   = templatefile(each.value, {})
  keep_original_source = true
}
You can save the code shown above in a file named main.tf. Then, run the following commands from the same directory where you stored that main.tf file:
terraform init # downloads the terraform provider for Kestra
terraform validate # validates the configuration incl. the syntax of your flows
terraform apply -auto-approve # deploys your flows - can be used in a CI/CD process
Dive into each option
The following sections provide more details on each of the options listed above.