 Configuration
Configuration reference for Kestra.
Almost everything in Kestra is configurable. This page covers key options such as data sources, logging, security, and AI.
Kestra reads configuration from YAML. Provide it as an environment variable, a file, or inline in Docker Compose (see installation options). The configuration holds deployment-specific options and is divided into sections that map to system components:
datasources:
  postgres:
    url: jdbc:postgresql://postgres:5432/kestra
    driver-class-name: org.postgresql.Driver
    username: kestra
    password: k3str4
kestra:
  server:
    basic-auth:
      username: "[email protected]" # must be a valid email address
      password: kestra
      # Do not authenticate these URLs (some Micronaut defaults are open by default for security reasons)
      open-urls:
        - "/api/v1/main/executions/webhook/"
  repository:
    type: postgres
  storage:
    type: local
    local:
      base-path: "/app/storage"
  queue:
    type: postgres
  tasks:
    tmp-dir:
      path: "/tmp/kestra-wd/tmp"
  url: "http://localhost:8080/"
Environment Variables
Environment variables override file-based configuration.
Conversion Rules
- Replace dots (
.), hyphens (-), and camelCase word boundaries with underscores (_). - Use uppercase for all letters.
- Prefix with
KESTRA_for Kestra-specific settings.
Examples
| Configuration value | Resulting properties |
|---|---|
MYAPP_MYSTUFF | myapp.mystuff, myapp-mystuff |
MY_APP_MY_STUFF | my.app.my.stuff, my.app.my-stuff, my-app.my.stuff, my-app.my-stuff, etc. |
Example: Replace a Config File Entry
File-based configuration:
datasources:
  postgres:
    username: kestra
Environment variable:
DATASOURCES_POSTGRES_USERNAME=kestra
Example: Camel Case and Hyphenated Keys
Regardless of whether your YAML uses camelCase or kebab-case (-),
convert all separators and case transitions into underscores.
YAML configuration:
kestra:
  storage:
    s3:
      accessKey: myKey
or
kestra:
  storage:
    s3:
      access-key: myKey
Environment variable:
KESTRA_STORAGE_S3_ACCESS_KEY=myKey
Setup
Configure three core components during initial setup:
- Internal storage
- Queue
- Repository
Internal storage configuration
The default local storage writes to the host filesystem and suits only local testing (no resiliency). Configure another type by setting kestra.storage.type and installing the corresponding storage plugin. Example for Google Cloud Storage:
kestra:
  storage:
    type: gcs
See Internal storage for details.
Queue configuration
Queues must be compatible with the repository type. Defaults depend on your architecture and installation.
Available types:
- In-memory (with in-memory repository) — for local testing
- Database (JDBC) — H2, MySQL, PostgreSQL
- Kafka (with Elasticsearch repository; Enterprise Edition)
Enable the PostgreSQL queue:
kestra:
  queue:
    type: postgres
See database for details.
Repository configuration
Repositories must match the queue type:
- In-memory — for local testing only; lacks resiliency/scalability and some features
- Database — H2, MySQL, or PostgreSQL
- Elasticsearch — with Kafka queue (Enterprise Edition)
Enable PostgreSQL repository:
kestra:
  repository:
    type: postgres
See database and Elasticsearch for details.
Database
Queue and repository
Set kestra.queue.type and kestra.repository.type to your database:
kestra:
  queue:
    type: postgres
  repository:
    type: postgres
Supported: PostgreSQL, H2, MySQL. Use H2 for local development. For production, use PostgreSQL (or MySQL if PostgreSQL isn’t an option).
See software requirements for minimum versions.
For PostgreSQL performance issues, consider random_page_cost=1.1 to improve index usage on queue queries. You can also set kestra.queue.postgres.disable-seq-scan=true to force index usage on polling.
Datasources
After setting repository/queue types, configure datasources. Kestra uses HikariCP; all Hikari options can be set here.
Connection pool size
Each Kestra instance opens up to maximum-pool-size connections (default 10), with minimum-idle (default 10).
- Standalone server: ~10 connections
- Split components: ~40 (10 per component)
- Split components with 3 replicas: ~120
Defaults generally suffice.
Datasources
HikariCP properties:
| Property | Type | Description | Default value |
|---|---|---|---|
url | String | JDBC connection string | |
catalog | String | Default catalog | driver default |
schema | String | Default schema | driver default |
username | String | Default username | |
password | String | Default password | |
transaction-isolation | String | Default isolation level | driver default |
pool-name | String | Pool name | HikariPool-<Generated> |
connection-init-sql | String | SQL run on new connections | null |
connection-test-query | String | Validation query | null |
connection-timeout | Long | Max wait for a connection (ms) | 30000 |
idle-timeout | Long | Max idle time (ms) | 600000 |
minimum-idle | Long | Minimum idle connections (defaults to maximum-pool-size) | 10 |
initialization-fail-timeout | Long | Initialization failure timeout (ms) | 1 |
leak-detection-threshold | Long | Leak detection threshold (ms) | 0 |
maximum-pool-size | Int | Pool size | 10 |
max-lifetime | Long | Max connection lifetime (ms) | 1800000 |
validation-timeout | Long | Max validation time (ms) | 5000 |
Example:
datasources:
  postgres:
    url: jdbc:postgresql://localhost:5432/kestra
    driver-class-name: org.postgresql.Driver
    username: kestra
    password: k3str4
    maximum-pool-size: 20
    minimum-idle: 10
JDBC queues
Kestra’s JDBC queues long-poll the queues table. Lower intervals reduce latency but increase DB load.
kestra.jdbc.queues.poll-sizekestra.jdbc.queues.min-poll-intervalkestra.jdbc.queues.max-poll-intervalkestra.jdbc.queues.poll-switch-interval
Defaults:
kestra:
  jdbc:
    queues:
      poll-size: 100
      min-poll-interval: 25ms
      max-poll-interval: 1000ms
      poll-switch-interval: 5s
JDBC cleaner
Cleans queues periodically:
kestra:
  jdbc:
    cleaner:
      initial-delay: 1h
      fixed-delay: 1h
      retention: 7d
initial-delay: when to startfixed-delay: how oftenretention: oldest entries to keep
Protecting against large messages
Experimental (>= 0.19).
Reject oversize messages to protect memory:
kestra:
  jdbc:
    queues:
      message-protection:
        enabled: true
        limit: 1048576 # 1 MiB
Telemetry
Anonymous usage reporting is enabled by default; see details.
Disable:
kestra:
  anonymous-usage-report:
    enabled: false
Adjust timings:
kestra:
  anonymous-usage-report:
    initial-delay: 5m
    fixed-delay: 1h
UI usage:
kestra:
  ui-anonymous-usage-report:
    enabled: false
Elasticsearch
Enterprise Edition only.
Minimal config:
kestra:
  elasticsearch:
    client:
      http-hosts: "http://localhost:9200"
  repository:
    type: elasticsearch
With basic auth:
kestra:
  elasticsearch:
    client:
      http-hosts:
        - "http://node-1:9200"
        - "http://node-2:9200"
        - "http://node-3:9200"
      basic-auth:
        username: "<your-user>"
        password: "<your-password>"
  repository:
    type: elasticsearch
Trust all SSL certificates
Useful for dev/self-signed certs:
kestra:
  elasticsearch:
    client:
      http-hosts: "https://localhost:9200"
      trust-all-ssl: true
Indices prefix
Change index prefix (default kestra_):
kestra:
  elasticsearch:
    defaults:
      indice-prefix: "uat_kestra"
Indices split
Split large indices by periodicity (DAILY, WEEKLY, MONTHLY, YEARLY):
kestra:
  elasticsearch:
    indices:
      executions:
        alias: daily
      logs:
        alias: daily
      metrics:
        alias: daily
Index rotation
Enables aliases and rotating indices (name-periodicity-1). Move existing indices (e.g., kestra_logs → kestra_logs-1) before switching. Purge only safe historical indices (logs, metrics, executions). Switching periodicity is safe; aliases match name-*.
EE Java security
Opt in to EE Java security for filesystem and class restrictions:
kestra:
  ee:
    java-security:
      enabled: true
      forbidden-paths:
        - /etc/
      authorized-class-prefix:
        - io.kestra.plugin.core
        - io.kestra.plugin.gcp
- Forbidden paths: disallow read/write on listed paths.
- Authorized class prefix: classes allowed to create threads.
- Forbidden class prefix: classes blocked from creating threads:
kestra:
  ee:
    java-security:
      enabled: true
      forbidden-class-prefix:
        - io.kestra.plugin.scripts
EE license
Provide a valid EE license:
kestra:
  ee:
    license:
      id: <LICENSE ID>
      fingerprint: <LICENSE FINGERPRINT>
      key: |
        <LICENSE KEY>
The license is set up using three configuration properties: id, fingerprint, and key.
kestra.ee.license.id: license identifier.kestra.ee.license.fingerprint: license authentication. This is required for using Versioned Plugins.kestra.ee.license.key: license key.
Kestra validates the license on startup.
EE sidebar configuration
Right sidebar: custom links
kestra:
  ee:
    right-sidebar:
      custom-links:
        internal-docs:
          title: "Internal Docs"
          url: "https://kestra.io/docs/"
        support-portal:
          title: "Support portal"
          url: "https://kestra.io/support/"
The right-sidebar syntax changed after 0.24.0; update older configs.
Left sidebar: disable menus
kestra:
  ee:
    left-sidebar:
      disabled-menus:
        - "Blueprints/Flow Blueprints"
        - "Blueprints/Dashboard Blueprints"
        - "Blueprints/App Blueprints"
Multi-tenancy
Removed in 0.23. See the 0.23 migration guide.
Enable (pre-0.23):
kestra:
  ee:
    tenants:
      enabled: true
Default tenant
Removed in 0.23. See the 0.23 migration guide.
Disable the default tenant when multi-tenancy is on:
kestra:
  ee:
    tenants:
      enabled: true
      default-tenant: false
Encryption
Kestra 0.15.0+ supports encryption of sensitive data (inputs/outputs) at rest. Provide a base64-encoded 32-character key:
kestra:
  encryption:
    secret-key: BASE64_ENCODED_STRING_OF_32_CHARCTERS
Generate with OpenSSL:
openssl rand -base64 32
Or with Bash:
random_string=$(LC_ALL=C tr -dc 'A-Za-z0-9' < /dev/urandom | head -c 32)
echo "$random_string" | base64
Docker Compose example:
  kestra:
    image: kestra/kestra:latest
    environment:
      KESTRA_CONFIGURATION: |
        kestra:
          encryption:
            secret-key: NWRhUDc5TERWY2QyMDhSSHhfeWYzbjJpNE5vb3M5NnY=
Use SECRET input/output types:
id: my_secret_flow
namespace: company.team

inputs:
  - id: secret
    type: SECRET

tasks:
  - id: mytask
    type: io.kestra.plugin.core.log.Log
    message: task that needs the secret to connect to an external system

outputs:
  - id: secret_output
    type: SECRET
    value: "{{ inputs.secret }}"
Without kestra.encryption.secret-key, SECRET types throw:
Illegal argument: Unable to use a SECRET input as encryption is not configured.
Endpoints
Secure Micronaut endpoints with basic auth:
endpoints:
  all:
    basic-auth:
      username: your-user
      password: your-password
Change management port:
endpoints:
  all:
    port: 8084
Environment
Display an environment badge in the UI:
kestra:
  environment:
    name: Production
    color: "#FCB37C"
You can also set this via the UI Settings page.
JVM
Set JVM options with JAVA_OPTS:
export JAVA_OPTS="-Duser.timezone=Europe/Paris"
Proxy example (see Java docs):
JAVA_OPTS=-Dhttp.proxyHost=10.0.0.100 -Dhttp.proxyPort=8800
Timezone
Kestra uses the system timezone by default. Change with user.timezone. Affects scheduling and log display.
Memory
Kestra defaults to -XX:MaxRAMPercentage=50.0. Alternatively, set a fixed heap with -Xmx, e.g., -Xmx1g.
Indexer
Controls bulk indexing from Kafka to Elasticsearch:
kestra:
  indexer:
    batch-size: 500
    batch-duration: PT1S
Larger values reduce load but delay UI updates.
Kafka
You can set up your Kafka connection using the kestra.kafka configuration. Enterprise Edition only.
Client properties
Minimal:
kestra:
  kafka:
    client:
      properties:
        bootstrap.servers: "localhost:9092"
  queue:
    type: kafka
With SSL:
kestra:
  kafka:
    client:
      properties:
        bootstrap.servers: "host:port"
        security.protocol: "SSL"
        ssl.endpoint.identification.algorithm: ""
        ssl.key.password: "<your-password>"
        ssl.keystore.location: "/etc/ssl/private/keystore.p12"
        ssl.keystore.password: "<your-password>"
        ssl.keystore.type: "PKCS12"
        ssl.truststore.location: "/etc/ssl/private/truststore.jks"
        ssl.truststore.password: "<your-password>"
  queue:
    type: kafka
kestra.kafka.client.properties accepts any Kafka property (see Kafka docs).
Topics
Defaults can be tuned:
kestra.kafka.defaults.topic.partitions(default 16)kestra.kafka.defaults.topic.replication-factor(default 1)
The number of topic's partitions limits the number of concurrently processing server instances consuming that particular topic. For example, using 16 partitions for every topic limits the effective number of instances to 16 executor servers, 16 worker servers, etc.
Set replication factor per your cluster. For 3 brokers, use 3 for HA.
Consumer, producer, and stream defaults
You can change the default properties of the Kafka client used by Kestra using the kestra.kafka.defaults.[consumer|producer|stream].properties configuration. These allow you to change any available properties.
kestra:
  kafka:
    defaults:
      consumer:
        properties:
          isolation.level: "read_committed"
          auto.offset.reset: "earliest"
          enable.auto.commit: "false"
      producer:
        properties:
          acks: "all"
          compression.type: "lz4"
          max.request.size: "10485760"
      stream:
        properties:
          processing.guarantee: "exactly_once"
          replication.factor: "${kestra.kafka.defaults.topic.replication-factor}"
          acks: "all"
          compression.type: "lz4"
          max.request.size: "10485760"
          state.dir: "/tmp/kafka-streams"
Topic names and properties
Rename topics or set per-topic properties via kestra.kafka.defaults.topics. See defaults in the project’s application.yml.
kestra.kafka.defaults.topics.{{topic}}.name: Change the name of the topic.kestra.kafka.defaults.topics.{{topic}}.properties: Change the default properties used during topic automatic creation.
Consumer prefix
Change consumer group prefix (default kestra) for multi-instance clusters:
kestra:
  kafka:
    defaults:
      consumer-prefix: "uat_kestra"
Topic prefix
Change topic prefix (default kestra_):
kestra:
  kafka:
    defaults:
      topic-prefix: "uat_kestra"
Client loggers
Enable message logging for debugging:
kestra:
  kafka:
    client:
      loggers:
        - level: INFO
          type: PRODUCER
          topic-regexp: "kestra_(executions|workertaskresult)"
          key-regexp: .*parallel.*
          value-regexp: .*parallel.*
Heavy performance impact; use sparingly.
Kafka Streams state directory
kestra.kafka.stream.properties.state-dir sets local state. Default: /tmp/kafka-streams. Persisting reduces startup time. Purge before upgrades if needed.
Topic retention
Set on a per-topic basis:
kestra:
  kafka:
    topics:
      execution:
        properties:
          retention.ms: "86400000"
Protecting against large messages
This is an Experimental feature.
Store oversize messages in internal storage to avoid failures:
kestra:
  kafka:
    message-protection:
      enabled: true
Listeners
Deprecated and disabled since 0.11.0. Re-enable if needed:
kestra:
  listeners:
    enabled: true
Logger
Server log
Adjust log levels:
logger:
  levels:
    io.kestra.core.runners: TRACE
    org.opensearch.client.RestClient: DEBUG
    org.apache.http: DEBUG
    org.apache.http.wire: DEBUG
    org.apache.kafka: DEBUG
    io.netty.handler.logging: TRACE
Disable flow execution logs in server logs:
logger:
  levels:
    flow: 'OFF'
Disable logs for a specific flow (hello-world):
logger:
  levels:
    flow.hello-world: 'OFF'
Disable logs for a specific task (taskId = log, flowId = hello-world):
logger:
  levels:
    flow.hello-world.log: 'OFF'
You can also disable specific trigger's logs by its ID.
Execution-related loggers:
execution: flow start/endtask: task run start/endtrigger: trigger evaluation start/end
Disable globally:
logger:
  levels:
    execution: 'OFF'
    task: 'OFF'
    trigger: 'OFF'
Or per flow:
logger:
  levels:
    execution.hello-world: 'OFF'
    task.hello-world: 'OFF'
    trigger.hello-world: 'OFF'
Or per task/trigger:
logger:
  levels:
    task.hello-world.log: 'OFF'
    trigger.hello-world.schedule: 'OFF'
Access log configuration
micronaut:
  server:
    netty:
      access-logger:
        enabled: true
        logger-name: io.kestra.webserver.access
        log-format: "[Date: {}] [Duration: {} ms] [Method: {}] [Url: {}] [Status: {}] [Length: {}] [Ip: {}] [Port: {}]"
        exclusions:
          - /ui/.+
          - /health
          - /prometheus
Log format
Kestra uses Logback, a logging framework for Java.
You can customize its configuration by providing a logback.xml file as:
JAVA_OPTS="-Dlogback.configurationFile=file:/path/to/logback.xml"
GCP example
<?xml version="1.0" encoding="UTF-8"?>
<configuration debug="false">
  <include resource="logback/base.xml" />
  <include resource="logback/gcp.xml" />
  <root level="WARN">
    <appender-ref ref="CONSOLE_JSON_OUT" />
    <appender-ref ref="CONSOLE_JSON_ERR" />
  </root>
</configuration>
ECS format example
<?xml version="1.0" encoding="UTF-8"?>
<configuration debug="true">
  <include resource="logback/base.xml" />
  <include resource="logback/ecs.xml" />
  <root level="WARN">
    <appender-ref ref="CONSOLE_ECS_OUT" />
    <appender-ref ref="CONSOLE_ECS_ERR" />
  </root>
</configuration>
Metrics
Set a global prefix:
kestra:
  metrics:
    prefix: kestra
Micronaut
Kestra runs on Micronaut. See the Micronaut guide for all options. Highlights:
Configure port
micronaut:
  server:
    port: 8086
Configure SSL
This guide will help you configure SSL with Micronaut.
Example (passwords via env vars):
micronaut:
  security:
    x509:
      enabled: true
  ssl:
    enabled: true
  server:
    ssl:
      client-authentication: need
      key-store:
        path: classpath:ssl/keystore.p12
        password: ${KEYSTORE_PASSWORD}
        type: PKCS12
      trust-store:
        path: classpath:ssl/truststore.jks
        password: ${TRUSTSTORE_PASSWORD}
        type: JKS
Timeout and max upload size
micronaut:
  server:
    max-request-size: 10GB
    multipart:
      max-file-size: 10GB
      disk: true
    read-idle-timeout: 60m
    write-idle-timeout: 60m
    idle-timeout: 60m
    netty:
      max-chunk-size: 10MB
Changing base path
If behind a reverse proxy, you can change the base path of the application with the following configuration:
micronaut:
  server:
    context-path: "kestra-prd"
Changing host resolution
If behind a reverse proxy, you can change host resolution (http/https/domain name) providing the header sent by your reverse proxy:
micronaut:
  server:
    host-resolution:
      host-header: Host
      protocol-header: X-Forwarded-Proto
Configuring CORS
micronaut:
  server:
    cors:
      enabled: true
For finer control, see the CORS docs.
Configure local flow synchronization
micronaut:
  io:
    watch:
      enabled: true
      paths:
        - /path/to/your/flows
See the local flow sync guide.
Plugins
Installing plugins
Install from Maven repositories with:
kestra plugins install io.kestra.plugin:plugin-script-python:LATEST
By default Kestra uses Maven Central; add more repositories if needed.
Adding custom Maven repositories
kestra:
  plugins:
    repositories:
      central:
        url: https://repo.maven.apache.org/maven2/
      google-artifact-registry:
        url: https://${GCP_REGISTRY_LOCATION}-maven.pkg.dev/${GCP_PROJECT_ID}/${GCP_REPOSITORY}
        basic-auth:
          username: oauth2accesstoken
          password: ${GCP_OAUTH_ACCESS_TOKEN}
Installing EE plugins
kestra:
  plugins:
    repositories:
      kestra-io:
        url: https://registry.kestra.io/maven
        basic-auth:
          username: ${kestra.ee.license.id:}
          password: ${kestra.ee.license.fingerprint:}
Plugin defaults
Apply global defaults that flows can override:
kestra:
  plugins:
    defaults:
      - type: io.kestra.plugin.core.log.Log
        values:
          level: ERROR
Defaults are evaluated by the Executor and propagated to all components. Keep a single, unified kestra.plugins.defaults across servers; workers do not render templates themselves.
For finer control, use flow-level pluginDefaults.
See Plugin defaults.
Forced plugin defaults
Force non-overridable values:
kestra:
  plugins:
    defaults:
      - type: io.kestra.plugin.scripts.shell.Commands
        forced: true
        values:
          containerImage: ubuntu:latest
          taskRunner:
            type: io.kestra.plugin.scripts.runner.docker.Docker
Enable or disable features
Some plugin features can be enabled globally:
kestra:
  plugins:
    configurations:
      - type: io.kestra.plugin.core.flow.Subflow
        values:
          outputs:
            enabled: true
      - type: io.kestra.plugin.core.flow.Flow
        values:
          outputs:
            enabled: true
Set default values
Set defaults for features not exposed in flow properties, e.g., default missed schedule recovery:
kestra:
  plugins:
    configurations:
      - type: io.kestra.plugin.core.trigger.Schedule
        values:
          recoverMissedSchedules: NONE # ALL | NONE | LAST
Override in a flow:
triggers:
  - id: schedule
    type: io.kestra.plugin.core.trigger.Schedule
    cron: "*/15 * * * *"
    recoverMissedSchedules: LAST
Volume enabled for Docker task runner
Disabled by default; enable if needed:
kestra:
  plugins:
    configurations:
      - type: io.kestra.plugin.scripts.runner.docker.Docker
        values:
          volumeEnabled: true
Allowed plugins
Enterprise Edition (>= 0.19).
Restrict plugins via include/exclude regex:
kestra:
  plugins:
    security:
      includes:
        - io.kestra.*
      excludes:
        - io.kestra.plugin.core.debug.Echo
Plugin management
(>= 0.22.0)
kestra:
  plugins:
    management:
      enabled: true
      remote-storage-enabled: true
      custom-plugins-enabled: true
      local-repository-path: /tmp/kestra/plugins-repository
      auto-reload-enabled: true
      auto-reload-interval: 60s
      default-version: LATEST
remote-storage-enabled: store managed plugins in internal storageauto-reload-enabled/auto-reload-interval: periodic refreshdefault-version:latest,current,oldest,none, or a specific version
Retries
APIs for storage and secret managers can fail transiently. Configure global retries:
kestra.retries.attempts(default5)kestra.retries.delay(default1s)kestra.retries.max-delay(defaultundefined)kestra.retries.multiplier(default2.0)
These retries cover internal storage and secret managers, not tasks.
To set task-level retries globally, use plugin defaults:
- type: io.kestra
  retry:
    type: constant
    interval: PT5M
    maxDuration: PT1H
    maxAttempts: 3
    warningOnRetry: true
Secret managers
Configure a secrets backend via kestra.secret. To isolate from specific services, use kestra.secret.isolation.
kestra:
  secret:
    type: azure-key-vault
    azure-key-vault:
      client-secret:
        tenant-id: "id"
        client-id: "id"
        client-secret: "secret"
    isolation: # >= 0.22
      enabled: true
      denied-services:
        - EXECUTOR
If configured in the UI, top-level keys are implied. Example UI screenshot:
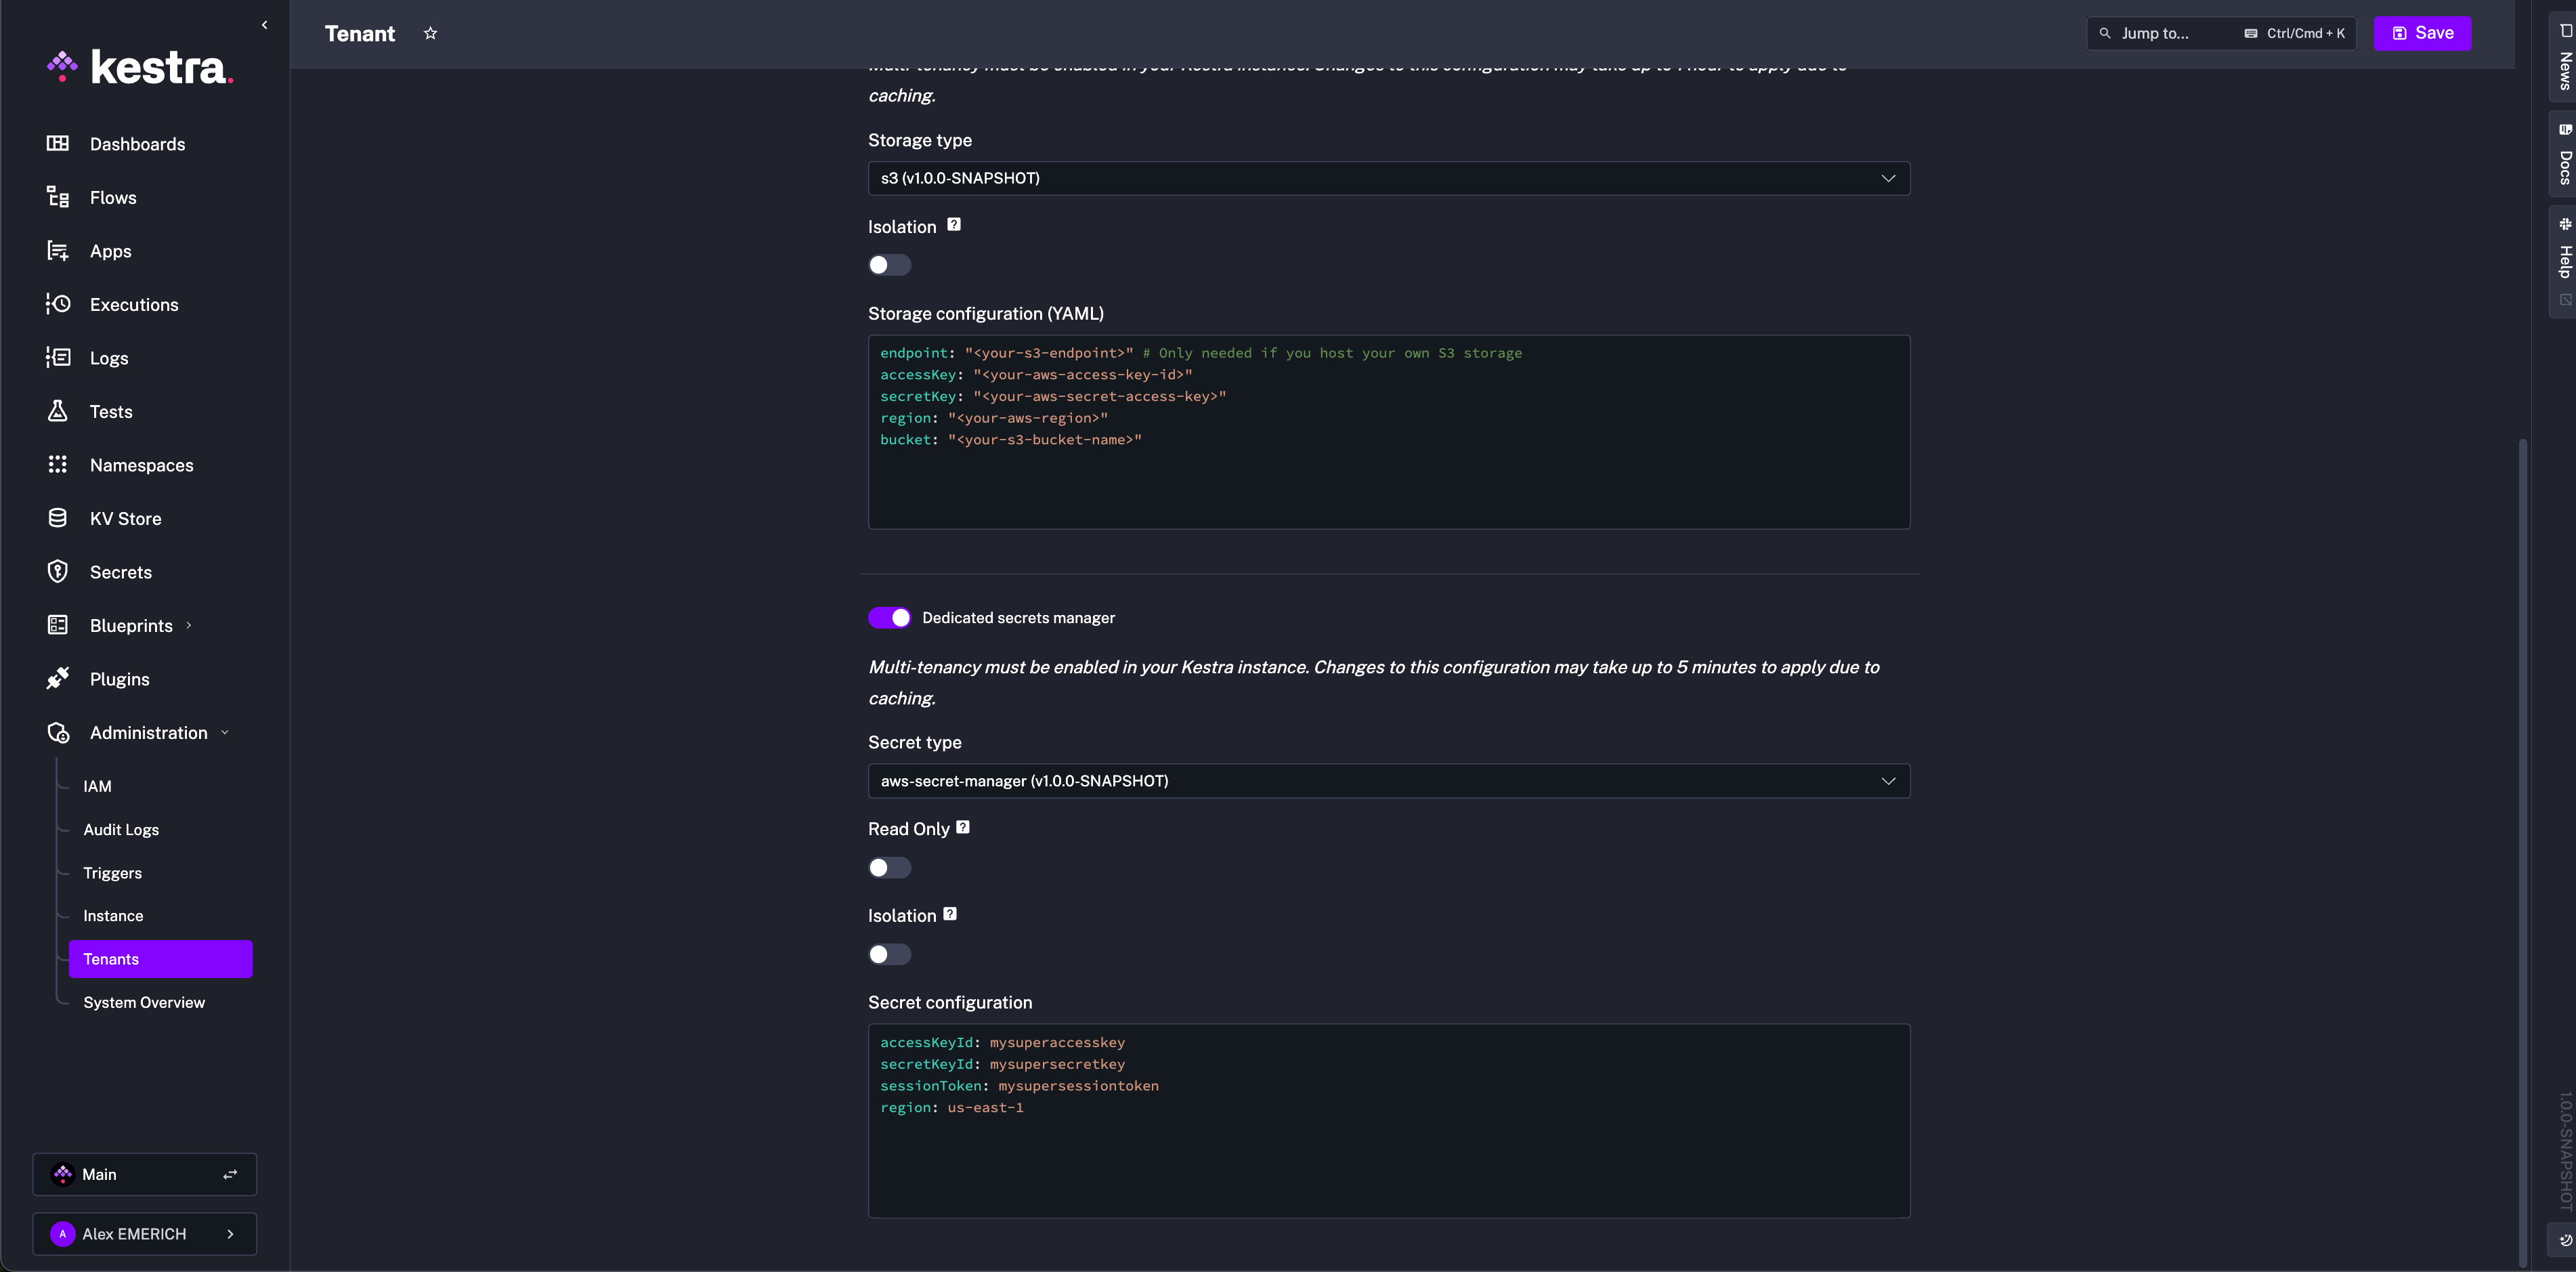
AWS Secrets Manager
Ensure permissions: CreateSecret, DeleteSecret, DescribeSecret, GetSecretValue, ListSecrets, PutSecretValue, RestoreSecret, TagResource, UpdateSecret.
kestra:
  secret:
    type: aws-secret-manager
    aws-secret-manager:
      access-key-id: mysuperaccesskey
      secret-key-id: mysupersecret-key
      session-token: mysupersessiontoken
      region: us-east-1
Azure Key Vault
Grant the service principal (client-id) permissions: "Get","List","Set","Delete","Recover","Backup","Restore","Purge".
kestra:
  secret:
    type: azure-key-vault
    azure-key-vault:
      client-secret:
        tenant-id: "id"
        client-id: "id"
        client-secret: "secret"
Elasticsearch
Secrets are additionally encrypted with AES. Provide a 32-char minimum key:
kestra:
  secret:
    type: elasticsearch
    elasticsearch:
      secret: "a-secure-32-character-minimum-key"
Google Secret Manager
Grant roles/secretmanager.admin. Paste the service account JSON or use GOOGLE_APPLICATION_CREDENTIALS.
kestra:
  secret:
    type: google-secret-manager
    google-secret-manager:
      project: gcp-project-id
      service-account: |
        <service-account JSON>
HashiCorp Vault (KV v2)
Supported auth methods: Userpass, Token, AppRole.
kestra:
  secret:
    type: vault
    vault:
      address: "http://localhost:8200"
      password:
        user: john
        password: foo
    cache:
      enabled: true
      maximum-size: 1000
      expire-after-write: 60s
kestra:
  secret:
    type: vault
    vault:
      address: "http://localhost:8200"
      token:
        token: your-secret-token
kestra:
  secret:
    type: vault
    vault:
      address: "http://localhost:8200"
      app-role:
        path: approle
        role-id: your-role-id
        secret-id: your-secret-id
JDBC
kestra:
  secret:
    type: jdbc
    jdbc:
      secret: "your-secret-key"
Secret tags
kestra:
  secret:
    <secret-type>:
      tags:
        application: kestra-production
Secret cache
kestra:
  secret:
    cache:
      enabled: true
      maximum-size: 1000
      expire-after-write: 60s
Security
Using the kestra.security configuration, you can set up multiple security features of Kestra.
Super-admin
The Super-admin has the highest privileges.
kestra:
  security:
    super-admin:
      username: your_username
      password: ${KESTRA_SUPERADMIN_PASSWORD}
      tenant-admin-access:
        - <optional>
Never store clear-text passwords in config. Use environment variables.
Default role
Assign a default role to new users (not service accounts):
kestra:
  security:
    default-role:
      name: default
      description: "Default role"
      permissions:
        FLOW: ["CREATE", "READ", "UPDATE", "DELETE"]
With multi-tenancy, restrict to one tenant:
kestra:
  security:
    default-role:
      name: default
      description: "Default role"
      permissions:
        FLOW: ["CREATE", "READ", "UPDATE", "DELETE"]
      tenant-id: staging
Place this under kestra.security, not micronaut.security.
Invitation expiration
Default is 7 days. Change with:
kestra:
  security:
    invitations:
      expire-after: P30D
Basic authentication password rules
Enforce password complexity:
kestra:
  security:
    basic-auth:
      password-regexp: "<regexp-rule>"
Server
HTTP basic authentication
Protect an open-source instance with basic auth:
kestra:
  server:
    basic-auth:
      enabled: true
      username: admin
      password: kestra
For multi-user auth (SSO, RBAC), see the Enterprise authentication page.
Delete configuration files
Delete configuration files after startup to prevent tasks from reading secrets:
kestra:
  configurations:
    delete-files-on-start: true
Server liveness & heartbeats
Kestra servers send heartbeats for liveness. Refer to the Server Lifecycle Administration documentation for more details.
kestra.server.liveness.enabled (Boolean, default true)
kestra.server.liveness.interval (Duration, default 5s)
kestra.server.liveness.timeout (Duration, default 45s)
Must match across all Executors.
kestra.server.liveness.initial-delay (Duration, default 45s)
Must match across all Executors.
kestra.server.liveness.heartbeat-interval (Duration, default 3s)
Must be strictly less than timeout.
Recommended (JDBC / OSS):
kestra:
  server:
    liveness:
      enabled: true
      interval: 5s
      timeout: 45s
      initial-delay: 45s
      heartbeat-interval: 3s
Recommended (Kafka / EE):
kestra:
  server:
    liveness:
      timeout: 1m
      initial-delay: 1m
Worker liveness in Kafka mode is handled by Kafka’s protocol guarantees.
Heartbeat frequency
Workers send heartbeats every kestra.heartbeat.frequency (default 10s).
Heartbeat missed
Executors consider a worker DEAD after kestra.heartbeat.heartbeat-missed intervals (default 3).
Worker task restart strategy
kestra.server.worker-task-restart-strategy: NEVER | IMMEDIATELY | AFTER_TERMINATION_GRACE_PERIOD (default).
Termination grace period
Upon SIGTERM, servers try to stop gracefully. Default:
kestra:
  server:
    termination-grace-period: 5m
Ensure the supervising platform (Kubernetes, Docker Compose, systemd, etc.) uses a termination grace period longer than Kestra’s setting. For example, when Kestra uses 5m, configure Kubernetes terminationGracePeriodSeconds to at least 6 minutes. If the external timeout is shorter, the process manager may send SIGKILL before Kestra finishes its graceful shutdown.
Internal storage
Default local storage (not for production):
kestra:
  storage:
    type: local
    local:
      base-path: /tmp/kestra/storage/
Important: Local storage behavior differs significantly between standalone and distributed deployments.
Standalone deployments:
- ✅ Local storage with persistent volumes is OK for standalone Kestra deployments
- ✅ Suitable for single-node installations and development environments
Distributed deployments:
- ❌ Local storage with ReadWriteOnce persistent volumes is NOT recommended for distributed services
- ✅ Local storage with ReadWriteMany persistent volumes is OK for distributed services
- ❌ Host storage sharing is NOT recommended — this is difficult to achieve reliably
When ReadWriteMany is not available: Since ReadWriteMany persistent volumes are rarely available in modern Kubernetes clusters, consider these alternatives:
- Cloud storage services: S3, GCS, Azure Blob Storage
- Distributed object storage: MinIO, Ceph, SeaweedFS, Garage, or similar solutions
Other storage backends are supported via plugins:
Isolate storage to specific services (>= 0.22):
kestra:
  storage:
    type: gcs
    isolation:
      enabled: true
      denied-services:
        - EXECUTOR
Screenshot example:
S3
Install plugin:
./kestra plugins install io.kestra.storage:storage-s3:LATEST
Configure:
kestra:
  storage:
    type: s3
    s3:
      endpoint: "<your-s3-endpoint>" # only for self-hosted S3
      access-key: "<your-aws-access-key-id>"
      secret-key: "<your-aws-secret-access-key>"
      region: "<your-aws-region>"
      bucket: "<your-s3-bucket-name>"
      force-path-style: "<true|false>"
For EC2/EKS with IAM roles, omit keys:
kestra:
  storage:
    type: s3
    s3:
      region: "<your-aws-region>"
      bucket: "<your-s3-bucket-name>"
More options in the S3 plugin source.
Assume role (STS)
kestra:
  storage:
    type: s3
    s3:
      region: "<your-aws-region>"
      bucket: "<your-s3-bucket-name>"
      sts-role-arn: "<role-arn>"
      sts-role-external-id: "<optional>"
      sts-role-session-name: "<optional>"
      sts-role-session-duration: "<optional>"
      sts-endpoint-override: "<optional>"
MinIO
Install plugin and set endpoint/port:
./kestra plugins install io.kestra.storage:storage-minio:LATEST
kestra:
  storage:
    type: minio
    minio:
      endpoint: my.domain.com
      port: 9000
      secure: false
      access-key: ${AWS_ACCESS_KEY_ID}
      secret-key: ${AWS_SECRET_ACCESS_KEY}
      region: "default"
      bucket: my-bucket
      part-size: 5MB
If MinIO is configured with MINIO_DOMAIN, use virtual host syntax via kestra.storage.minio.vhost: true. Keep endpoint as base domain (my.domain.com), not bucket.domain.
Outscale Object Storage (OOS)
Outscale Object Storage (OOS) is a large-scale, secure, and resilient (S3-like) storage service in the Cloud. Install the MinIO plugin and use an Outscale Object Storage endpoint. Ensure that secure: true is configured to use this endpoint with MinIO type.
kestra:
  storage:
    type: minio
    minio:
      endpoint: https://oos.eu-west-2.outscale.com
      bucket: your-bucket-name
      accessKey: YOUR_ACCESS_KEY
      secretKey: YOUR_SECRET_KEY
      port: 443
      secure: true
Azure
Install plugin:
./kestra plugins install io.kestra.storage:storage-azure:LATEST
Configure one of the auth methods:
kestra:
  storage:
    type: azure
    azure:
      endpoint: "https://unittestkt.blob.core.windows.net"
      container: storage
      connection-string: "<connection-string>"
      shared-key-account-name: "<name>"
      shared-key-account-access-key: "<access-key>"
      sas-token: "<sas-token>"
Disable Hierarchical namespace on the container (not supported).
GCS
Install plugin:
./kestra plugins install io.kestra.storage:storage-gcs:LATEST
Configure:
kestra:
  storage:
    type: gcs
    gcs:
      bucket: "<bucket>"
      project-id: "<project-id>"
      service-account: "<JSON or use default credentials>"
If not set, default credentials are used (GKE/GCE). Alternatively, set GOOGLE_APPLICATION_CREDENTIALS. You can find more details in the GCP documentation.
System flows
Reserve system for background workflows. Change the namespace name:
kestra:
  system-flows:
    namespace: system
Tasks
Temporary storage
Change the temporary directory used during task processing:
kestra:
  tasks:
    tmp-dir:
      path: /home/kestra/tmp
Match volume mounts:
volumes:
  - kestra-data:/app/storage
  - /var/run/docker.sock:/var/run/docker.sock
  - /home/kestra:/home/kestra
Tutorial flows
Disable in production:
kestra:
  tutorial-flows:
    enabled: false
Enabling templates
Templates are deprecated and disabled by default since 0.11.0. Re-enable:
kestra:
  templates:
    enabled: true
Kestra URL
Some notifications require kestra.url to link back to the UI/API. Use the full URI without /ui or /api:
kestra:
  url: https://www.my-host.com/kestra/
Variables
Environment variables prefix
Expose environment variables to flows. By default, Kestra reads variables starting with ENV_ and exposes them as {{ envs.name }} (lowercase, without prefix).
kestra:
  variables:
    env-vars-prefix: ENV_
Docker Compose example:
  kestra:
    image: kestra/kestra:latest
    environment:
      ENV_MY_VARIABLE: extra variable value
      ENV_NEW_VARIABLE: new variable value
      KESTRA_CONFIGURATION:
        kestra:
          variables:
            env-vars-prefix: "ENV_"
ENV_MY_VARIABLE → {{ envs.my_variable }}.
Global variables
Define globals accessible in all flows:
kestra:
  variables:
    globals:
      host: pg.db.prod
Camel case becomes hyphenated.
Recursive rendering
Restore pre-0.14.0 behavior (defaults to false):
kestra:
  variables:
    recursive-rendering: true
Template cache
Template rendering is CPU-intensive; keep caching enabled by default. Disable if required:
kestra:
  variables:
    cache-enabled: false
Set cache size:
kestra:
  variables:
    cache-size: 1000
Webserver
Google Analytics ID
kestra:
  webserver:
    google-analytics: UA-12345678-1
Append HTML tags to the application
Inject CSS/JS into the web UI:
kestra:
  webserver:
    html-head: |
      <style type="text/css">
        .v-sidebar-menu .logo:after {
          background: var(--danger);
          display: block;
          content: "Local";
          position: relative;
          text-transform: uppercase;
          bottom: -65px;
          text-align: center;
          color: var(--white-always);
        }
      </style>
Configuring a mail server
(EE) Used for invitations and password resets:
kestra:
  ee:
    mail-service:
      host: host.smtp.io
      port: 587
      username: user
      password: password
      from: [email protected]
      from-name: Kestra
      auth: true
      starttls-enable: true
Store execution data in internal storage
Store workflow inputs/outputs in internal storage (per tenant/namespace) for isolation:
kestra:
  ee:
    execution-data:
      internal-storage:
        enabled: true
Enforce globally:
kestra:
  ee:
    execution-data:
      internal-storage:
        force-globally: true
Currently, outputs are not auto-fetched from internal storage in the UI; preview or download them instead.
Configure per namespace/tenant via the UI.
Add custom links to Kestra UI (EE)
Add sidebar links:
kestra:
  ee:
    custom-links:
      link1:
        title: "Internal Documentation"
        url: "https://kestra.io/docs/"
      link2:
        title: "Internal Support Portal"
        url: "https://kestra.io/support/"
Allowed file paths
To use the universal file access protocol, bind-mount the host directory and allow it in config:
  kestra:
    image: kestra/kestra:latest
    volumes:
      - /Users/yourdir/scripts:/scripts
    environment:
      KESTRA_CONFIGURATION: |
        kestra:
          local-files:
            allowed-paths:
              - /scripts
Disable local file preview (default true) with kestra.local-files.enable-preview: false.
AI Copilot
Enable Copilot in the flow editor:
kestra:
  ai:
    type: gemini
    gemini:
      model-name: gemini-2.5-flash
      api-key: YOUR_GEMINI_API_KEY
Optional parameters:
temperature,top-p,top-k,max-output-tokenslog-requests,log-responsesbase-url
Enterprise Edition supports multiple providers (Bedrock, Anthropic, Azure OpenAI, DeepSeek, Gemini, Vertex AI, Mistral, OpenAI, and Ollama). See AI Copilot.
Air-gapped Kestra Instance (EE)
To keep your Kestra Instance offline, you can use the following in your Kestra configuration to alter blueprint management and remove UI components that rely on external APIs. The UI adapts fully: blueprints fetch from the Kestra API, YouTube embeds hide without internet, fonts fall back to local versions, and internet-dependent sidebar features hide automatically. Kestra runs smoothly in completely isolated environments.
kestra:
  ee:
    airgapped: true
For Enterprise users, check out the Custom Links configuration to add your own documentation and resources to the Kestra UI sidebar if needed.
Was this page helpful?