Execute Julia Scripts Directly in Kestra
For the complete documentation index, see llms.txt. For a full content snapshot, see llms-full.txt. Append.mdto anykestra.io/docs/*URL for plain Markdown.
Run Julia code directly in your flows and generate outputs.
Julia is renowned for high-performance numerical analysis and computational science. Leverage Kestra to orchestrate your Julia scripts, enhancing their capabilities in large-scale analytics and machine learning applications. From data ingestion to complex numerical simulations, Kestra streamlines your Julia workflows, accelerating development and deployment.
This guide is going to walk you through how to get Julia running in a workflow, how to manage input and output files, and how you can pass outputs and metrics back to Kestra to use in later tasks.
Executing Julia inside Kestra
Kestra has an official plugin for Julia allowing you to execute Julia code in a flow by either writing your Julia inline or by executing a .jl file. You can get outputs and metrics from your Julia code too.
Scripts
If you want to write a short amount of Julia code to perform a task, you can use the io.kestra.plugin.scripts.julia.Script type to write it directly inside your flow. This allows you to keep everything in one place.
id: julia_scriptnamespace: company.teamdescription: This flow runs the Julia script.
tasks:  - id: http_download    type: io.kestra.plugin.core.http.Download    uri: https://huggingface.co/datasets/kestra/datasets/raw/main/csv/orders.csv
  - id: julia_script_task    type: io.kestra.plugin.scripts.julia.Script    script: |      println("The current execution is {{ execution.id }}")
      # Read the file downloaded in `http_download` task      lines = readlines("{{ outputs.http_download.uri }}")      println(lines)
You can read more about the Scripts type in the Plugin documentation
Commands
If you would prefer to put your Julia code in a .jl file (e.g. your code is much longer or spread across multiple files), you can run the previous example using the io.kestra.plugin.scripts.julia.Commands type:
id: julia_commandsnamespace: company.teamtasks: - id: run_julia type: io.kestra.plugin.scripts.julia.Commands namespaceFiles: enabled: true commands: - julia main.jlYou’ll need to add your Julia code using the Editor or sync it using Git so Kestra can see it. You’ll also need to set the enabled flag for the namespaceFiles property to true so Kestra can access the file.
You can also have the Julia code written inline.
id: julia_commandsnamespace: company.teamtasks:  - id: http_download    type: io.kestra.plugin.core.http.Download    uri: https://huggingface.co/datasets/kestra/datasets/raw/main/csv/orders.csv
  - id: run_julia    type: io.kestra.plugin.scripts.julia.Commands    inputFiles:      orders.csv: "{{ read(outputs.http_download.uri) }}"      main.jl: |        println("The current execution is {{ execution.id }}")
        # Read the file downloaded in `http_download` task        lines = readlines("orders.csv")        println(lines)    commands:      - julia main.jl
You can read more about the Commands type in the Plugin documentation.
Handling Outputs
If you want to get a variable or file from your Julia script, you can use an output.
Variable Output
You can get the JSON outputs from the Julia commands / script using the ::{}:: pattern. Here is an example:
id: julia_outputsnamespace: company.teamdescription: This flow runs the Julia script, and outputs the variable.
tasks:  - id: julia_outputs_task    type: io.kestra.plugin.scripts.julia.Script    script: |      println("::{\"outputs\":{\"test\":\"value\",\"int\":2,\"bool\":true,\"float\":3.65}}::")
All the output variables can be viewed in the Outputs tab of the execution.
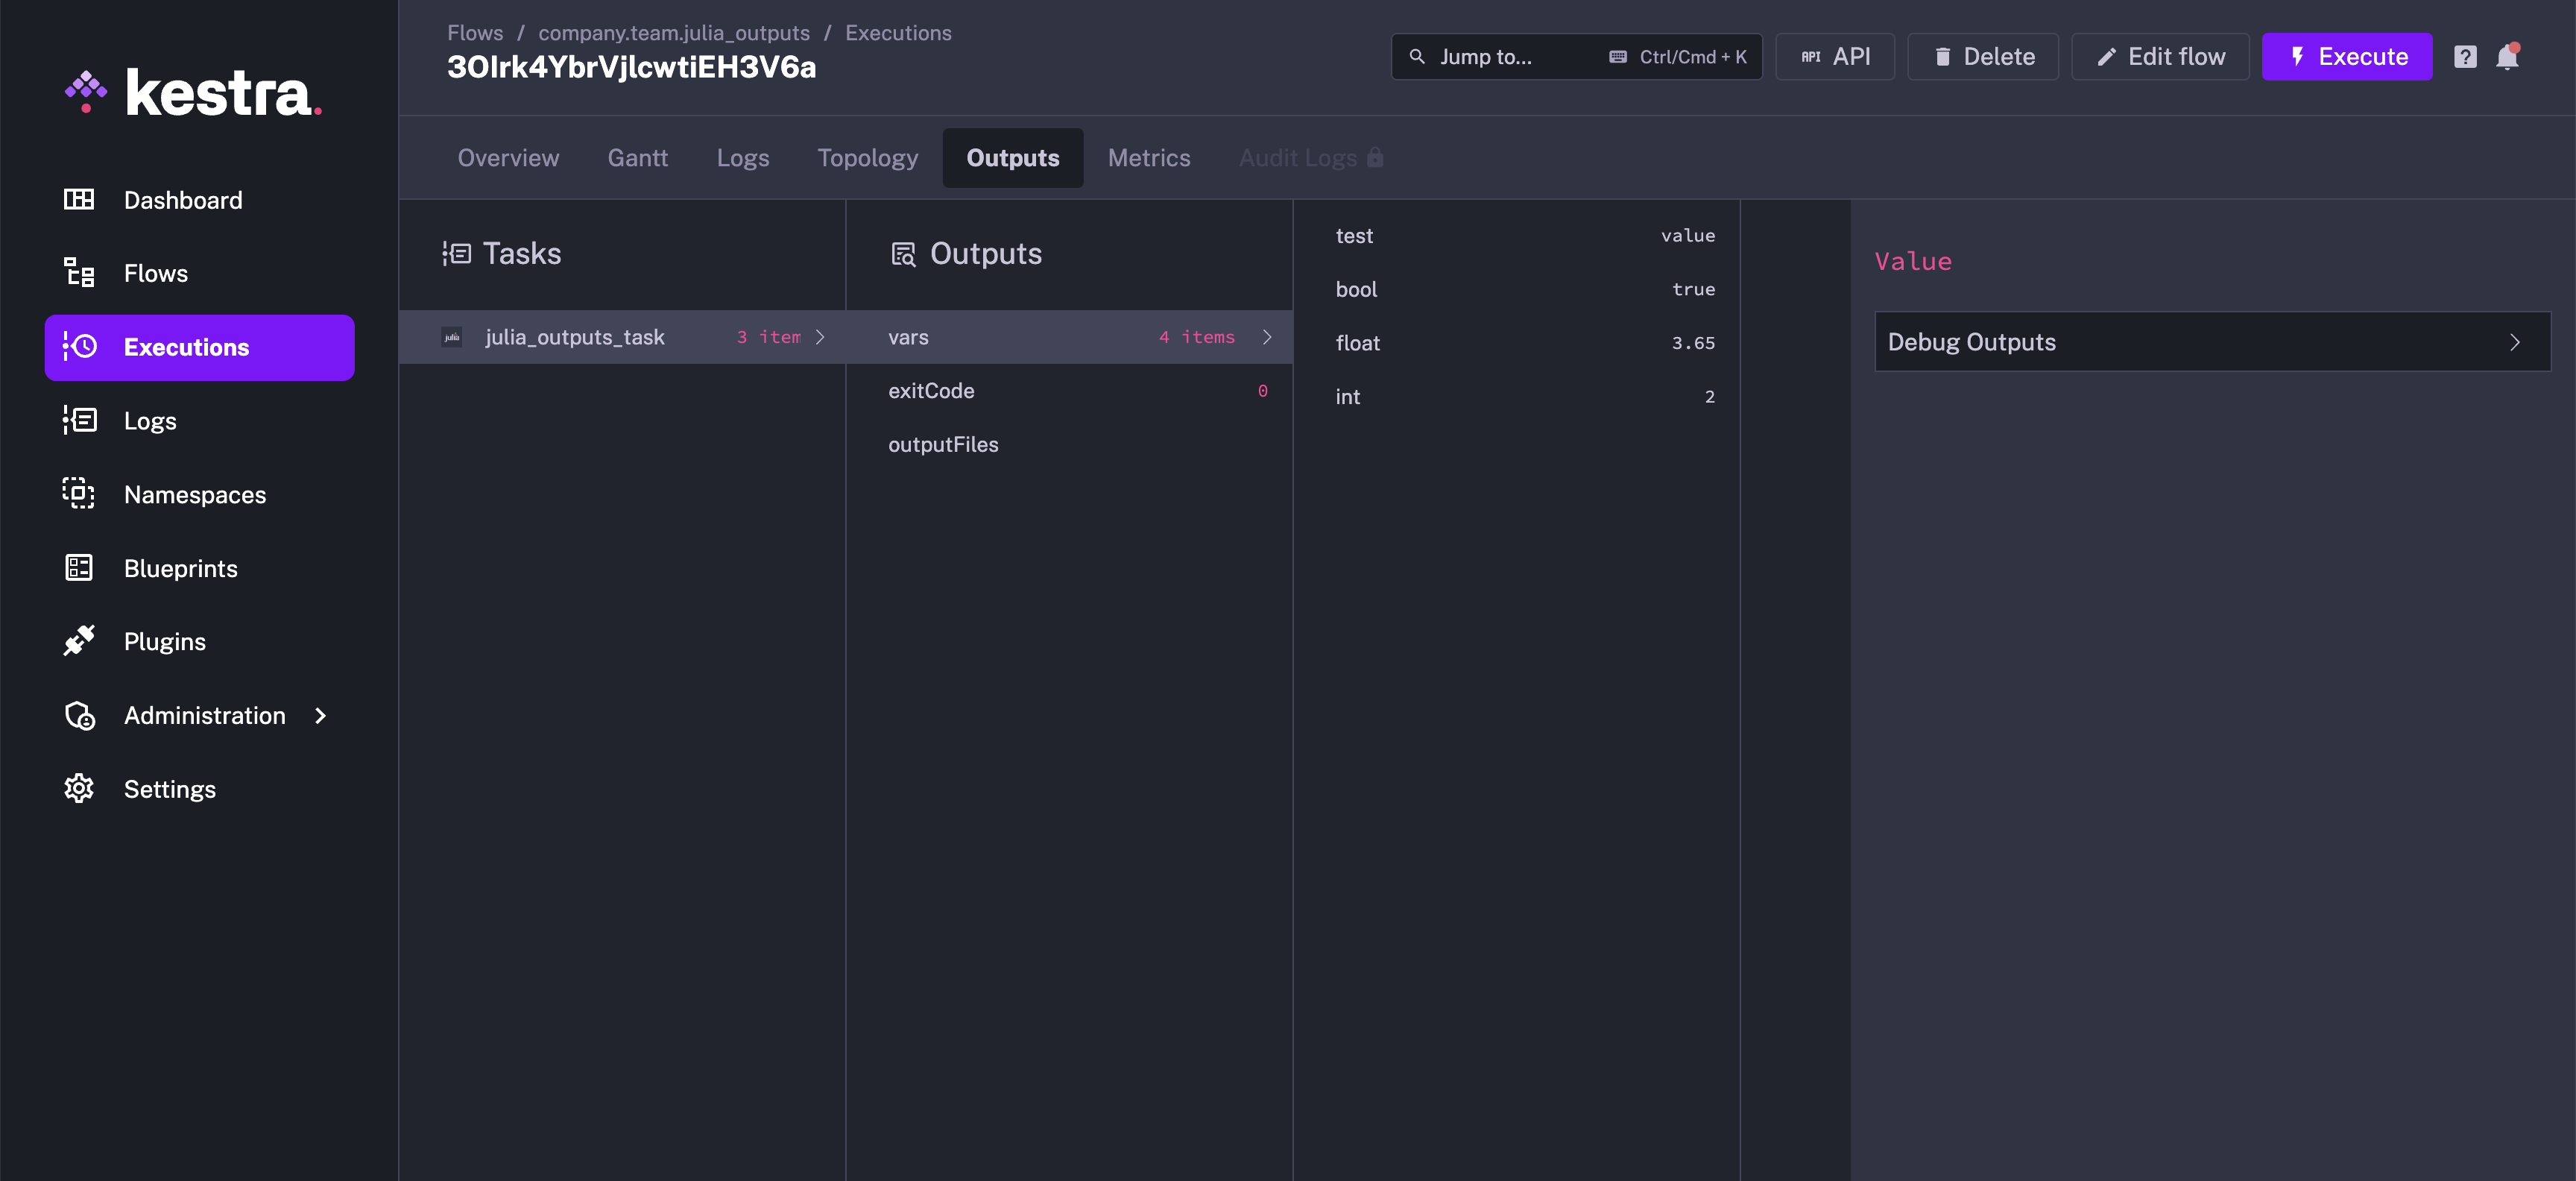
You can refer to the outputs in another task as shown in the example below:
id: julia_outputs_usagenamespace: company.teamdescription: This flow runs the Julia script, and outputs the variable.
tasks:  - id: julia_outputs_task    type: io.kestra.plugin.scripts.julia.Script    script: |      println("::{\"outputs\":{\"test\":\"value\",\"int\":2,\"bool\":true,\"float\":3.65}}::")
  - id: return    type: io.kestra.plugin.core.debug.Return    format: '{{ outputs.julia_outputs_task.vars.test }}'
This example works for both io.kestra.plugin.scripts.julia.Script and io.kestra.plugin.scripts.julia.Commands.
File Output
Inside of your Julia script, write a file to the system. You’ll need to add the outputFiles property to your flow and list the files you’re trying to put out. In this case, we want to output output.txt. More information on the formats you can use for this property can be found in Script Output Metrics.
The example below writes a output.txt file containing the “Hello World” text. We can then refer the file using the syntax {{ outputs.{task_id}.outputFiles['<filename>'] }}, and read the contents of the file using the read() function.
id: julia_output_filenamespace: company.teamdescription: This flow runs the Julia script to output a file.
tasks:  - id: julia_outputs_task    type: io.kestra.plugin.scripts.julia.Script    outputFiles:      - output.txt    script: |      open("output.txt", "w") do file        write(file, "Hello World")      end
  - id: log_output    type: io.kestra.plugin.core.log.Log    message: "{{ read(outputs.julia_outputs_task.outputFiles['output.txt']) }}"
This example works for both io.kestra.plugin.scripts.julia.Script and io.kestra.plugin.scripts.julia.Commands.
Handling Metrics
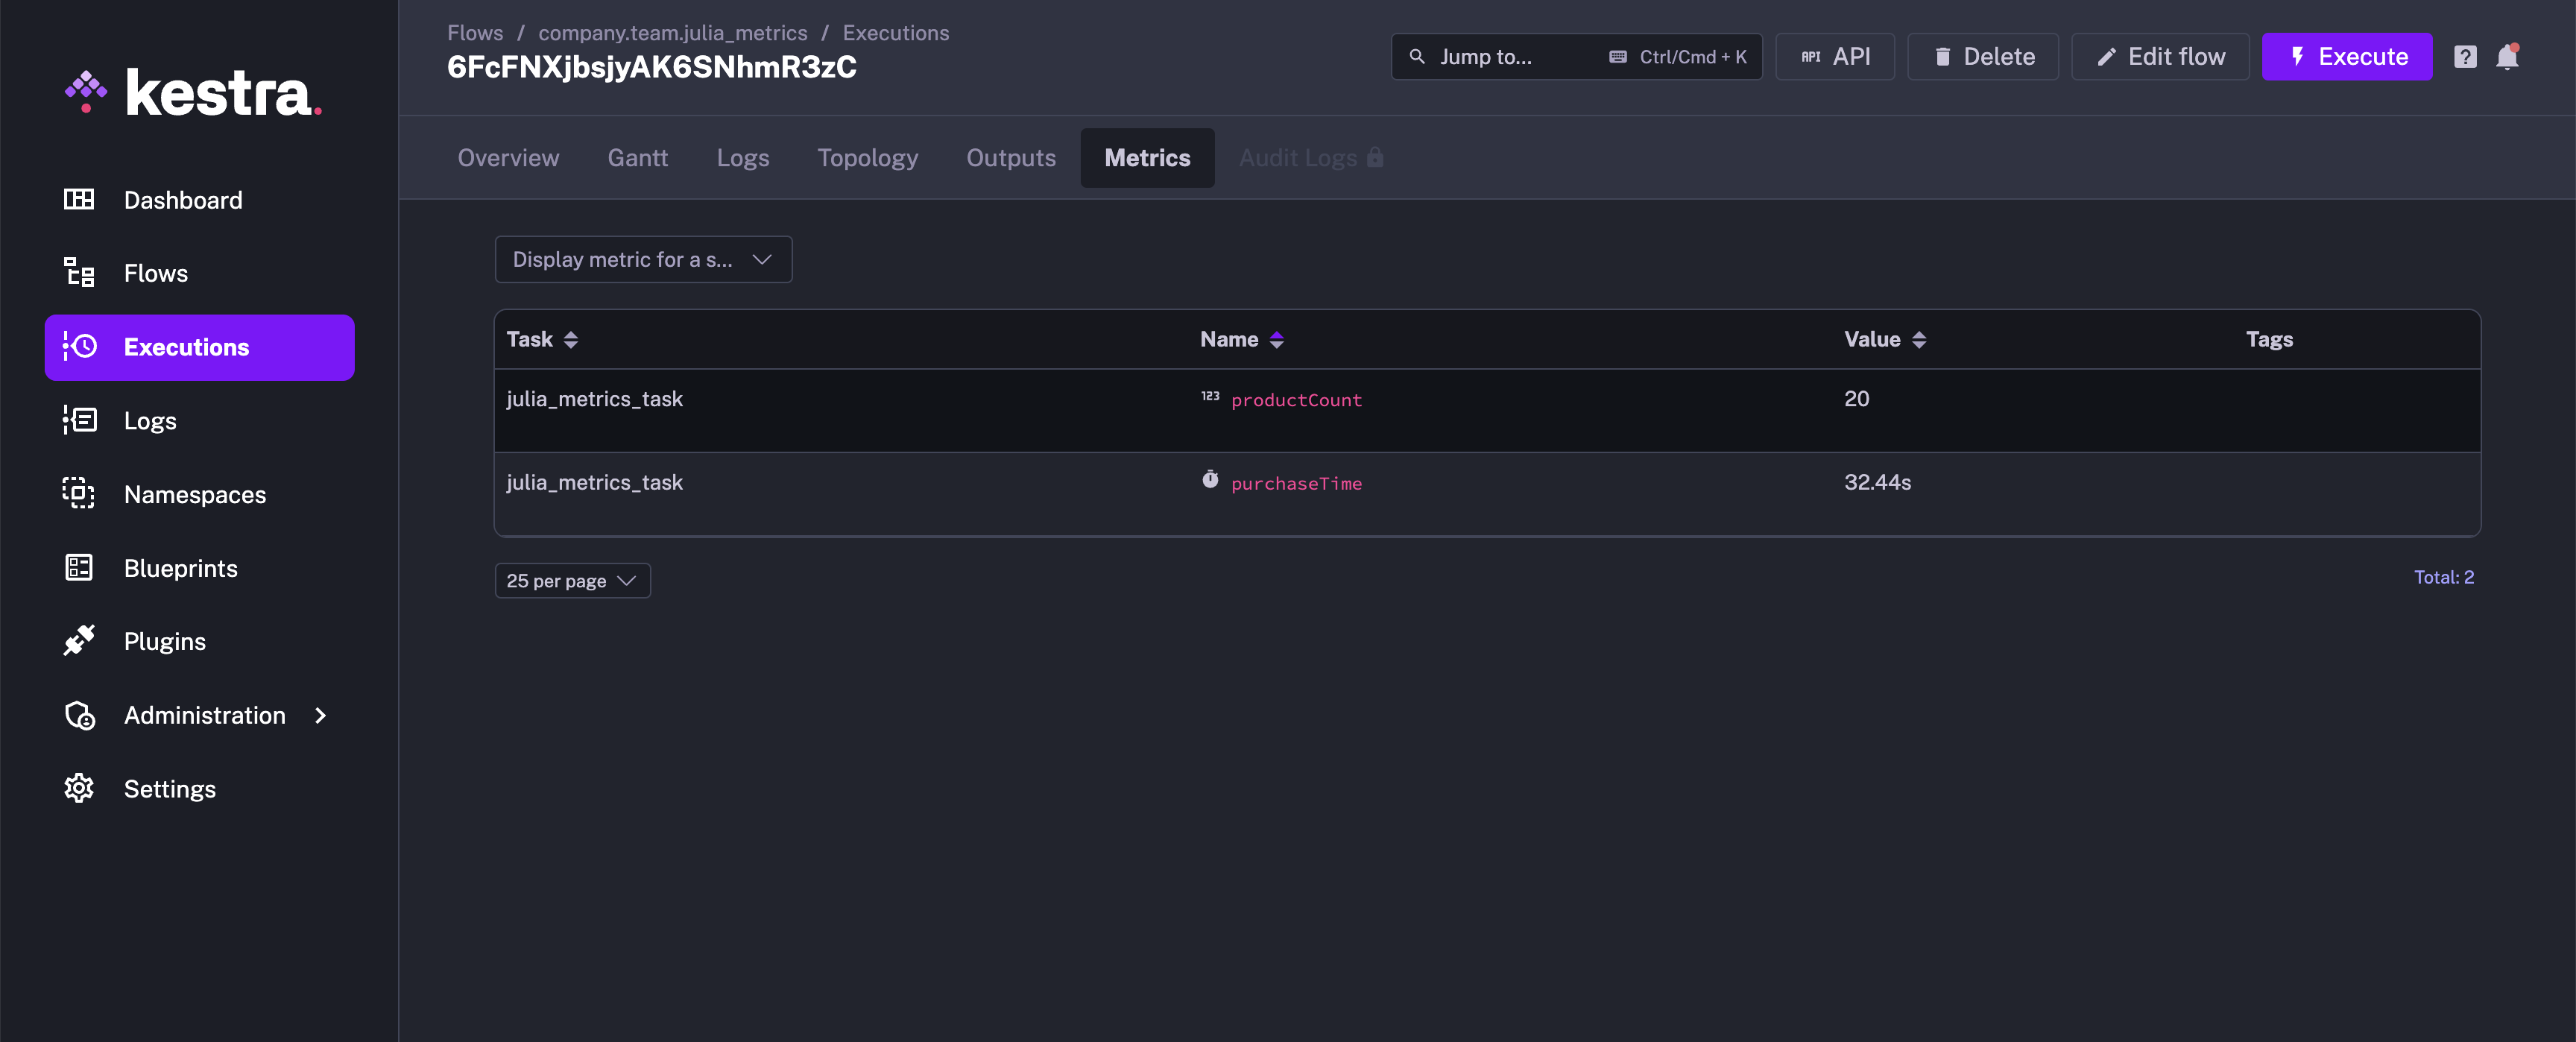
You can also get metrics from your Julia script. Metrics use the same ::{}:: pattern as outputs. This example demonstrates both the counter and timer metrics.
id: julia_metricsnamespace: company.teamdescription: This flow runs the Julia script, and puts out the metrics.
tasks:  - id: julia_metrics_task    type: io.kestra.plugin.scripts.julia.Script    script: |      println("There are 20 products in the cart")      println("::{\"outputs\":{\"productCount\":20}}::")      println("::{\"metrics\":[{\"name\":\"productCount\",\"type\":\"counter\",\"value\":20}]}::")      println("::{\"metrics\":[{\"name\":\"purchaseTime\",\"type\":\"timer\",\"value\":32.44}]}::")
Once this has executed, both the metrics can be viewed under Metrics.
Was this page helpful?