Extend Kestra by Packaging a Custom Java Plugin
For the complete documentation index, see llms.txt. For a full content snapshot, see llms-full.txt. Append.mdto anykestra.io/docs/*URL for plain Markdown.
Build your own Custom Plugin for Kestra.
This tutorial walks through building a custom plugin for Kestra.
Use-case for Custom Plugin
We will be building a plugin that fetches the data for a given pokemon. We will use the API provided by PokeAPI.co to fetch the pokemon’s details: https://pokeapi.co/api/v2/pokemon/{pokemon_name}.
The API provides detailed information about any pokemon. We will fetch a few fields like the ability names, base experience, height and move names, and showcase it in the output of our plugin. The plugin task will accept the pokemon name, and return the selected fields in the output. This is how the task should look:
id: fetch_detailstype: io.kestra.plugin.pokemon.Fetchpokemon: pikachuRequirements
You will need the following installed on your machine before proceeding:
- Java 21 or later.
- IntelliJ IDEA (or any other Java IDE, we provide only help for IntelliJ IDEA).
- Gradle (included most of the time with the IDE).
Create a new plugin
Here are the steps:
- Go on the plugin-template repository.
- Click on Use this template.
- Choose the GitHub account you want to link and the repository name for the new plugin.
- Clone the new repository:
git clone git@github.com:{{user}}/{{name}}.git. - Open the cloned directory in IntelliJ IDEA.
- Enable annotations processors.
- If you are using an IntelliJ IDEA < 2020.03, install the lombok plugins (if not, it’s included by default).
Once you completed the steps above, you should see a similar directory structure:
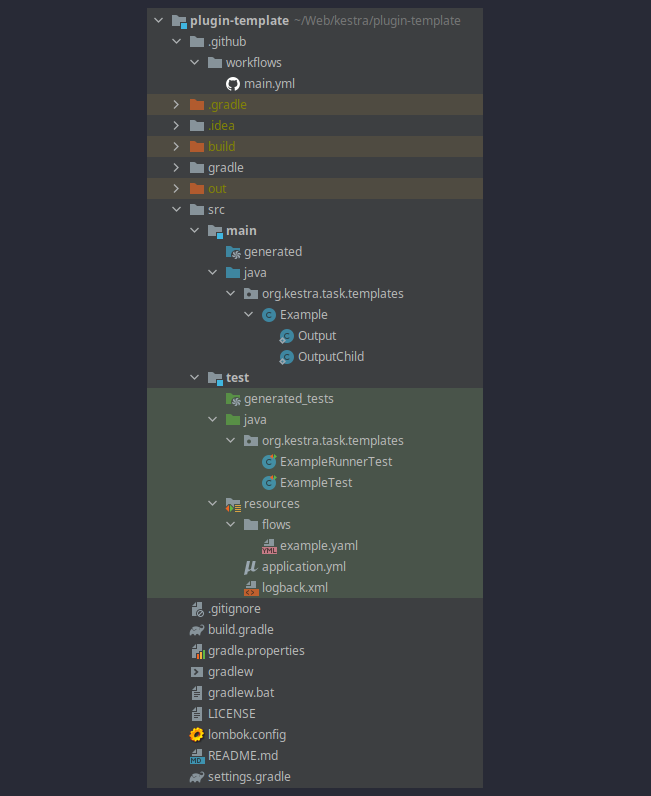
As you can see, there is one generated plugin: the Example class representing the Example plugin (a task).
A project typically hosts multiple plugins. We call a project a group of plugins, and you can have multiple sub-groups inside a project by splitting plugins into different packages. Each package that has a plugin class is a sub-group of plugins.
Gradle Configuration
We use Gradle as a build tool.
Mandatory configuration
The first thing we need to configure is the plugin name and the class package.
- Change in
settings.gradletherootProject.name = 'plugin-template'with the plugin namerootProject.name = 'plugin-pokemon'. - Change the class package: by default, the template provides a package
io.kestra.plugin.templates, just rename thetemplatesfolder insrc/main/java&src/test/javatopokemon. And change the first line inExample.java,ExampleRunnerTest.javaandExampleTest.javatopackage io.kestra.plugin.pokemon;. - In
build.gradle: a. replacedescription 'Plugin template for Kestra'to the package namedescription 'Plugin pokemon for Kestra'. b. In thedependenciessection, add a dependency which we will be using in our plugin task:implementation group: 'com.googlecode.json-simple', name: 'json-simple', version: '1.1.1'c. Change thejarsection to the following:
jar { manifest { attributes( "X-Kestra-Name": project.name, "X-Kestra-Title": "Pokemon", "X-Kestra-Group": project.group + ".pokemon", "X-Kestra-Description": project.description, "X-Kestra-Version": project.version ) }}Develop Fetch Task
Create Pokemon class
In src/main/java/io/kestra/plugin/pokemon, we will create a new class Pokemon.java. This will be used to map the JSON output of the pokemon API to the Java class. We only need to add the fields that we are interested in, and ignore the rest.
Here is how the Pokemon.java file should look
package io.kestra.plugin.pokemon;
import java.util.*;import lombok.*;
@Datapublic class Pokemon {  List<DetailedAbility> abilities;  long base_experience;  long height;  List<DetailedMove> moves;}
@Dataclass DetailedAbility {  Ability ability;}
@Dataclass Ability {  String name;}
@Dataclass DetailedMove {  Move move;}
@Dataclass Move { String name;}Runnable Task
We will refactor the java file from Example.java to Fetch.java.
In this file, we will put in the appropriate schema for the plugin, including the inputs and output of the plugin. This will help us generate documentation for the plugin too. Also, we will include a few examples to help users understand how to use the plugin.
The class should extend Task and implement RunnableTask for it to be considered as a plugin task. The RunnableTask has a generic representing the output class. The output class should implement io.kestra.core.models.tasks.Output.
The actual crux of the task logic resides in the run method. This is an override method from the Task class, and takes RunContext as an argument, and return the instance of the Output class.
In the run method, we use the name of the pokemon, and make a call to the pokemon API. The fetched response is then mapped to the Pokemon class using the ObjectMapper. The resulting Pokemon object is then transformed into the Fetch.Output class, and returned.
Here is a pokemon Fetch task that will fetch the details of a given pokemon
package io.kestra.plugin.pokemon;
import io.kestra.core.models.annotations.Plugin;import io.swagger.v3.oas.annotations.media.Schema;import lombok.*;import lombok.experimental.SuperBuilder;import org.apache.commons.lang3.StringUtils;import io.kestra.core.models.annotations.PluginProperty;import io.kestra.core.models.tasks.RunnableTask;import io.kestra.core.models.tasks.Task;import io.kestra.core.runners.RunContext;import org.slf4j.Logger;
import com.fasterxml.jackson.databind.ObjectMapper;import com.fasterxml.jackson.databind.DeserializationFeature;import java.io.*;import java.net.*;import java.util.*;import io.kestra.plugin.pokemon.Pokemon;
@SuperBuilder@ToString@EqualsAndHashCode@Getter@NoArgsConstructor@Schema(    title = "Fetch the pokemon details.",    description = "Fetches all the details about the given pokemon.")@Plugin(    examples = {        @io.kestra.core.models.annotations.Example(            title = "Fetching the details for pikachu",            code = {                "pokemon: gengar"            }        )    })public class Fetch extends Task implements RunnableTask<Fetch.Output> {    @Schema(        title = "Name of the pokemon.",        description = "Name of the pokemon for which details need to be fetched."    )    @PluginProperty(dynamic = true) // If the variables will be rendered with template {{ }}    @Builder.Default    private String pokemon = "pikachu";
    @Override    public Fetch.Output run(RunContext runContext) throws Exception {        Logger logger = runContext.logger();        ObjectMapper om = new ObjectMapper().configure(DeserializationFeature.FAIL_ON_UNKNOWN_PROPERTIES, false);
        String inputPokemon = runContext.render(pokemon);        StringBuilder result = new StringBuilder();        URL url = new URL("https://pokeapi.co/api/v2/pokemon/" + inputPokemon);        HttpURLConnection conn = (HttpURLConnection) url.openConnection();        conn.setRequestMethod("GET");        try (BufferedReader reader = new BufferedReader(                    new InputStreamReader(conn.getInputStream()))) {            for (String line; (line = reader.readLine()) != null; ) {                result.append(line);            }        }
        Pokemon pokemonObject = om.readValue(result.toString(), Pokemon.class);        List<String> abilities = new ArrayList();        for(DetailedAbility detailedAbility: pokemonObject.abilities) {            abilities.add(detailedAbility.ability.name);        }        List<String> moves = new ArrayList();        for(DetailedMove detailedMove: pokemonObject.moves) {            moves.add(detailedMove.move.name);        }
        return Output.builder()            .abilities(abilities)            .baseExperience(pokemonObject.base_experience)            .height(pokemonObject.height)            .moves(moves)            .build();    }
/** * Input or Output can be nested as you need */ @Builder @Getter public static class Output implements io.kestra.core.models.tasks.Output { @Schema( title = "Abilities of the pokemon." ) private final List<String> abilities; @Schema( title = "Whether the ability is hidden." ) private final long baseExperience; @Schema( title = "Slot corresponding to the ability." ) private final long height; @Schema( title = "Slot corresponding to the ability." ) private final List<String> moves; }}Compile the plugin
Now that the plugin is developed, package and test it on a Kestra instance. Use the included Gradle task to build the plugin.
To build your plugin, execute the ./gradlew shadowJar command from the plugin directory.
The resulting JAR file will be generated in the build/libs directory.
To use this plugin in your Kestra instance, add this JAR to the Kestra plugins path.
Writing unit tests
Refactor the file names from ExampleRunnerTest.java and ExampleTest.java to FetchRunnerTest.java and FetchTest.java respectively. Under the tests/resources/flows folder, rename example.yaml to pokemonFetch.yaml.
Use the following flow in pokemonFetch.yaml:
Contents of pokemonFetch.yaml
id: pokemonFetchnamespace: company.team
tasks:- id: fetch-pikachu  type: io.kestra.plugin.pokemon.Fetch  pokemon: "pikachu"- id: fetch-gengar  type: io.kestra.plugin.pokemon.Fetch  pokemon: "gengar"
Update FetchRunnerTest.java to load pokemonFetch.yaml and run the flow, then assert that all tasks were executed.
Contents of FetchRunnerTest.java
package io.kestra.plugin.pokemon;
import io.kestra.core.junit.annotations.KestraTest;import org.junit.jupiter.api.BeforeEach;import org.junit.jupiter.api.Test;import io.kestra.core.models.executions.Execution;import io.kestra.core.repositories.LocalFlowRepositoryLoader;import io.kestra.core.runners.RunnerUtils;import io.kestra.core.runners.StandAloneRunner;
import jakarta.inject.Inject;import java.io.IOException;import java.net.URISyntaxException;import java.util.Map;import java.util.Objects;import java.util.concurrent.TimeoutException;
import static org.hamcrest.MatcherAssert.assertThat;import static org.hamcrest.Matchers.hasSize;import static org.hamcrest.Matchers.is;
/** * This test will load all flow located in `src/test/resources/flows/` * and will run an in-memory runner to be able to test a full flow. There is also a * configuration file in `src/test/resources/application.yml` that is only for the full runner * test to configure in-memory runner. */@KestraTestclass FetchRunnerTest {    @Inject    protected StandAloneRunner runner;
    @Inject    protected RunnerUtils runnerUtils;
    @Inject    protected LocalFlowRepositoryLoader repositoryLoader;
    @BeforeEach    protected void init() throws IOException, URISyntaxException {        repositoryLoader.load(Objects.requireNonNull(FetchRunnerTest.class.getClassLoader().getResource("flows")));        this.runner.run();    }
    @SuppressWarnings("unchecked")    @Test    void flow() throws TimeoutException {        Execution execution = runnerUtils.runOne(null, "io.kestra.plugin", "pokemonFetch");
assertThat(execution.getTaskRunList(), hasSize(2)); }}Test the plugin logic in FetchTest.java by creating the input, invoking the task, and verifying the output.
Contents of FetchTest.java
package io.kestra.plugin.pokemon;
import com.google.common.collect.ImmutableMap;import io.micronaut.test.extensions.junit5.annotation.MicronautTest;import org.apache.commons.lang3.StringUtils;import org.junit.jupiter.api.Test;import io.kestra.core.runners.RunContext;import io.kestra.core.runners.RunContextFactory;
import jakarta.inject.Inject;
import static org.hamcrest.MatcherAssert.assertThat;import static org.hamcrest.Matchers.is;
/** * This test will only test the main task, this allow you to send any input * parameters to your task and test the returning behavior easily. */@MicronautTestclass FetchTest {    @Inject    private RunContextFactory runContextFactory;
    @Test    void run() throws Exception {        RunContext runContext = runContextFactory.of(ImmutableMap.of("variable", "gengar"));
        Fetch task = Fetch.builder()            .pokemon("{{ variable }}")            .build();
Fetch.Output runOutput = task.run(runContext); assertThat(runOutput.getBaseExperience(), is(250L)); assertThat(runOutput.getHeight(), is(15L)); assertThat(runOutput.getAbilities().size(), is(1)); assertThat(runOutput.getMoves().size(), is(123)); }}Running the tests
You can run the tests from Intellij IDE, or from the terminal using the command:
./gradlew testPlugin in Action
Now that the plugin is developed and tested, its time to see the plugin in action.
Use a custom docker image with your plugin
Add this Dockerfile to the root of your plugin project:
FROM kestra/kestra:develop
COPY build/libs/* /app/plugins/
You can build and run the image with the following command assuming you’re in the root directory of your plugin:
./gradlew shadowJar && docker build -t kestra-custom . && docker run --rm -p 8080:8080 kestra-custom server local
You can now navigate to http://localhost:8080 and start using your custom plugin.
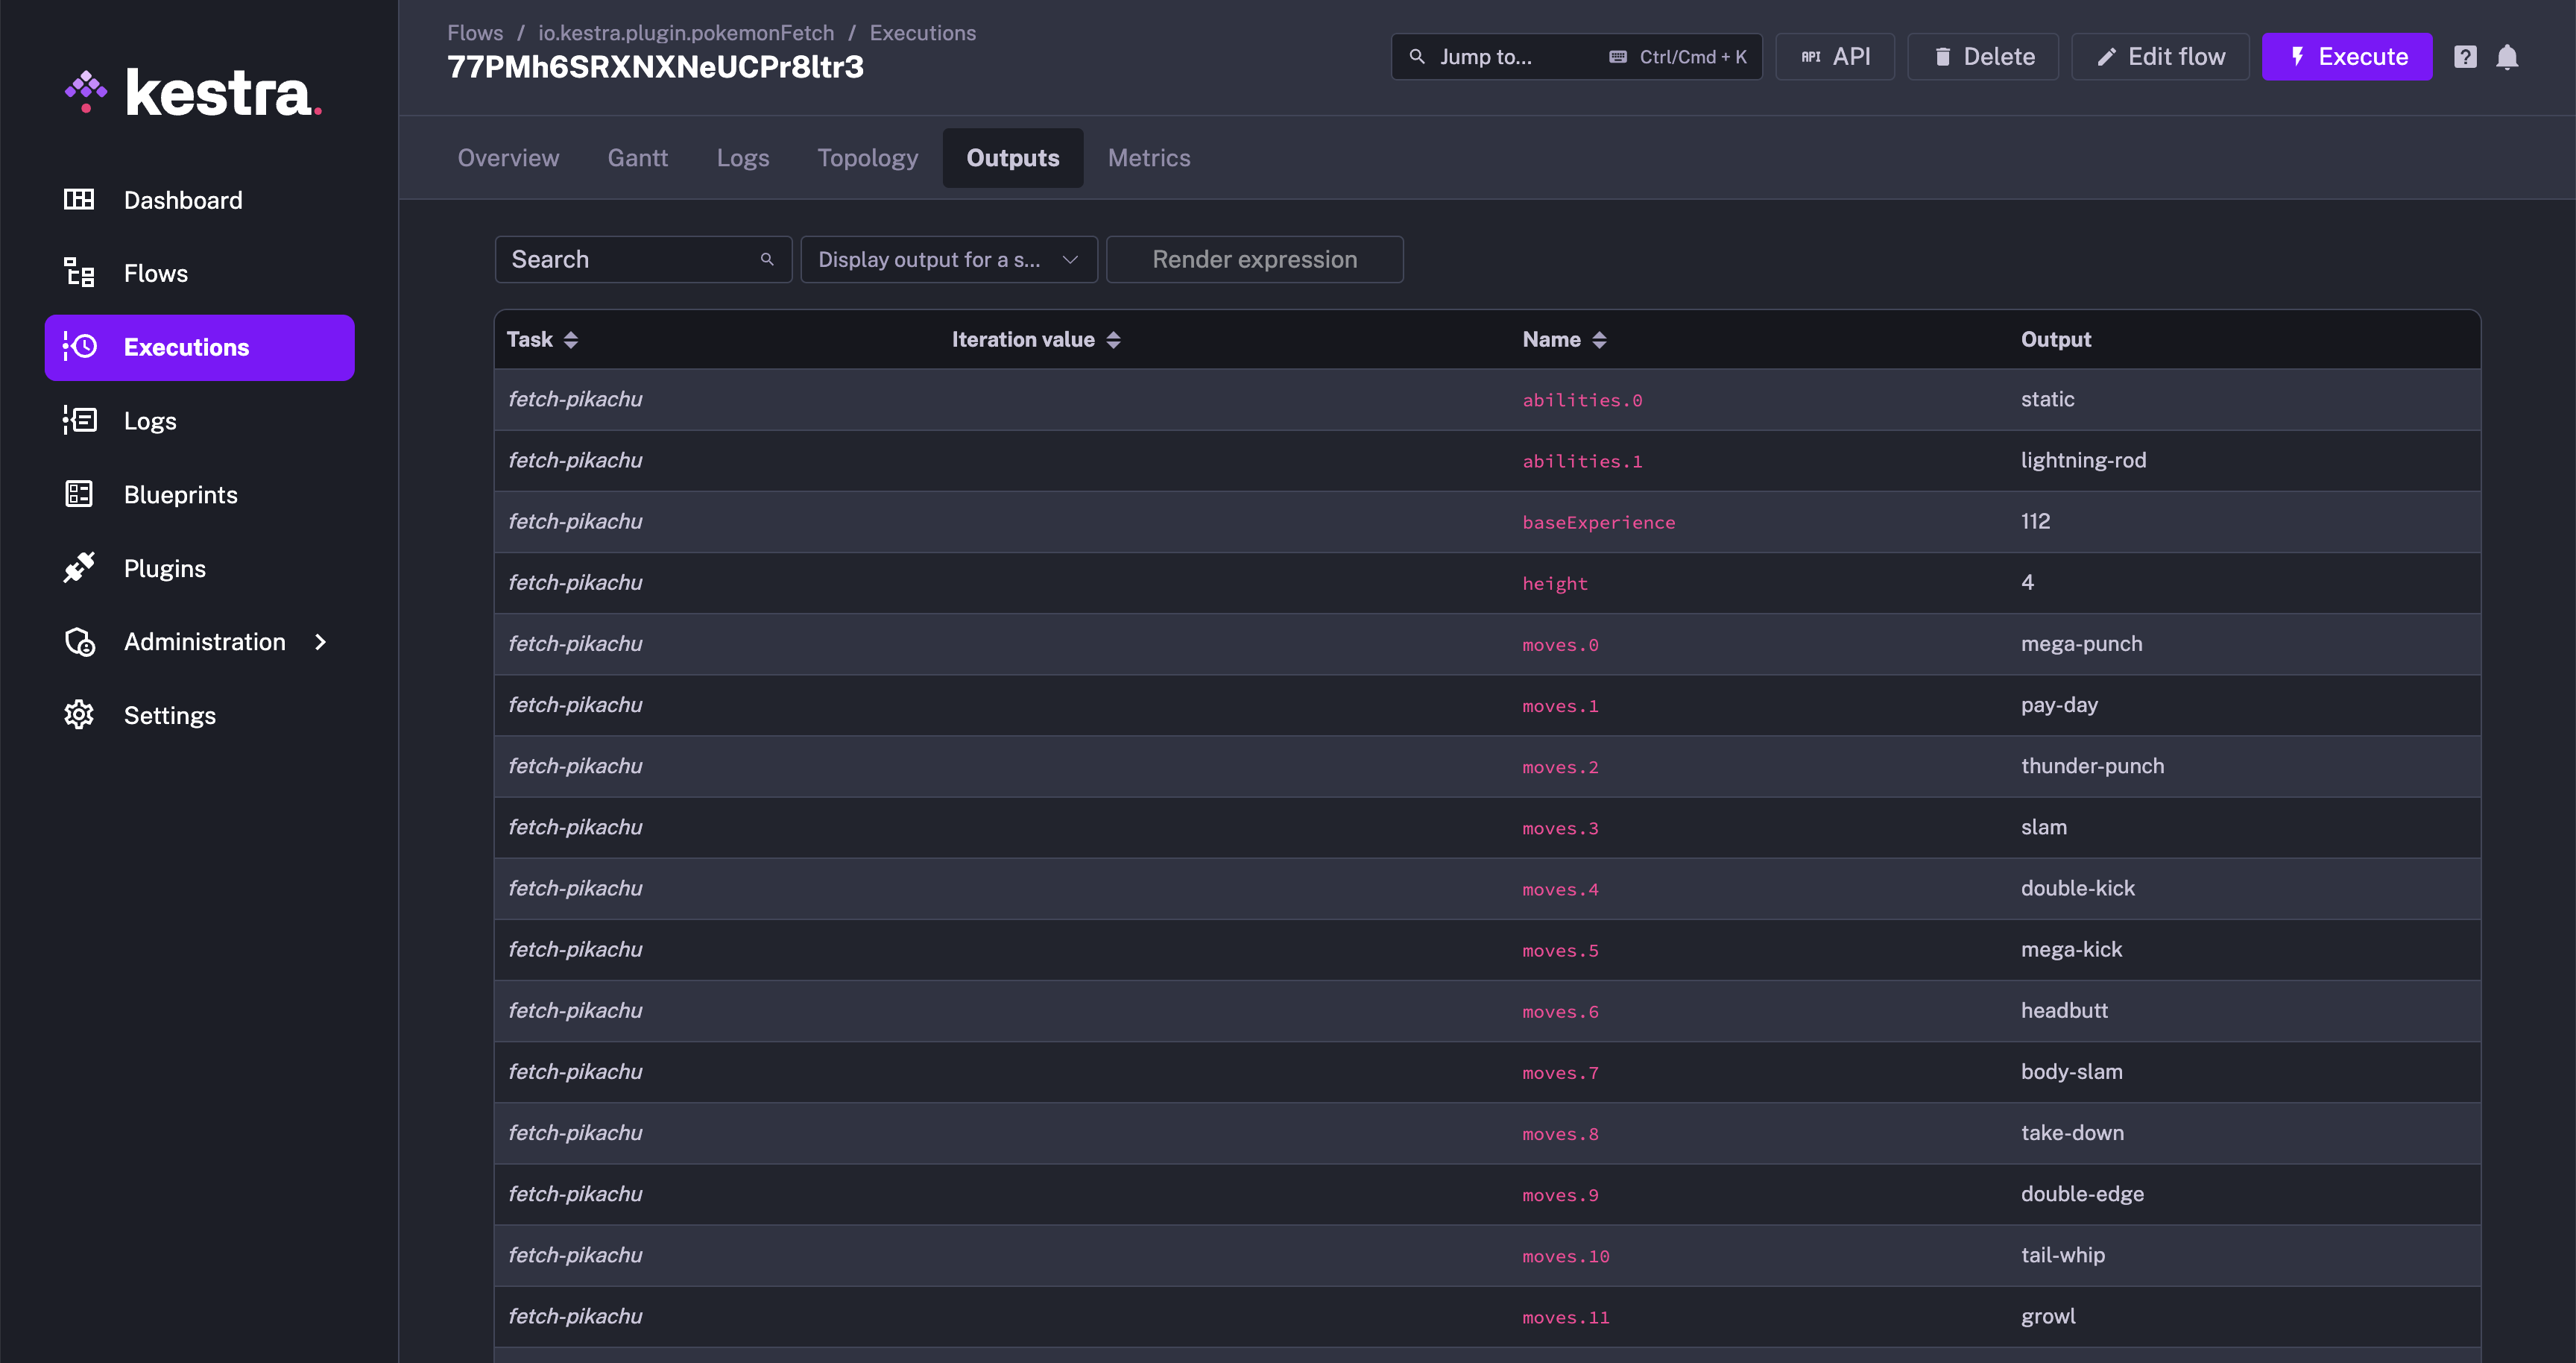
Execute the plugin and check the Output
Create a new flow, and use this newly-built plugin’s task in the flow. Here is a sample flow:
id: pokemonFetchnamespace: company.team
tasks:- id: fetch-pikachu  type: io.kestra.plugin.pokemon.Fetch  pokemon: "pikachu"
On executing the flow, navigate to the Outputs tab to view the output.
You are now all set to build more plugins and explore Kestra to its fullest!
Was this page helpful?