Automate Flow Validation and Deployment via GitHub Actions CI/CD
For the complete documentation index, see llms.txt. For a full content snapshot, see llms-full.txt. Append.mdto anykestra.io/docs/*URL for plain Markdown.
How to use GitHub Actions to automatically validate and deploy your flows to Kestra.
If you’re version controlling your flows in a Git repository, it can be useful to automatically validate that they’re in the correct format before merging into your main branch. On top of that, you can automatically deploy your flows in your main branch to your Kestra instance.
There are three GitHub Actions available:
- Validate Flows - Validate your flows before deploying anything.
- Deploy Flows - Deploy your flows to your Kestra server.
- Deploy Namespace Files - Deploy namespace files to your Kestra server.
Validate Your Flows
The Validate Flows Action sets up a workflow to check all flows in the specified directory when a commit is pushed to main or a Pull Request is opened for the main branch. For the full list of inputs, see the GitHub Actions reference.
In the example below:
- Triggers when a commit is pushed to
mainor when a PR is opened for themainbranch. - Checks out the repository so we can access the files in later steps.
- Uses the Validate Flows Action to check all the flows in the
./kestra/flowsdirectory.
name: Kestra CI/CDon:  push:    branches: [ "main" ]  pull_request:    branches: [ "main" ]
jobs:  validate:    runs-on: ubuntu-latest    name: Kestra validate    steps:      - name: Checkout repo content        uses: actions/checkout@v4
      - name: Validate all flows        uses: kestra-io/github-actions/validate-flows@main        with:          directory: ./kestra/flows          server: https://server-url.com
Deploy Your Flows
The Deploy Flows Action sets up a workflow to deploy when new commits are pushed to the main branch. Specify a directory containing your flows and optionally a namespace to deploy them to. For the full list of inputs, see the GitHub Actions reference.
If you want to deploy flows to multiple namespaces, you can add multiple steps using the Deploy Flows Action, each with a different namespace and directory.
In the example below:
- Triggers when commits are pushed to
main. - Checks out the repository so we can access the files in later steps.
- Deploys flows from
kestra/flowsto thecompany.teamnamespace in the Kestra instance.
name: Kestra CI/CDon:  push:    branches: [ "main" ]
jobs:  deploy:    runs-on: ubuntu-latest    name: Kestra deploy    steps:      - name: Checkout repo content        uses: actions/checkout@v4
      - name: Deploy flows        uses: kestra-io/github-actions/deploy-flows@main        with:          namespace: company.team          directory: ./kestra/flows          server: https://server-url.com
Deploy Namespace Files
Using the Deploy Namespace Files Action, you can deploy configuration files or other resources to a namespace. This is useful for managing shared files across your flows.
In the example below:
- Triggers when commits are pushed to
main. - Checks out the repository so we can access the files in later steps.
- Deploys a configuration file to the
company.teamnamespace.
name: Kestra CI/CDon:  push:    branches: [ "main" ]
jobs:  deploy-nsfiles:    runs-on: ubuntu-latest    name: Kestra deploy namespace files    steps:      - name: Checkout repo content        uses: actions/checkout@v4
      - name: Deploy namespace files        uses: kestra-io/github-actions/deploy-namespace-files@main        with:          namespace: company.team          localPath: ./config/app.yaml          namespacePath: config/app.yaml          server: https://server-url.com
Authentication
If you have authentication enabled in your Kestra instance, you will need to add additional properties so your action can authenticate with your instance.
Basic Authentication
If you have basic authentication enabled with a username and password (e.g. on the Open Source Edition), you can add the user and password properties to your action using GitHub Secrets:
name: Kestra CI/CDon:  push:    branches: [ "main" ]
jobs:  deploy:    runs-on: ubuntu-latest    name: Kestra deploy    steps:      - name: Checkout repo content        uses: actions/checkout@v4
      - name: Deploy flows        uses: kestra-io/github-actions/deploy-flows@main        with:          namespace: company.team          directory: ./kestra/flows          server: https://server-url.com          user: ${{ secrets.KESTRA_USERNAME }}          password: ${{ secrets.KESTRA_PASSWORD }}
As you can see, the user and password are added as secrets with the expression syntax ${{ secrets.name }} to prevent you from committing these to your repository.
API Token Authentication
If you’re using the Enterprise Edition, you can use an API Token instead:
name: Kestra CI/CDon:  push:    branches: [ "main" ]
jobs:  deploy:    runs-on: ubuntu-latest    name: Kestra deploy    steps:      - name: Checkout repo content        uses: actions/checkout@v4
      - name: Deploy flows        uses: kestra-io/github-actions/deploy-flows@main        with:          namespace: company.team          directory: ./kestra/flows          server: https://server-url.com          apiToken: ${{ secrets.KESTRA_API_TOKEN }}
Set Up a Branch Ruleset
If you’re working in a team, it can be useful to set up a Ruleset on your main branch to prevent broken flows from being deployed accidentally to your production instance.
To enable this, go to the Settings of your repository on GitHub and go to Rules then Rulesets. In here, we can create a new branch ruleset.
The goal of this ruleset is to protect the main branch as our GitHub Action will automatically deploy any flows in this branch to our Kestra instance. To achieve this, we can set the specific Branch rules:
- Require a pull request before merging - No commits can be made directly to the
mainbranch - Require status checks to pass - Requires our Validate Flows Action to pass before we can merge our Pull Requests
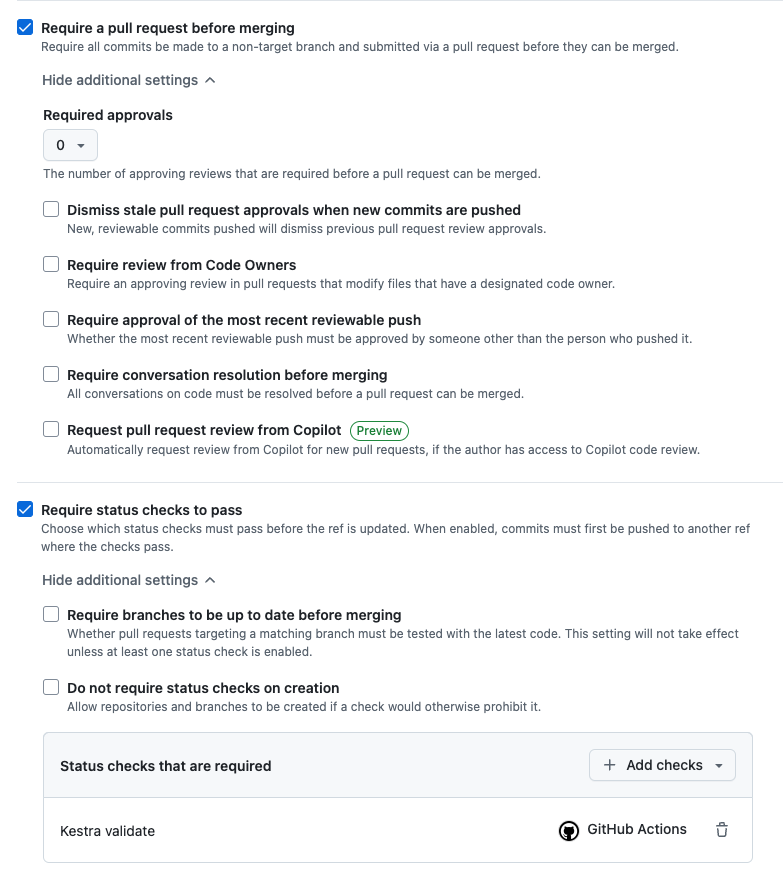
With these enabled, we are required to make a Pull Request before our flows end up in production. This enables us to run our validate check and require that to pass before we can merge any pull requests.
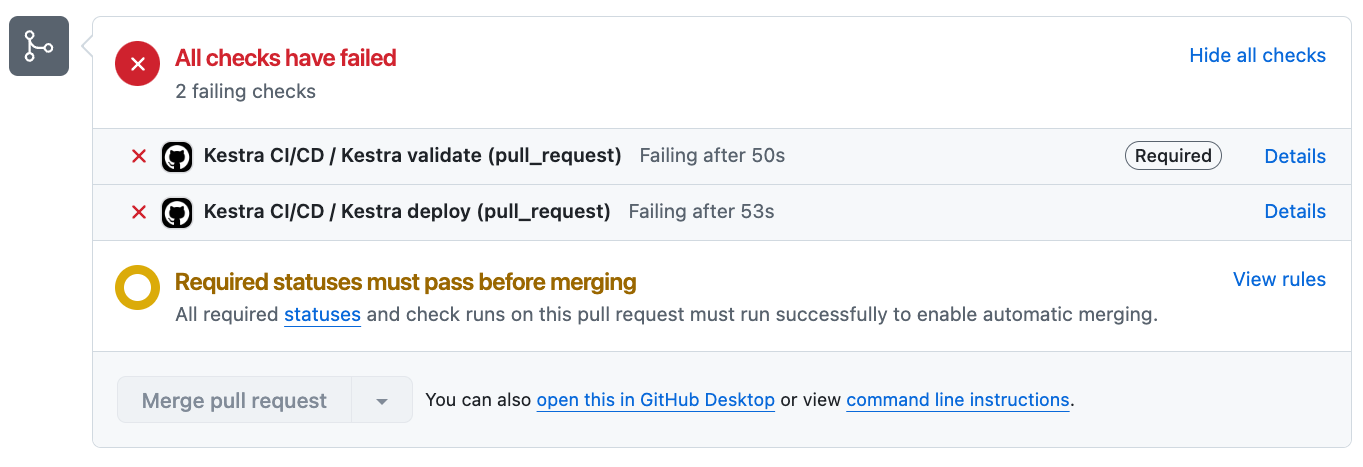
In the example above, the flow had an incorrect indentation so it failed the validate check. As a result of this, the Pull Request is unable to be merged until it is fixed.
Was this page helpful?