How to Contribute to Kestra: Fix Bugs, Add Features, and Submit PRs
For the complete documentation index, see llms.txt. For a full content snapshot, see llms-full.txt. Append.mdto anykestra.io/docs/*URL for plain Markdown.
Contribute to the Kestra open-source project.
Contribute to the Kestra codebase
You can contribute to Kestra in many ways, depending on your skills and interests. The issues with the label good first issue are a great place to start and get familiar with the codebase. Check out the current list of good first issues and start contributing.
Build a plugin
Check out our Plugin Developer Guide for instructions on how to build a new plugin.
Contribute to the documentation
To contribute to the documentation, fork the docs repository and create a pull request with your changes.
Check out the Contribute to Kestra Documentation page for more information about building the documentation site locally, how we write the documentation, and contributing to the product and plugin documentation.
Write a blog post
You can contribute an article about how you use Kestra to our blog. Email hello@kestra.io to start the collaboration. If you wrote a post mentioning Kestra on your personal blog, we’d be happy to feature it in our community section.
Other ways to show support
Build Kestra locally
Requirements
The following dependencies are required to build Kestra locally:
- JDK 25
- Node 24 and npm 11.7.0 or later (see
ui/.nvmrc) - Docker & Docker Compose
- an IDE (Intellij IDEA, Eclipse or VS Code)
To start contributing:
- Fork the repository
- Clone the fork on your workstation:
git clone git@github.com:{YOUR_USERNAME}/kestra.gitcd kestraBackend development
The backend is built using Micronaut.
Open the cloned repository in your favorite IDE. In many IDEs, Gradle build will be detected and all dependencies will be downloaded.
You can also build it from a terminal using ./gradlew build. The Gradle wrapper will automatically download the correct Gradle version to use.
- Set your IDE language level and project SDK to Java 25. Every Gradle toolchain in the build is
JavaLanguageVersion.of(25), and the build sets no separate source or target compatibility. - You may need to enable Java annotation processors since we use it a lot.
- The main class is
io.kestra.cli.Kestrafrom modulekestra.cli.main. It was namedio.kestra.cli.Appbefore 2.0, so older guides and screenshots may still show that name. - Pass as program arguments the server you want to develop, for example
server standalonestarts a standalone Kestra server. - The server starts by default on port 8080 and is reachable on
http://localhost:8080.
Run configuration
To start a standalone server from your IDE, create an Application run configuration with the following values:
| Field | Value |
|---|---|
| SDK | Java 25 |
| Module classpath | kestra.cli.main |
| Main class | io.kestra.cli.Kestra |
| Program arguments | server standalone |
| Working directory | the repository root |
Then add the environment variables you need:
MICRONAUT_ENVIRONMENTS: can be set as any string and will load a custom configuration file incli/src/main/resources/application-{env}.yml. Those files are gitignored, so create the one you need first, for examplecli/src/main/resources/application-override.ymlforMICRONAUT_ENVIRONMENTS=override.KESTRA_PLUGINS_PATH: is the path where you save plugins as Jar and is loaded during the startup process.NODE_OPTIONS: only needed if you hit a JavaScript memory heap out error during startup, for example--max-old-space-size=4096or--max-old-space-size=8192.
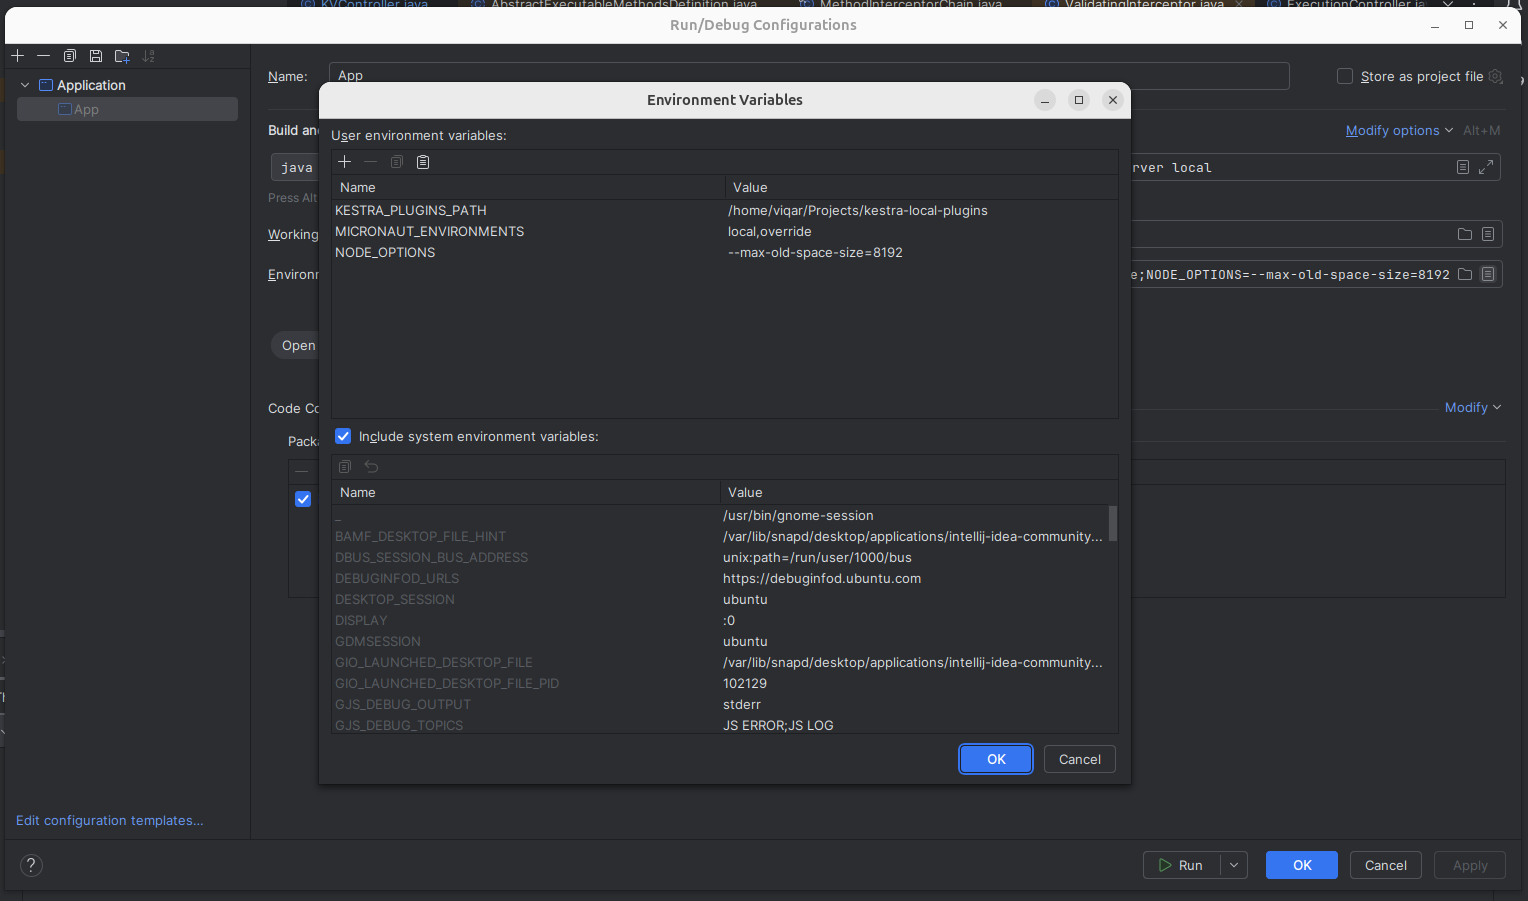
Start a server from the command line
Two Gradle tasks start a server without any IDE configuration. Both set MICRONAUT_ENVIRONMENTS=override and load plugins from local/plugins.
The local development server, which is the quickest way to get a running instance:
./gradlew runLocalThe standalone all-in-one server:
./gradlew runStandalonerunStandalone takes a different plugin directory through -PstandalonePlugins=/path/to/plugins or the KESTRA_PLUGINS_PATH environment variable.
Test a change without rebuilding everything
You do not need to rebuild the Docker image to try a change out. For backend work, run the tests of the module you touched:
./gradlew :core:unitTestunitTest skips the tests tagged as flaky or integration, and --tests narrows the run down to a single class or method:
./gradlew :core:unitTest --tests "*.MyTest"For anything that has to be seen in a running server, start one with ./gradlew runLocal instead. If the change is in the UI, run the frontend dev server against it as described in Frontend development below, so you get hot reload instead of a full build.
If you want to launch all tests, you need Python and some packages installed on your machine. On Ubuntu, you can install them with the following command:
sudo apt install python3 pip python3-venvpython3 -m pip install virtualenvFrontend development
All frontend code is located in the /ui folder, and every command below runs from there.
The front-end uses Vue.js. Deep knowledge of Vue.js is not required to contribute.
To run Kestra’s frontend in development mode, you will need the Node.js version pinned in ui/.nvmrc, currently 24, and npm 11.7.0 or later.
ui/.npmrc sets engine-strict=true, so an older Node or npm fails the install with EBADENGINE rather than producing a broken tree.
Initial setup
cd ui && npm installRun the frontend
npm run devThis will start a local server on port 5173.
You will need to open the Kestra UI in a browser at http://localhost:5173
Open Storybook
You can also run the Storybook to view the components in isolation.
npm run storybookThis will start a local server on port 6006 and open the Storybook in your default browser at http://localhost:6006.
You can also run all tests in the command line without opening a browser:
npm run test:unitEven better, you can run one test file in isolation by specifying part of its name or path in the command
npm run test:unit BarChartStory files are a separate Vitest project, so they run with their own command:
npm run test:storybookChecks run on every pull request
Run these before pushing, so the first CI run is not the one that tells you about a type error or a missing translation key:
npm run check:typesnpm run test:lintnpm run translations:checkEnd-to-end tests are also part of the pipeline, and they build and start a backend themselves:
npm run test:e2eSet up the configuration to connect to the backend
Now that you can run the frontend, if opened, you will see a loading screen running forever. It waits for a backend to answer.
Start one from the repository root with the Gradle task:
./gradlew runLocalThis will start a local server on port 8080, accessible at http://localhost:8080. The task already sets MICRONAUT_ENVIRONMENTS=override and the plugins path, so it takes no further arguments.
The Vite dev server proxies /api and /swagger to http://localhost:8080, so the frontend’s calls are same-origin and no further configuration is needed.
This changes if you point the frontend at a backend directly by setting VITE_APP_API_URL, since the calls then bypass that proxy and the backend has to allow the http://localhost:5173 origin. Create cli/src/main/resources/application-override.yml, which is gitignored and therefore absent from a fresh clone, and add the following to your Observability and Networking configuration YAML definition:
micronaut: server: cors: enabled: true configurations: all: allowedOrigins: - http://localhost:5173Set up Kestra frontend without building the backend from the source code
If you want to work on the frontend without having to install Java and everything to run the Kestra Application, you can start a Kestra Docker container and connect the frontend to it.
To do so, you can first use the following Docker Compose file.
Save it as docker-compose.yml in a separate directory from the Git repository and run the following command in this new directory:
docker compose upThis starts Kestra running with PostgreSQL as the database. You can change the port or other configurations by updating the docker-compose.yml file.
Finally, install the dependencies with npm install from the ui folder, and serve the UI with hot reload at http://localhost:5173 using the command: npm run dev.
Kestra devcontainer
Thanks to the Kestra community, if you are using VSCode, you can start development on either the frontend or backend with a bootstrapped Docker container without the need to manually set up the environment.
Check out the README for set-up instructions and the associated Dockerfile in the repository to get started.
Code of conduct
This project and everyone participating in it is governed by the
By participating, you are expected to uphold this code. Please report unacceptable behavior to hello@kestra.io.
Legal notice
When contributing to this project, you must agree that you have authored 100% of the content, that you have the necessary rights to the content and that the content you contribute may be provided under the project license.
Submit issues
To submit feature requests or report bugs, please open an issue on GitHub.
Reporting bugs
Bug reports make Kestra better for everyone. We provide a preconfigured template for bugs to make it very clear what information we need.
Before reporting a bug, please search for your issue in our already reported bugs to avoid raising a duplicate.
Reporting security issues
If you’ve found a security issue, please report directly to Kestra’s GitHub Advisories to make our team aware.
Requesting new features
Use our issue templates when opening new issues. It contains a few essential questions that help us understand the problem you are looking to solve.
To see what has already been proposed by the community, you can refer to our current issues board.
Was this page helpful?